
The Raiser's Edge Data Cleanup Series: Tips and Shortcuts
Published
Today we have a very special topic in mind for the data cleanup series: my personal tips to make your life easier and wow your coworkers.
When I'm working in my database, I always aim for efficiency. The first way to removing inefficient obstacles is to set up your program in a logical, standardized, and easily-understood manner. The second is to use keyboard shortcuts and program features whenever possible to speed up these tasks.
Often while teaching I'll blurt out the little tips and tricks and minutiae I've picked up, and I'll get the question "is there some place where all this stuff is listed?" Well, no, at least not until this very moment.
Naming Your Queries
If your organization was anything like mine, you may have difficulty finding a specific query. But with a few small cleanup steps, and a new naming convention, you can vastly improve the situation.
Let's talk about how queries are saved. When I worked in nonprofits, I would probably name a query something like "SP Query for 02/19/13 mailing", which was helpful to precisely nobody. Also, I rarely used the Description field in a useful manner. So to begin, give your query a very clear title that explains the purpose or the query's contents.
For anyone who has taken a Query class with us, you should be familiar with the T F C O S breakdown. Whenever I'm about to create a query, I open up Notepad or Microsoft® Word and type out everything contained within the query in the TFCOS format. Then, when I am done with my query, I paste the COS portion into my description. Why only COS? Well let's see how I have my query screen formatted:
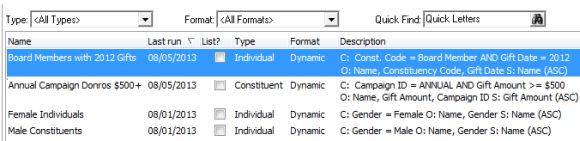
Get what I'm going for? I have arranged my columns so that Type, Format and Description are in order, meaning I can see the TFCOS breakdown for every single query that I create. Now if everyone in your organization uses the same format, each user can easily see the whole story of every saved query.
(A note: I highly recommend typing the TFCOS in another program. Using the enter key to create a second row while typing in Description will save and close the window. Go to Tools->Query Options if you accidentally closed out too early. You can also use Shift+Enter to create a line break inside the Description field).
Now, if you don't know how to modify the columns, just right-click anywhere in the list of queries and select Columns from the menu. You can bring over new columns (like Last Run, which is super useful) and use the up and down arrows to reorder them.
Naming Your Exports
Similarly, when saving exports, I highly recommend jotting down exactly what you've entered into any Criteria Groups. So, for example, if you've included a Business Address (under All Addresses), a business phone number (Phones), and business email address (Phones 2), I would recommend typing the fields into the description:
That way, anybody who needs to use this export in the future will know exactly what's going on, without having to open up every criteria group.
Arranging Your Query and Export Categories
Now that our queries and exports are perfectly named, we need to categorize them. If your organization was like mine, you have dozens of different query categories. To begin, you should create a naming standard for your categories. For example, consider a category for each RE user, or, if your organization is a little larger, a category for each department and task. So, you could have Development Mailings and Development Reports, and others for Marketing or Education or Archival folders.
But even with a naming convention, if the folders are scattered haphazardly, users may have difficulty finding the exact folder required. Let's solve that problem. We're going to take our newly-created folders:
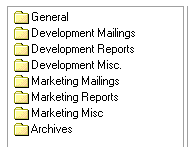
And create new folders to act solely as headers to divide our different departments:
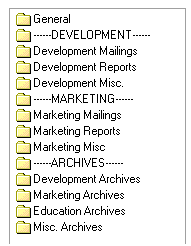
In Query and Export, click the Organize Categories button in the top center of the page to create a new category, simply named "------DEVELOPMENT------" or "------ARCHIVES------". Then use the up and down arrows in the same organize categories window to arrange the appropriate folders beneath the header.
After this initial setup, on a biweekly or monthly basis, make sure that queries have been placed in the appropriate category. I recommend emptying out the General folder, which will indicate that any queries present are ready for relocation. You can also add and sort by the Created On and Last Run columns to aid organization.
One More Thing About Queries/Exports...
When creating more complex queries or exports, I encounter a common issue where users get confused about exactly what they're viewing in the long list of available fields. So, for example, if a user opens up Constituent Information and Spouse and Gifts and Addresses and Phones all at the same time, it becomes very difficult to keep from getting lost. Let's solve this problem by always minimizing a category when you are finished with it.
For whatever category you want to close up, single click on any field within the folder. Then repeatedly touch the left arrow key on your keyboard until each category has been closed. You can also use the up and down arrow keys to move around and right arrow key to open up a closed category. Relatedly, if you want to add a highlighted field as criteria or output or sort, you can use the enter key.
False Headers for Addressees / Salutations
Let's assume the Addresses and Salutations table in Configuration is completely perfect for every name format your company needs (hint: use Global Change). You may still have a beast of a time finding the exact template you want to use. Why don't we create headers that group all of our different types of our adds/sals together?
Let's navigate to Configuration->Addressees/Salutations. What we're going to do is create a brand new add/sal template, only we're going to do so very differently. Start by clicking where you want the header to go. So for example, I want my first header to start at the very top of the screen, so I click the first existing add/sal template. Then, I click "Insert" in the taskbar.
Here's where we get to be clever. On our first line, we are going to type out a spacer to really make our header stand out. So I will type in "------" in the first white field and hit Tab to go to the next column. The system doesn't have anything called "------", and asks if we wish to create it, which yes we will. Then, hit tab a few more times until you get to the second white line. Here, in all caps, I type in "CONST AND SPOUSE" to indicate that all of our add/sals beneath this section refer to Constituents and their spouses, in that order. Then I keep tabbing (click the yes button to add the new entry) until the third line, where I scroll all the way down until I find the "------". When done, click "Save and Close", and admire your handiwork. Create additional headers as needed.
Next, use the up and down arrows to arrange all of the existing templates beneath the appropriate header. Don't forget my little trick from the Configuration Tables blog post, where you can hold down the ALT key + U or W to rapidly move entries up or down, respectively.
Shortcut Keys
Some of these you may know, some of these you may not, but if you are pro-keyboard like I am, here are some great tricks:
F3: In a date field, enter F3 for today's date.
Date this month and this year: Also in a date field, just enter the day number. So if you want to enter the 22nd of this month and this year, just type in 22 and hit tab to go to the next field.
Tab: Tab will take you forward field by field by field.
Shift+Tab: This will take you backward field by field.
F7: Whenever you are in a field with an adjacent clickable icon, such as a calendar or calculator or drop down arrow, hit F7 to activate that icon.
Spacebar/little dotted line: This is a bit more obscure. Whenever you have clicked on a button, you may see a tiny dotted line ringing the entire inside. To activate this button, just hit the spacebar. This can be a real timesaver, especially for repetitive tasks.
ALT+[key]: Ever notice in Windows that some menu bar words have a single underlined letter? To jump directly to that area, hold down the ALT key, and hit the underlined letter.
F5: In a note field, F5 will enter a timestamp, containing today's date and time, along with the RE user name. Also, on the results tab of a query, F5 will refresh your results.
First letter search: If you have selected a drop down field, or you're choosing a field in query/export, you can press the first letter of the word to cycle through all entries beginning with that letter. So, for example, if you are choosing a date range, pressing T repeatedly will cycle through Today, Tomorrow, This Week, This Month, This Calendar Year and This Fiscal Year.
Windows Key + left arrow/right arrow: Using Windows 7 or Windows 8? Have a nice widescreen monitor? You can put programs side-by-side using these keystrokes. Let's say you have a Microsoft® Word document or email with information you need to enter into RE. Put RE on one half of the screen, Outlook or your web browser on the other half, and you eliminate having to repeatedly switch between windows.
So that's my list of all the little things to make your life just a little bit easier in The Raiser's Edge, but I highly doubt it's comprehensive. What time saving tips do you have? Let me know in the comments below.
Also, join me and the other educational consultants in Raiser's Edge classes to learn other ways to increase efficiency and become an RE expert. Search for upcoming classes in your neck of the woods and check out our Learn training subscription.
I'll see you all next time as we delve into topics suggested by blog readers just like you.
When I'm working in my database, I always aim for efficiency. The first way to removing inefficient obstacles is to set up your program in a logical, standardized, and easily-understood manner. The second is to use keyboard shortcuts and program features whenever possible to speed up these tasks.
Often while teaching I'll blurt out the little tips and tricks and minutiae I've picked up, and I'll get the question "is there some place where all this stuff is listed?" Well, no, at least not until this very moment.
Naming Your Queries
If your organization was anything like mine, you may have difficulty finding a specific query. But with a few small cleanup steps, and a new naming convention, you can vastly improve the situation.
Let's talk about how queries are saved. When I worked in nonprofits, I would probably name a query something like "SP Query for 02/19/13 mailing", which was helpful to precisely nobody. Also, I rarely used the Description field in a useful manner. So to begin, give your query a very clear title that explains the purpose or the query's contents.
For anyone who has taken a Query class with us, you should be familiar with the T F C O S breakdown. Whenever I'm about to create a query, I open up Notepad or Microsoft® Word and type out everything contained within the query in the TFCOS format. Then, when I am done with my query, I paste the COS portion into my description. Why only COS? Well let's see how I have my query screen formatted:
Get what I'm going for? I have arranged my columns so that Type, Format and Description are in order, meaning I can see the TFCOS breakdown for every single query that I create. Now if everyone in your organization uses the same format, each user can easily see the whole story of every saved query.
(A note: I highly recommend typing the TFCOS in another program. Using the enter key to create a second row while typing in Description will save and close the window. Go to Tools->Query Options if you accidentally closed out too early. You can also use Shift+Enter to create a line break inside the Description field).
Now, if you don't know how to modify the columns, just right-click anywhere in the list of queries and select Columns from the menu. You can bring over new columns (like Last Run, which is super useful) and use the up and down arrows to reorder them.
Naming Your Exports
Similarly, when saving exports, I highly recommend jotting down exactly what you've entered into any Criteria Groups. So, for example, if you've included a Business Address (under All Addresses), a business phone number (Phones), and business email address (Phones 2), I would recommend typing the fields into the description:
That way, anybody who needs to use this export in the future will know exactly what's going on, without having to open up every criteria group.
Arranging Your Query and Export Categories
Now that our queries and exports are perfectly named, we need to categorize them. If your organization was like mine, you have dozens of different query categories. To begin, you should create a naming standard for your categories. For example, consider a category for each RE user, or, if your organization is a little larger, a category for each department and task. So, you could have Development Mailings and Development Reports, and others for Marketing or Education or Archival folders.
But even with a naming convention, if the folders are scattered haphazardly, users may have difficulty finding the exact folder required. Let's solve that problem. We're going to take our newly-created folders:
And create new folders to act solely as headers to divide our different departments:
In Query and Export, click the Organize Categories button in the top center of the page to create a new category, simply named "------DEVELOPMENT------" or "------ARCHIVES------". Then use the up and down arrows in the same organize categories window to arrange the appropriate folders beneath the header.
After this initial setup, on a biweekly or monthly basis, make sure that queries have been placed in the appropriate category. I recommend emptying out the General folder, which will indicate that any queries present are ready for relocation. You can also add and sort by the Created On and Last Run columns to aid organization.
One More Thing About Queries/Exports...
When creating more complex queries or exports, I encounter a common issue where users get confused about exactly what they're viewing in the long list of available fields. So, for example, if a user opens up Constituent Information and Spouse and Gifts and Addresses and Phones all at the same time, it becomes very difficult to keep from getting lost. Let's solve this problem by always minimizing a category when you are finished with it.
For whatever category you want to close up, single click on any field within the folder. Then repeatedly touch the left arrow key on your keyboard until each category has been closed. You can also use the up and down arrow keys to move around and right arrow key to open up a closed category. Relatedly, if you want to add a highlighted field as criteria or output or sort, you can use the enter key.
False Headers for Addressees / Salutations
Let's assume the Addresses and Salutations table in Configuration is completely perfect for every name format your company needs (hint: use Global Change). You may still have a beast of a time finding the exact template you want to use. Why don't we create headers that group all of our different types of our adds/sals together?
Let's navigate to Configuration->Addressees/Salutations. What we're going to do is create a brand new add/sal template, only we're going to do so very differently. Start by clicking where you want the header to go. So for example, I want my first header to start at the very top of the screen, so I click the first existing add/sal template. Then, I click "Insert" in the taskbar.
Here's where we get to be clever. On our first line, we are going to type out a spacer to really make our header stand out. So I will type in "------" in the first white field and hit Tab to go to the next column. The system doesn't have anything called "------", and asks if we wish to create it, which yes we will. Then, hit tab a few more times until you get to the second white line. Here, in all caps, I type in "CONST AND SPOUSE" to indicate that all of our add/sals beneath this section refer to Constituents and their spouses, in that order. Then I keep tabbing (click the yes button to add the new entry) until the third line, where I scroll all the way down until I find the "------". When done, click "Save and Close", and admire your handiwork. Create additional headers as needed.
Next, use the up and down arrows to arrange all of the existing templates beneath the appropriate header. Don't forget my little trick from the Configuration Tables blog post, where you can hold down the ALT key + U or W to rapidly move entries up or down, respectively.
Shortcut Keys
Some of these you may know, some of these you may not, but if you are pro-keyboard like I am, here are some great tricks:
F3: In a date field, enter F3 for today's date.
Date this month and this year: Also in a date field, just enter the day number. So if you want to enter the 22nd of this month and this year, just type in 22 and hit tab to go to the next field.
Tab: Tab will take you forward field by field by field.
Shift+Tab: This will take you backward field by field.
F7: Whenever you are in a field with an adjacent clickable icon, such as a calendar or calculator or drop down arrow, hit F7 to activate that icon.
Spacebar/little dotted line: This is a bit more obscure. Whenever you have clicked on a button, you may see a tiny dotted line ringing the entire inside. To activate this button, just hit the spacebar. This can be a real timesaver, especially for repetitive tasks.
ALT+[key]: Ever notice in Windows that some menu bar words have a single underlined letter? To jump directly to that area, hold down the ALT key, and hit the underlined letter.
F5: In a note field, F5 will enter a timestamp, containing today's date and time, along with the RE user name. Also, on the results tab of a query, F5 will refresh your results.
First letter search: If you have selected a drop down field, or you're choosing a field in query/export, you can press the first letter of the word to cycle through all entries beginning with that letter. So, for example, if you are choosing a date range, pressing T repeatedly will cycle through Today, Tomorrow, This Week, This Month, This Calendar Year and This Fiscal Year.
Windows Key + left arrow/right arrow: Using Windows 7 or Windows 8? Have a nice widescreen monitor? You can put programs side-by-side using these keystrokes. Let's say you have a Microsoft® Word document or email with information you need to enter into RE. Put RE on one half of the screen, Outlook or your web browser on the other half, and you eliminate having to repeatedly switch between windows.
So that's my list of all the little things to make your life just a little bit easier in The Raiser's Edge, but I highly doubt it's comprehensive. What time saving tips do you have? Let me know in the comments below.
Also, join me and the other educational consultants in Raiser's Edge classes to learn other ways to increase efficiency and become an RE expert. Search for upcoming classes in your neck of the woods and check out our Learn training subscription.
I'll see you all next time as we delve into topics suggested by blog readers just like you.
News
Raiser's Edge® Blog
08/12/2013 8:24am EDT
Leave a Comment