
How To Send EReceipts
Published
We recently published a post about printing receipts in The Raiser’s Edge. Today, we are going to delve into this a little further by discussing the eReceipts function. Sending eReceipts can be a cost and time saving opportunity for your organization. When we use eReceipts, it creates a PDF copy of the receipt (the portion created by the Word Merge Wizard), as well as an emailed message to the donor. The PDF will be attached to the email so that the donor can easily save or print their receipt. This is convenient for the donor, and it also saves the time of having to print and mail receipts. There is no additional cost for using eReceipts, so you will be saving on postage as well.
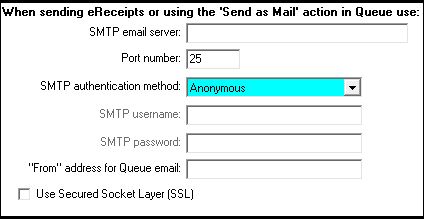
To enable emailing receipts, we need to first set up our Mail options in Configuration. Go to Config>Business Rules>Mail Options. Enter in the name of your SMTP email server and port number. You may need to retrieve this information from your IT department. If you are hosted by Blackbaud, the server and port number information can be found in this Knowledgebase solution. This only needs to be entered once for the entire database, rather than per user. The SMTP authentication method can be set to Anonymous, and the remainder of fields can be left blank.
After setting these fields, we can set up our email options in the receipt parameter file. Open a new or existing file from Mail>Receipts. In order to use the eReceipt function, we need to choose a receipt type of Create Custom Data File from the General tab. One issue that users run into is sending the emails by mistake. To prevent this, select the eReceipt tab of the parameter file. (This will only be available when we have Create Custom Data File selected for the Receipt type on the General tab). Make sure Send as eReceipts is not marked.
If we leave this option marked before we set up the remainder of our receipt parameter file, we will send receipts to donors when we run the receipts to preview them. We want to make sure we have previewed the receipts prior to marking this option.
If this is a new parameter file, or we have not created the template yet, select the General tab and click Send to Word Merge Wizard. This allows us to create a custom template using the Word Merge Wizard. After completing the template, go back to the General tab of the parameter file. We recommend marking the option to create a gift output query. This will serve as a list of gifts that were sent emails. Finish setting up the parameter file as needed. Instructions to prepare the receipt parameter file can be found in detail in this solution: How to print receipts in Mail.
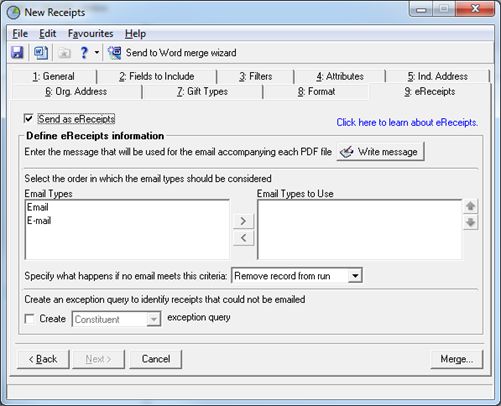
Run the merge and click No when it asks if we should like to mark the gifts as having been receipted. If the correct receipts are printing, then we are ready to set up our email options. Select the eReceipts tab. To activate the options, mark Send as eReceipts. Again, marking this option will cause the eReceipts to be sent when we click Merge to print or preview our receipts. Make sure the rest of our receipts are complete and accurate before this step.
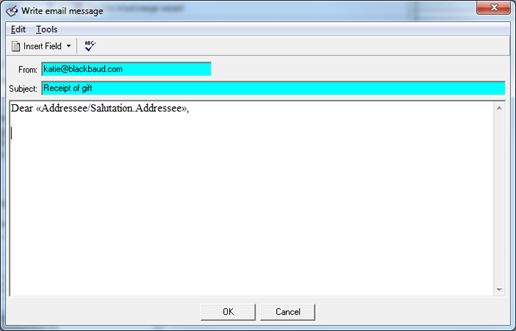
To create the email message, click Write Message. This will open a window for our email. Enter a From address. The donor will see this address as the sent address for their eReceipt. However, it is not actually sent from the email address entered here. The receipts are sent from the SMPT server, so we will not be able to see who the emails were sent to from our Sent box. (Again, this is why we mark the option to create an output query.) Enter a subject for the email in the Subject field. Click in the white box to write the email message. We can insert merge fields by clicking Insert Field and selecting the desired field(s). When the email is finished, click OK to save the message.
Next, select which email types should be considered by moving types from the Email Types box to the Email Types to Use box. If we select more than one email type and a constituent has multiple email addresses, the email will be chosen based on the hierarchy of this list.
Below that, we can choose what to do if no emails meet the criteria of our selected email types. Lastly, we have the option to create an output query for gifts/constituents that could not have emails sent. This will generate a query of records that either have no email addresses on their record or have Requests No Email selected on their Bio 1 tab.
After these options are set, we are ready to send out receipts! Select the General tab and click Merge.
Note: Emails will be sent once we click Merge.
An option will pop up asking if we want to mark the gifts as Receipted, Receipted and Acknowledged, or Do not update.
There are two ways to keep track of which receipts were sent during this run. As stated previously, we are unable to see what emails were sent from our Sent box. We can use the following ways to track this information:
This seems simple enough, right? Set up the parameter file, test the receipts, set up email options, and send the eReceipts. Once everything is set up, sending eReceipts will take no time. However, we do want to keep the following things in mind to avoid any trouble when working with eReceipts:
To enable emailing receipts, we need to first set up our Mail options in Configuration. Go to Config>Business Rules>Mail Options. Enter in the name of your SMTP email server and port number. You may need to retrieve this information from your IT department. If you are hosted by Blackbaud, the server and port number information can be found in this Knowledgebase solution. This only needs to be entered once for the entire database, rather than per user. The SMTP authentication method can be set to Anonymous, and the remainder of fields can be left blank.
After setting these fields, we can set up our email options in the receipt parameter file. Open a new or existing file from Mail>Receipts. In order to use the eReceipt function, we need to choose a receipt type of Create Custom Data File from the General tab. One issue that users run into is sending the emails by mistake. To prevent this, select the eReceipt tab of the parameter file. (This will only be available when we have Create Custom Data File selected for the Receipt type on the General tab). Make sure Send as eReceipts is not marked.
If we leave this option marked before we set up the remainder of our receipt parameter file, we will send receipts to donors when we run the receipts to preview them. We want to make sure we have previewed the receipts prior to marking this option.
If this is a new parameter file, or we have not created the template yet, select the General tab and click Send to Word Merge Wizard. This allows us to create a custom template using the Word Merge Wizard. After completing the template, go back to the General tab of the parameter file. We recommend marking the option to create a gift output query. This will serve as a list of gifts that were sent emails. Finish setting up the parameter file as needed. Instructions to prepare the receipt parameter file can be found in detail in this solution: How to print receipts in Mail.
Run the merge and click No when it asks if we should like to mark the gifts as having been receipted. If the correct receipts are printing, then we are ready to set up our email options. Select the eReceipts tab. To activate the options, mark Send as eReceipts. Again, marking this option will cause the eReceipts to be sent when we click Merge to print or preview our receipts. Make sure the rest of our receipts are complete and accurate before this step.
To create the email message, click Write Message. This will open a window for our email. Enter a From address. The donor will see this address as the sent address for their eReceipt. However, it is not actually sent from the email address entered here. The receipts are sent from the SMPT server, so we will not be able to see who the emails were sent to from our Sent box. (Again, this is why we mark the option to create an output query.) Enter a subject for the email in the Subject field. Click in the white box to write the email message. We can insert merge fields by clicking Insert Field and selecting the desired field(s). When the email is finished, click OK to save the message.
Next, select which email types should be considered by moving types from the Email Types box to the Email Types to Use box. If we select more than one email type and a constituent has multiple email addresses, the email will be chosen based on the hierarchy of this list.
Below that, we can choose what to do if no emails meet the criteria of our selected email types. Lastly, we have the option to create an output query for gifts/constituents that could not have emails sent. This will generate a query of records that either have no email addresses on their record or have Requests No Email selected on their Bio 1 tab.
After these options are set, we are ready to send out receipts! Select the General tab and click Merge.
Note: Emails will be sent once we click Merge.
An option will pop up asking if we want to mark the gifts as Receipted, Receipted and Acknowledged, or Do not update.
- Receipted: This will update the receipt status to Receipted, the receipt date to today’s date, and add the receipt number to the Receipt number field.
- Receipted and Acknowledged: This will update the fields listed above, in addition to changing the Acknowledged status to Acknowledged and populating the date. This means that we have the option to use our eReceipts as a thank you letter as well.
- Do not update: This will not update any Receipt or Acknowledged fields.
There are two ways to keep track of which receipts were sent during this run. As stated previously, we are unable to see what emails were sent from our Sent box. We can use the following ways to track this information:
- Create a gift output query (from the General tab)
- Save a copy of the merged document, which includes receipts for all of the gifts
This seems simple enough, right? Set up the parameter file, test the receipts, set up email options, and send the eReceipts. Once everything is set up, sending eReceipts will take no time. However, we do want to keep the following things in mind to avoid any trouble when working with eReceipts:
- Do not test sending the bulk emails. To test which emails will be sent, make sure Send as eReceipts is unmarked and merge the document. This will allow us to see which receipts will be printed and what the PDF will include.
- To test the actual email message, create a test gift record to receipt. This will allow you to send the test receipt to your inbox instead of the donor’s.
- Make sure the email addresses in your database are clean. Emails with an invalid format (such as test@@blackbaud.com or test@gmail.com1) will stop the remaining receipts from sending. If this happens, you will get an error message.
- If you are sending a very large number of receipts, it may be a good idea to break down the records into smaller groups. If there are any problem email addresses, it will be easier to identify which one if we have a smaller group of records.
- Sometimes we get a message that says “No records meet specified criteria.” This is a common message in Mail and means that no records included meet our parameters. The gifts may not be included in our query, have an incorrect date range, or may have been marked as Receipted already. If we get this message, no emails were sent during this run. For detailed steps troubleshooting the causes of this, take a look here.
News
Raiser's Edge® Blog
01/02/2015 6:00am EST
Leave a Comment