What's New In Raiser's Edge NXT The Week Of May 12
Published
This week, Raiser's Edge NXT introduces enhancements for Events. Also, for some, the ability to create a workflow to send an automated series of emails is available.
View event participant profile picture
To help you easily identify event participants, participant records now include their profile pictures from constituent records. If a participant doesn’t have a profile picture, their initials appear. From the participant’s record, you can add, update, or delete their profile picture or expand it to view the full image. For more information, see Participant Records.
View participant lists by status
You can now quickly open a list of the registered, attended, or invited participants for an event. From Events, select the total in the Registered, Attended, or Invited column to open a pre-filtered list of the event's participants.
Note: To open these participant lists, you must have security rights to view participants.
Improvements to exported event participant lists
In response to customer feedback, when you export a list of event participants, all name fields — including First, Middle, Last, Preferred, Former, Title, Suffix, and Class of (if you use Alumni Tracking) — now appear in separate columns in the CSV file. This change makes it easier to sort exported participant lists by name.
Send an automated email series in Workflow Designer (for some)
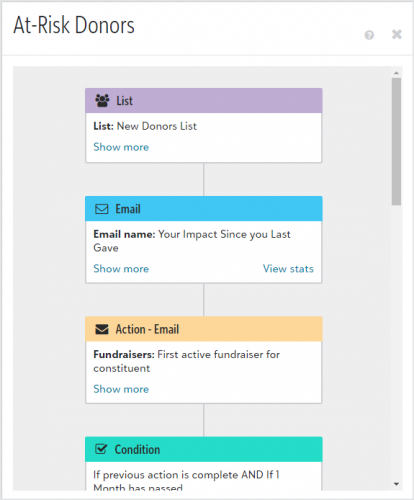
To easily communicate with your constituents, you can now create a workflow to send an automated series of emails from Raiser’s Edge NXT. This allows you to have a truly automated workflow, see how many people received your emails in the workflow, and view statistics on each email sent.
From Marketing, Email, select Workflow designer emails, then create an email from a blank layout or from a template. In the Email Designer, under Set the purpose, select Use this email for a workflow. Enter the rest of the details then publish your email. Continue creating and publishing emails for your workflow, then navigate to Workflow Designer.
Create a new workflow and add an email as the first step. Select one of the emails you created, and then add an action or condition as the next step.
Tip: When you set conditions, make sure to space emails out over a few days to prevent your constituents from receiving too many emails too quickly.
When you finish creating your workflow and you’re ready to send the first email, activate it. You can see how many recipients received your workflow by selecting the active workflow name in Workflow Designer.
To see email statistics, select View workflow from the workflow’s menu, then select View stats on an email step. For more information, check out this video or see Workflows.
View event participant profile picture
To help you easily identify event participants, participant records now include their profile pictures from constituent records. If a participant doesn’t have a profile picture, their initials appear. From the participant’s record, you can add, update, or delete their profile picture or expand it to view the full image. For more information, see Participant Records.
View participant lists by status
You can now quickly open a list of the registered, attended, or invited participants for an event. From Events, select the total in the Registered, Attended, or Invited column to open a pre-filtered list of the event's participants.
Note: To open these participant lists, you must have security rights to view participants.
Improvements to exported event participant lists
In response to customer feedback, when you export a list of event participants, all name fields — including First, Middle, Last, Preferred, Former, Title, Suffix, and Class of (if you use Alumni Tracking) — now appear in separate columns in the CSV file. This change makes it easier to sort exported participant lists by name.
Send an automated email series in Workflow Designer (for some)

To easily communicate with your constituents, you can now create a workflow to send an automated series of emails from Raiser’s Edge NXT. This allows you to have a truly automated workflow, see how many people received your emails in the workflow, and view statistics on each email sent.
From Marketing, Email, select Workflow designer emails, then create an email from a blank layout or from a template. In the Email Designer, under Set the purpose, select Use this email for a workflow. Enter the rest of the details then publish your email. Continue creating and publishing emails for your workflow, then navigate to Workflow Designer.
Create a new workflow and add an email as the first step. Select one of the emails you created, and then add an action or condition as the next step.
Tip: When you set conditions, make sure to space emails out over a few days to prevent your constituents from receiving too many emails too quickly.
When you finish creating your workflow and you’re ready to send the first email, activate it. You can see how many recipients received your workflow by selecting the active workflow name in Workflow Designer.
To see email statistics, select View workflow from the workflow’s menu, then select View stats on an email step. For more information, check out this video or see Workflows.
News
Blackbaud Raiser's Edge NXT® Blog
05/12/2020 3:40pm EDT


Leave a Comment