
Take a seat! Tips for using Event Seating in Altru
Published
Sometimes one of the hardest parts in planning an event is figuring out that seating. Not only do you want to make sure everyone has a fantastic time, but you often have to keep track of many special requests. That’s a lot to handle!
I’m in the process of planning a wedding now (exciting!), but the seating is one part that that I’m struggling with—keeping track of all that seating! While I love a good post-it, there’s got to be a better way than this:
 Good news—with Altru, there is! The event seating functionality can allow you to:
Never used Altru’s event seating functionality before? Don’t worry—here’s a short tour!
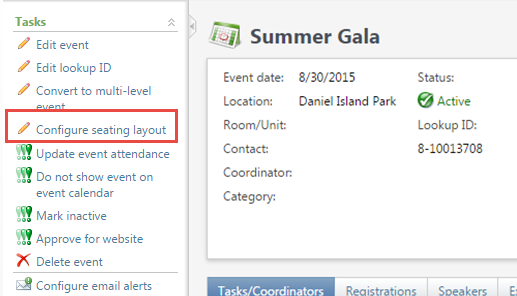
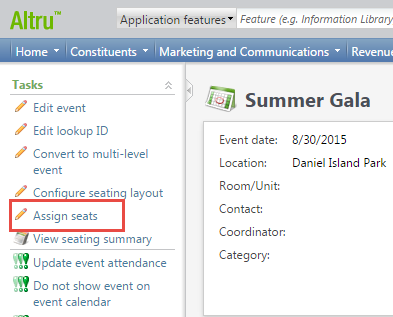
First things first, we need to Configure a Seating Layout.
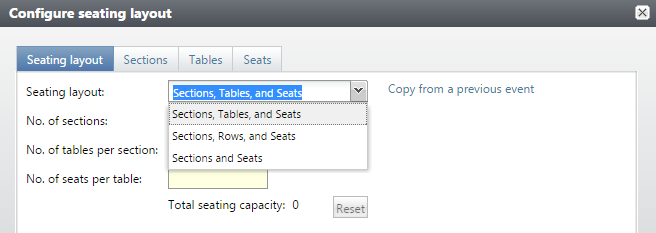
 When you configure a layout in Altru, you have the opportunity to select how people will be seated. Will they be in Sections and Tables? Sections and Rows? Or just Sections and Seats?
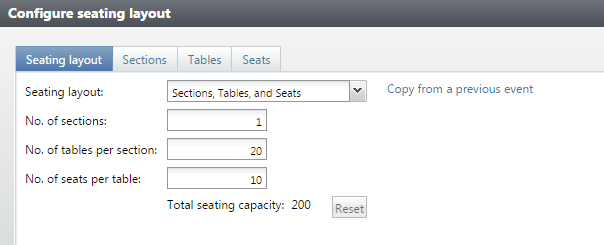
 You will then specify how many sections there are, how many tables/rows, and how many seats. (Note: It’s totally ok to just have one section if you don’t need sections at your event.) This then gives us a total seating capacity and we can adjust as we move along:
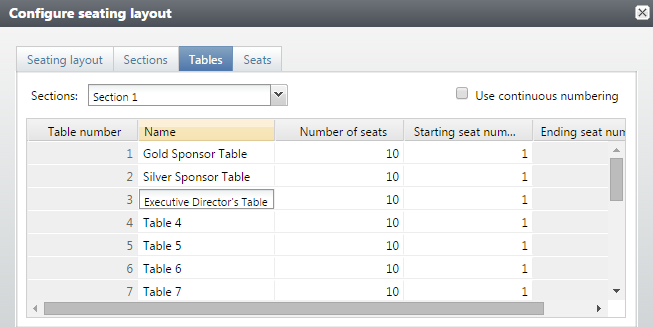
 From here, I like to name my tables and seats. This helps me with seating and reserving tables for specific sponsors:
 If necessary, you can also adjust the number of seats. For example, if one table needs to have 11 seats instead of 10, you can edit that here.
After the seating layout is saved, it’s time to get people seated! You’ll now notice the Assign Seats option in your event:
 This is where the real magic happens. There are a few pro tips to making the most out of seating your guests:
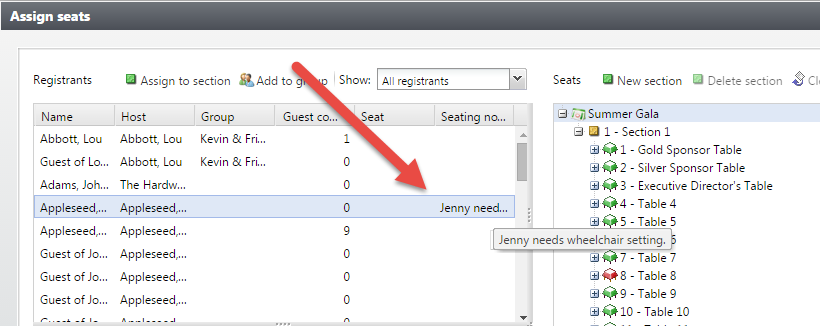
Tip 1: Seating Notes
When you edit a registrant on the Registrants tab, you may notice there’s a place for a seating note:
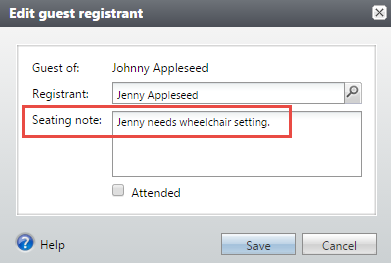 This field actually translates to the Seating section in Altru, so you can easily see if there are any special requests you need to accommodate or any important notes:
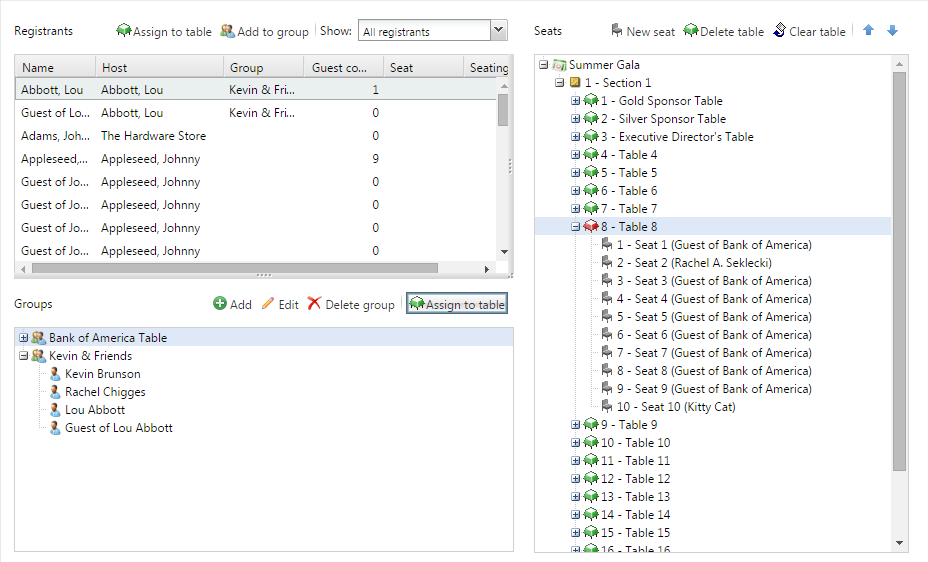
Tip 2: Use Groups:
You can use Groups in Assign Seats to group constituents that want to sit together. This can be a host and all of their guests or two donors that want to sit together, but registered separately. Groups can help you make sure your donors are sitting with the right people.
The best part? You also seat the entire group at once. With the group highlighted, click Assign to table:
Tip 3: Seat Multiple Guests at One Time
What if you don’t have constituents in a group—but you want to seat multiple guests at one table? You could click each guest into a seat, or you can use this short cut! Take advantage of your keyboard to highlight multiple guests. You can then drag these over to the seating section—all at once!
Tip 4: Use the Filters
If you’ve got a few hundred registrants, it may be difficult to look at all of their names in the Registrants box. You can use the Show menu to narrow your list:
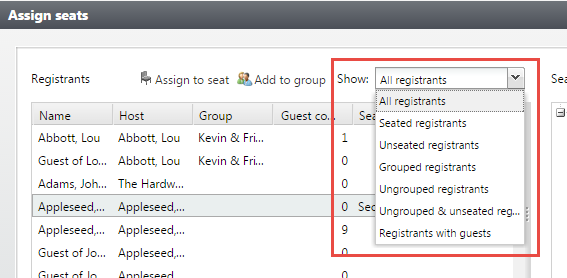 You can show Unseated Registrants only or Ungrouped and Unseated Registrants to help you figure out who still needs to be sat.
Tip 5: Escort your guests to their table
So now you’ve got everyone seated, but we still need to show our donors to their tables when they arrive!
Altru’s canned report for this is the Event Seating Summary Report. It looks like this:
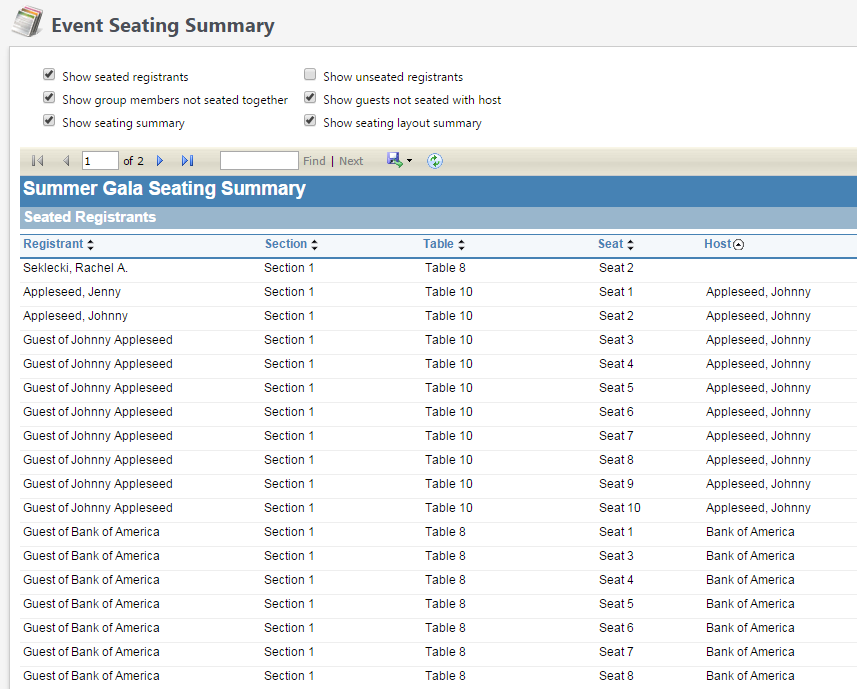 I also prefer to sort this report by Host, but you can do whatever is easiest for you!
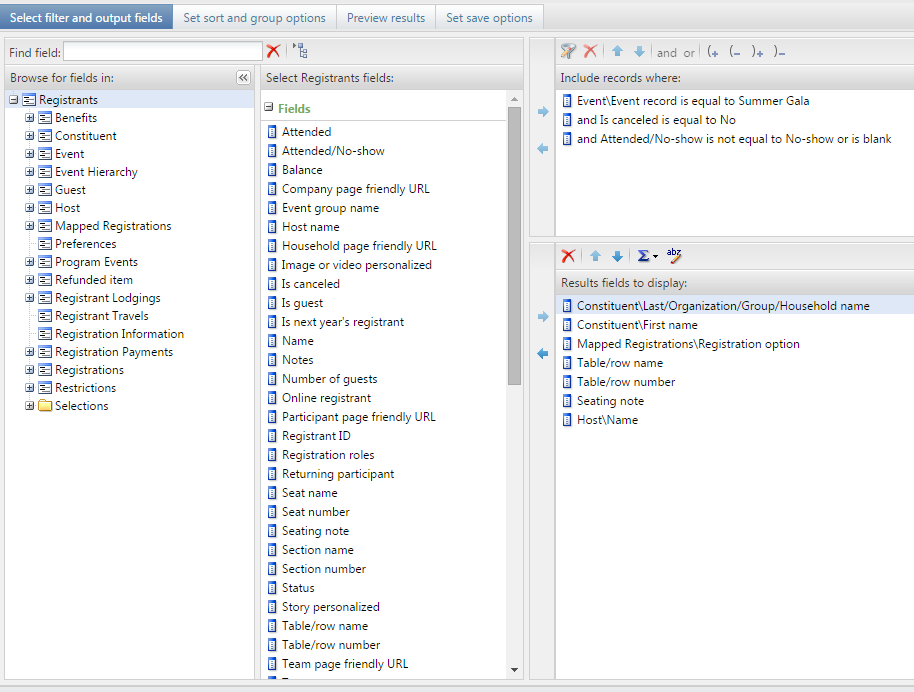
If this report isn’t for you, you could also add seating information to a Registrant query that you may already have for event check-in. All of these fields exist in the middle column of a registrants query. I recommend using Table/Row Number and Table/Row Name. You can also use Seat Number or Seating notes if you’d like to see that. Here’s an example of a quick query with this information:
I hope these tips have been helpful! I know you are ready to nail your event—just like my favorite event planner, Franc, from Father of the Bride—except you won’t be going over budget of course!
Happy seating!
I’m in the process of planning a wedding now (exciting!), but the seating is one part that that I’m struggling with—keeping track of all that seating! While I love a good post-it, there’s got to be a better way than this:
Good news—with Altru, there is! The event seating functionality can allow you to:- Add special seating notes to assist you with the seating process
- Pick a seating layout
- Group registrants that need to be seated together
- Assign your guests to the right seat
Never used Altru’s event seating functionality before? Don’t worry—here’s a short tour!
First things first, we need to Configure a Seating Layout.
When you configure a layout in Altru, you have the opportunity to select how people will be seated. Will they be in Sections and Tables? Sections and Rows? Or just Sections and Seats?You will then specify how many sections there are, how many tables/rows, and how many seats. (Note: It’s totally ok to just have one section if you don’t need sections at your event.) This then gives us a total seating capacity and we can adjust as we move along:From here, I like to name my tables and seats. This helps me with seating and reserving tables for specific sponsors:If necessary, you can also adjust the number of seats. For example, if one table needs to have 11 seats instead of 10, you can edit that here.After the seating layout is saved, it’s time to get people seated! You’ll now notice the Assign Seats option in your event:
This is where the real magic happens. There are a few pro tips to making the most out of seating your guests:Tip 1: Seating Notes
When you edit a registrant on the Registrants tab, you may notice there’s a place for a seating note:
This field actually translates to the Seating section in Altru, so you can easily see if there are any special requests you need to accommodate or any important notes:Tip 2: Use Groups:
You can use Groups in Assign Seats to group constituents that want to sit together. This can be a host and all of their guests or two donors that want to sit together, but registered separately. Groups can help you make sure your donors are sitting with the right people.
The best part? You also seat the entire group at once. With the group highlighted, click Assign to table:
Tip 3: Seat Multiple Guests at One Time
What if you don’t have constituents in a group—but you want to seat multiple guests at one table? You could click each guest into a seat, or you can use this short cut! Take advantage of your keyboard to highlight multiple guests. You can then drag these over to the seating section—all at once!
- Hold Shift and click the first record and the last record and your computer will select all in between. Here’s a short no sound video.
- Hold Ctrl and click single registrants to select all of those you clicked. Here’s a short no sound video.
Tip 4: Use the Filters
If you’ve got a few hundred registrants, it may be difficult to look at all of their names in the Registrants box. You can use the Show menu to narrow your list:
You can show Unseated Registrants only or Ungrouped and Unseated Registrants to help you figure out who still needs to be sat.Tip 5: Escort your guests to their table
So now you’ve got everyone seated, but we still need to show our donors to their tables when they arrive!
Altru’s canned report for this is the Event Seating Summary Report. It looks like this:
I also prefer to sort this report by Host, but you can do whatever is easiest for you!If this report isn’t for you, you could also add seating information to a Registrant query that you may already have for event check-in. All of these fields exist in the middle column of a registrants query. I recommend using Table/Row Number and Table/Row Name. You can also use Seat Number or Seating notes if you’d like to see that. Here’s an example of a quick query with this information:
I hope these tips have been helpful!
I know you are ready to nail your event—just like my favorite event planner, Franc, from Father of the Bride—except you won’t be going over budget of course!Happy seating!
News
ARCHIVED | Blackbaud Altru® Tips and Tricks
08/11/2015 8:07am EDT
Leave a Comment