
Altru Fundraising Event Assigned Seating Tips and Tricks
Published
As we approach the time of year in which many organizations host their Annual Gala, one ongoing struggle many organizations have is how to best manage seating arrangements at these events. The good news is that Altru has a fantastic seating arrangement feature which can be a big time saver! This feature allows you to create a layout for how many tables and chairs you have at your event and then take any registrant and assign them to the desired table/seat.
Now the question becomes; but why use Altru for my seating arrangements? Well, the advantages of using the seating arrangement feature in Altru are 4-fold:
As you can see, there are lots of great benefits to using the seating arrangement feature in Altru. We've also got a few tips and tricks that will really boost the effectiveness of this feature and make your life even easier!
Configuring the Seating Layout
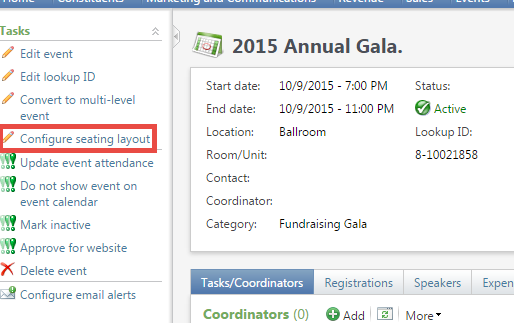
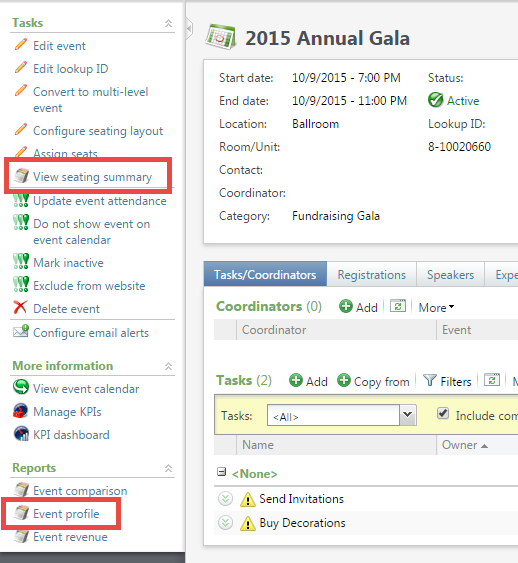
After you have created the fundraising event in Altru you can click on the feature Configure seating layout:
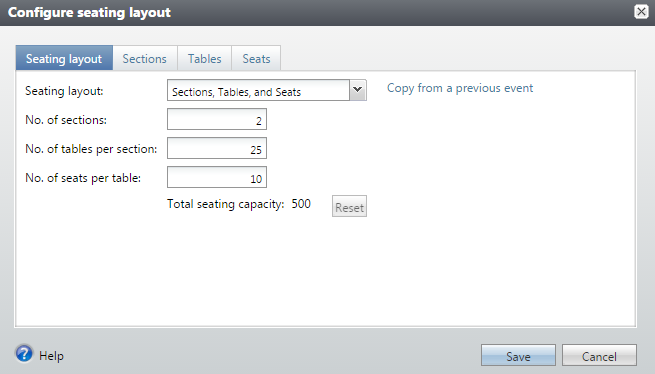
 The first thing you need to do is decide on the layout of the room for your event. Most events use the Sections, Tables and Seats option for their layout. For this example, we will be using 2 Sections, 25 Tables per section and 10 Seats per table, providing us a total of 500 seats for the event:
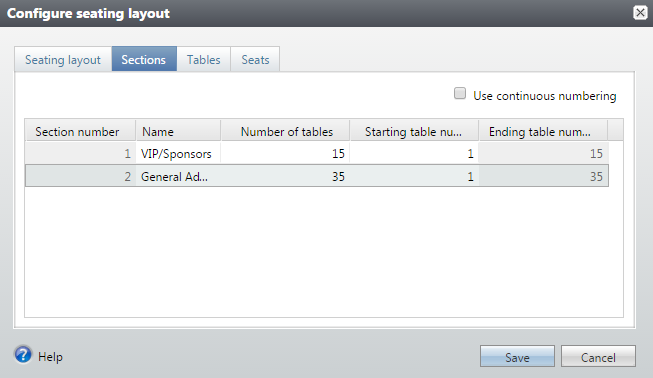
 You can even begin some naming of the sections, tables and seats to further help you keep track of where to place your registrants. Maybe you need a section for VIP/Sponsors and a section for General Admission. Even though we had 25 tables per section on our first step, we can also adjust the allocation of tables on the Sections tab to reflect what the physical setup of the event space will actually have:
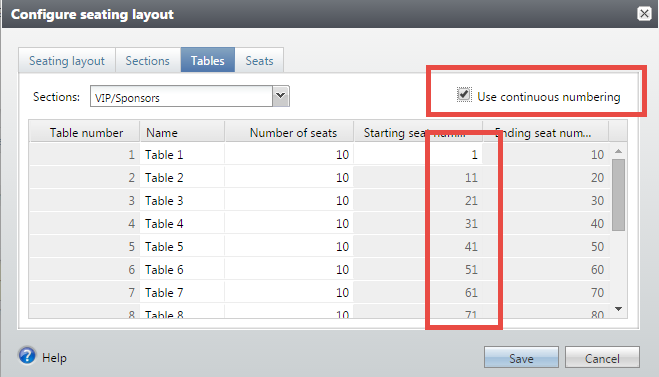
 Another decision can be made on the Tables tab of whether you would want to have each seat in the room have a unique ID number (Use continuous numbering) or whether you would like each seat to simply be numbered 1-10 for each table:

 After going through all of the tabs on this window, click Save.
Now you can begin to place people in seats as they register. Some offices will update the seating arrangements on a regular basis, while others will wait until right before the event and do one big project to assign all registrants at the same time. I find it helpful to check on the seating arrangements on a regular basis leading up to the event as there are many tools built into the assignment function to aid in this effort.
Assign Registrants to Seats
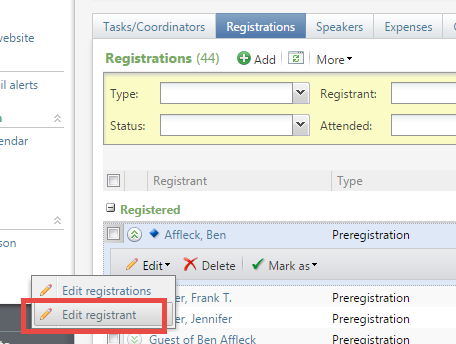
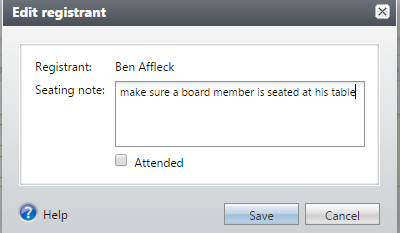
If you have registrants who have made requests to sit with certain people, or, internally, you want to record a note about a registrant, you can add a Seating note to their registration that will appear within the Assign Seats feature. To do so, find the name of the person on the Registrants tab of the event, click the double arrow next to their name and select Edit registrant:
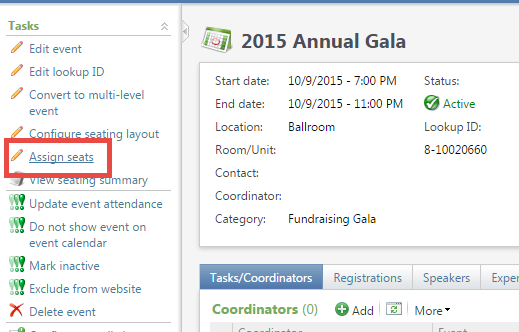
 To begin assigning registrants to seats, click the Assign seats link in the event record:
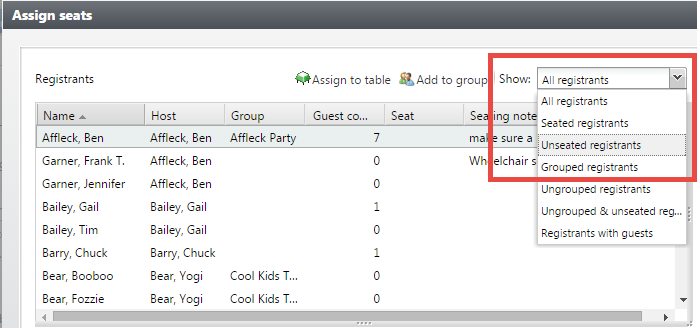
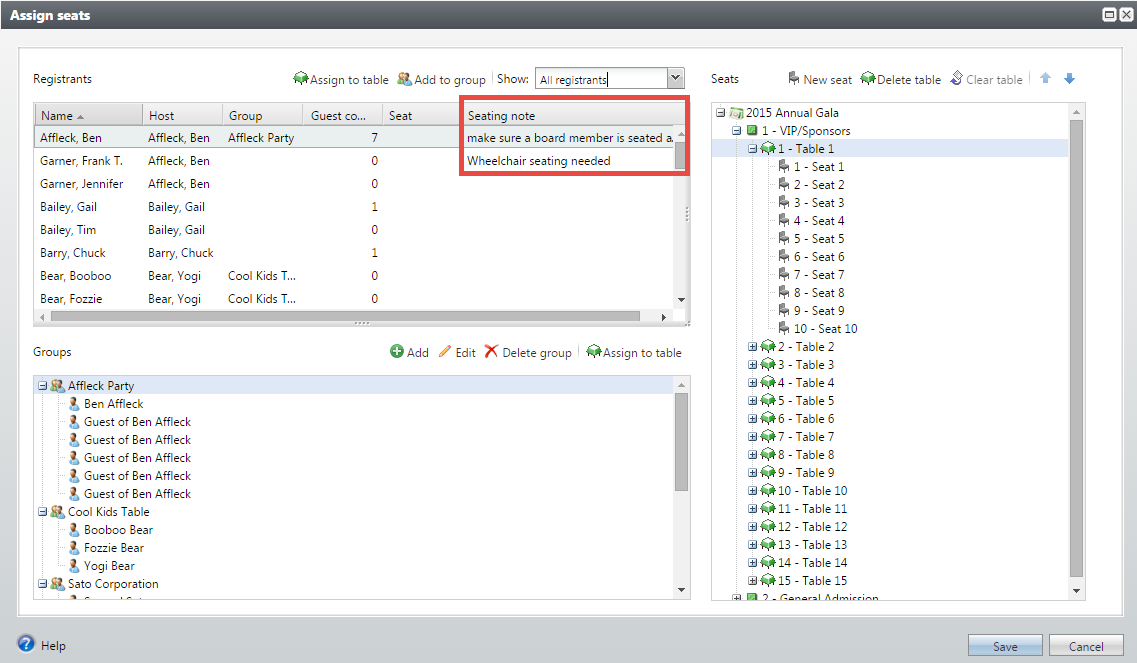 There are a number of great tools found within the Assign seats feature. For example, if you are assigning registrants to seats on a regular basis, you might want to change the Show filter to see only registrants not yet assigned a seat. This can make the list easier to manage as you get more and more registrants and some have already been seated.
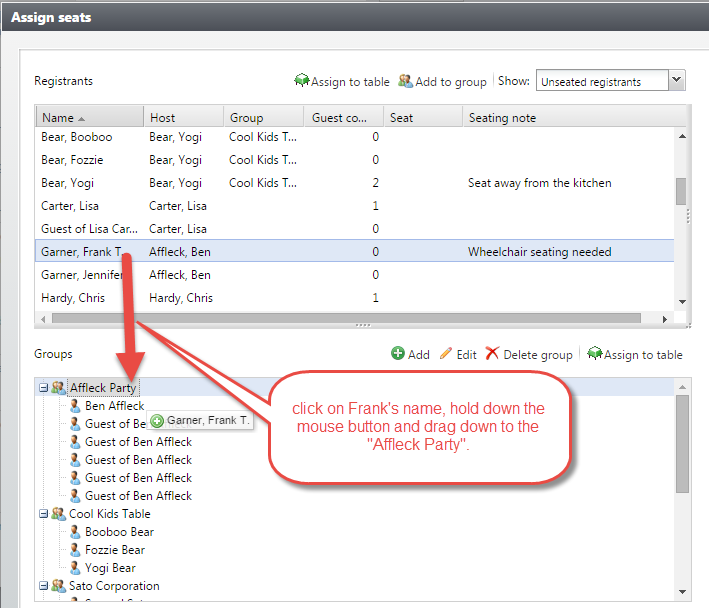
 You can also use the Groups tool to help keep people who want to, or need to, be seated together easily identified. This would be common for Sponsorships, or people who purchase entire tables at your event and want to be seated with the guests they are bringing. You can choose to Add a new group and then use the “drag and drop” method to highlight a name in the Registrants box, and “drag” the name down to the group you would like to place them in:
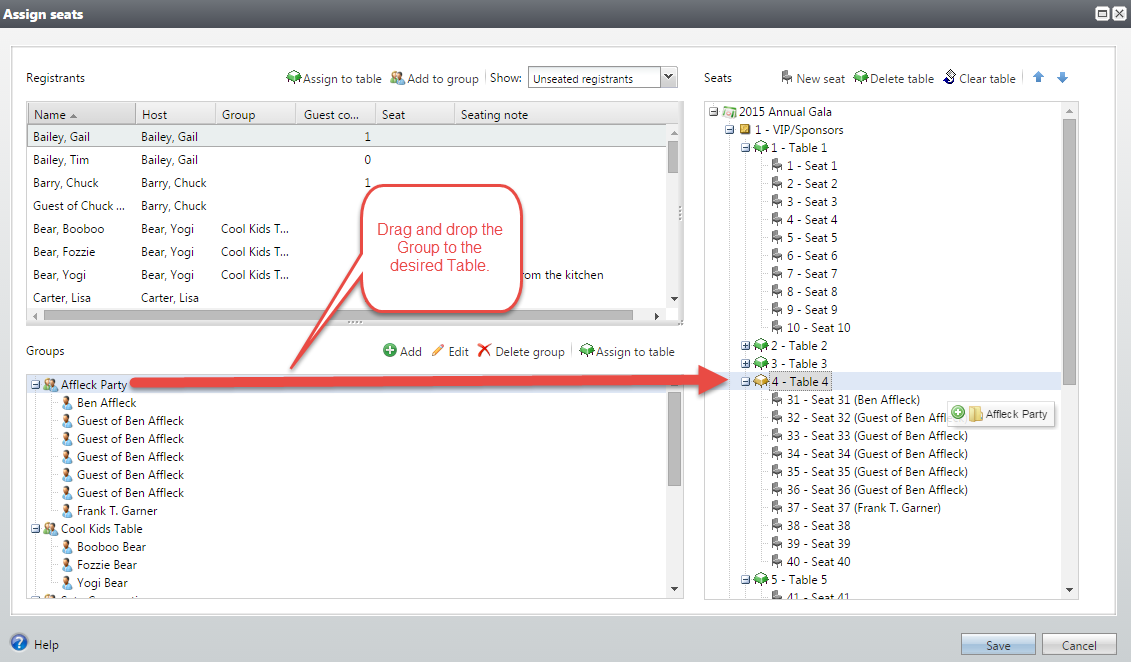
 Once you have a group compiled and know what table you will be seating them at, “drag and drop” the group to the desired table:
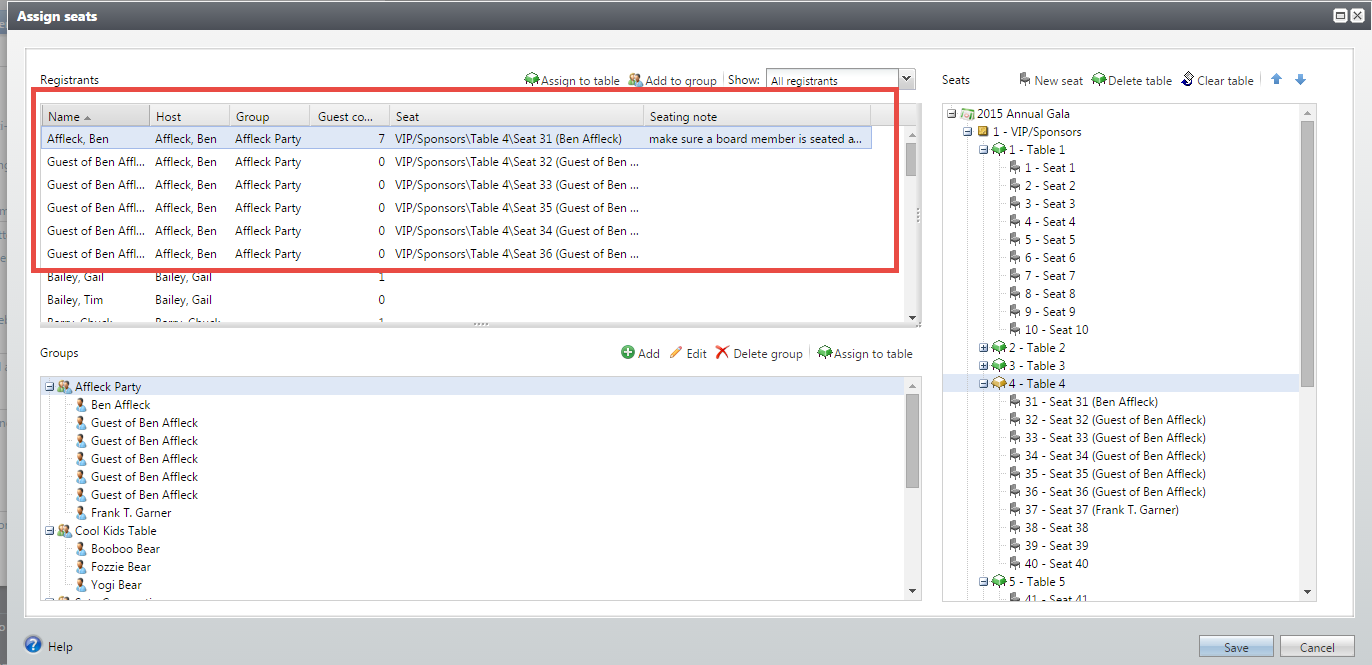
 Once a registrant has been placed in a seat, additional information will appear in the Registrants window to include their seat assignment:
Seating Arrangement Reports
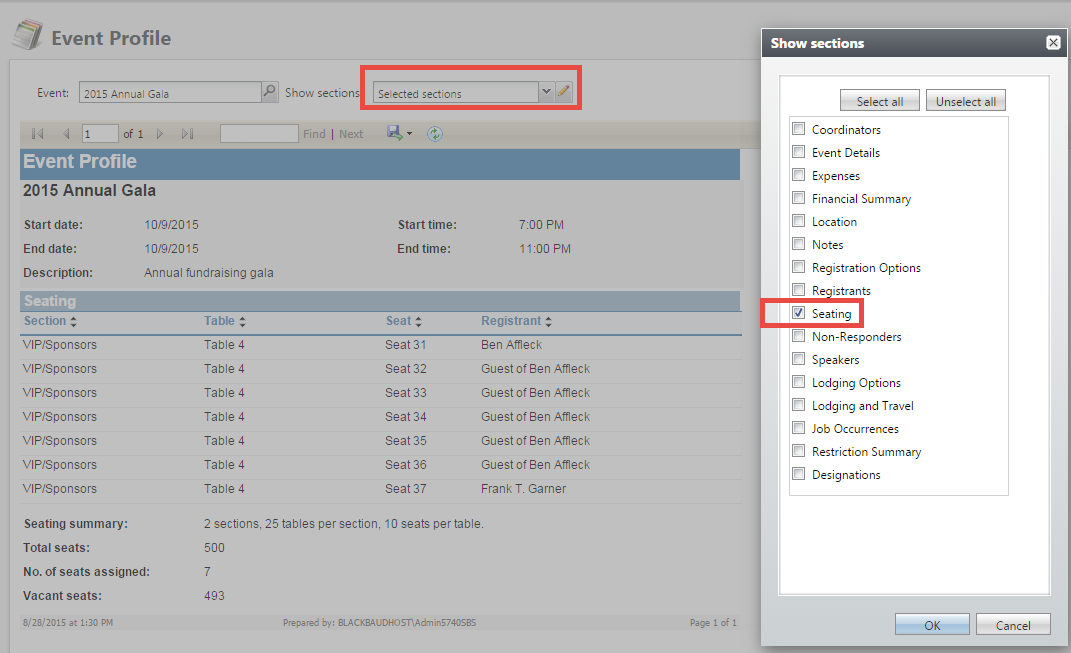
Once you have completed your assignments, or if you wish to view what assignments have already been made, there are two reports built into Altru that you can use: View seating summary and Event profile.
 For the Event profile report, choose to view only Selected sections and only select the option for Seating. This will show all registrants who have been assigned a seat.
 Now that you know some tips and tricks for using the seating arrangement feature, I hope that this will prove useful in your upcoming events season. If you’d like to learn more about how to use this information in Query, I would recommend taking the Query 201 class to learn about creating complex queries.
Now the question becomes; but why use Altru for my seating arrangements? Well, the advantages of using the seating arrangement feature in Altru are 4-fold:
- It is very easy to edit/change selections that you have previously made
- It is easy to produce “groups” that wish to sit together
- Altru has built in reporting to make it easy the night of the event to perform check-in and usher attendees to their seats
- You can use this valuable information in many different ways within Query
- Next year, see who sat with who
- See if people used the “seating notes” field about preferences last year and be aware ahead of time this year
As you can see, there are lots of great benefits to using the seating arrangement feature in Altru. We've also got a few tips and tricks that will really boost the effectiveness of this feature and make your life even easier!
Configuring the Seating Layout
After you have created the fundraising event in Altru you can click on the feature Configure seating layout:
The first thing you need to do is decide on the layout of the room for your event. Most events use the Sections, Tables and Seats option for their layout. For this example, we will be using 2 Sections, 25 Tables per section and 10 Seats per table, providing us a total of 500 seats for the event:You can even begin some naming of the sections, tables and seats to further help you keep track of where to place your registrants. Maybe you need a section for VIP/Sponsors and a section for General Admission. Even though we had 25 tables per section on our first step, we can also adjust the allocation of tables on the Sections tab to reflect what the physical setup of the event space will actually have:Another decision can be made on the Tables tab of whether you would want to have each seat in the room have a unique ID number (Use continuous numbering) or whether you would like each seat to simply be numbered 1-10 for each table:After going through all of the tabs on this window, click Save.Now you can begin to place people in seats as they register. Some offices will update the seating arrangements on a regular basis, while others will wait until right before the event and do one big project to assign all registrants at the same time. I find it helpful to check on the seating arrangements on a regular basis leading up to the event as there are many tools built into the assignment function to aid in this effort.
Assign Registrants to Seats
If you have registrants who have made requests to sit with certain people, or, internally, you want to record a note about a registrant, you can add a Seating note to their registration that will appear within the Assign Seats feature. To do so, find the name of the person on the Registrants tab of the event, click the double arrow next to their name and select Edit registrant:
To begin assigning registrants to seats, click the Assign seats link in the event record:There are a number of great tools found within the Assign seats feature. For example, if you are assigning registrants to seats on a regular basis, you might want to change the Show filter to see only registrants not yet assigned a seat. This can make the list easier to manage as you get more and more registrants and some have already been seated.You can also use the Groups tool to help keep people who want to, or need to, be seated together easily identified. This would be common for Sponsorships, or people who purchase entire tables at your event and want to be seated with the guests they are bringing. You can choose to Add a new group and then use the “drag and drop” method to highlight a name in the Registrants box, and “drag” the name down to the group you would like to place them in:Once you have a group compiled and know what table you will be seating them at, “drag and drop” the group to the desired table:Once a registrant has been placed in a seat, additional information will appear in the Registrants window to include their seat assignment:Seating Arrangement Reports
Once you have completed your assignments, or if you wish to view what assignments have already been made, there are two reports built into Altru that you can use: View seating summary and Event profile.
For the Event profile report, choose to view only Selected sections and only select the option for Seating. This will show all registrants who have been assigned a seat.Now that you know some tips and tricks for using the seating arrangement feature, I hope that this will prove useful in your upcoming events season. If you’d like to learn more about how to use this information in Query, I would recommend taking the Query 201 class to learn about creating complex queries.
News
ARCHIVED | Blackbaud Altru® Tips and Tricks
09/03/2015 7:33am EDT
Leave a Comment