
End of Year Processing: How to Promote Students to the Next Grade Level
Published
Congratulations on completing another successful school year! By now, the final grades have been entered, the students have Student Progression Entries for the next academic year, and you’re ready to promote students to their next grade levels.
Wouldn’t it would be nice if there was a quick and easy way to promote students all at once? Well, there is: the End of Year Processing Wizard. You can locate this wizard in Registrar’s Office by navigating to Administration, Status Wizards, and selecting End of Year Processing on the left.
The End of Year Processing Wizard will promote students to the next grade level, update graduation information for graduating students, delete tracks & checklist items, add new actions, and clear locker information from your student records.
Before running the wizard, ensure your students have Student Progression Entries for the next academic year. This task can be done by running the Mark for Reenrollment Wizard.
NOTE: The End of Year Processing Wizard can be run separately for each individual grade level, or collectively for the entire student body. If you promote students by individual grade level, then you will need to promote in order from the highest to lowest grade level. For example, promote seniors first, then juniors, then sophomores, and finally freshman. Promoting students in this order will ensure you do not unintentionally promote a grade level twice.
General Tab:
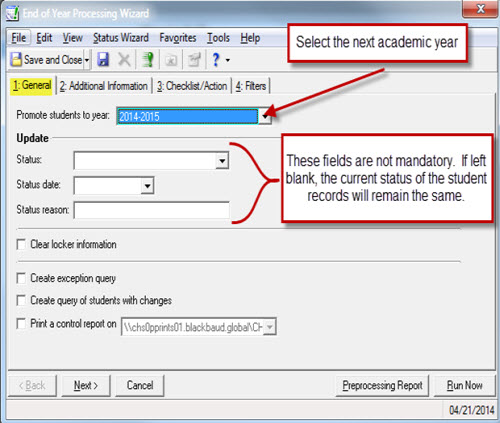
1. On the General tab, select the appropriate academic year in the Promote students to year field.
2. In the Update frame, you can select the status, status date, and status reason to assign to the included student records. These fields are not mandatory, but updating the status here can save time later.
Additional Information Tab:

3. Select the Additional Information tab to process students who are graduating. Mark the Process graduating students using promotion schedule check box and select the appropriate promotion schedule in the drop down menu.
Checklist/Action Tab:
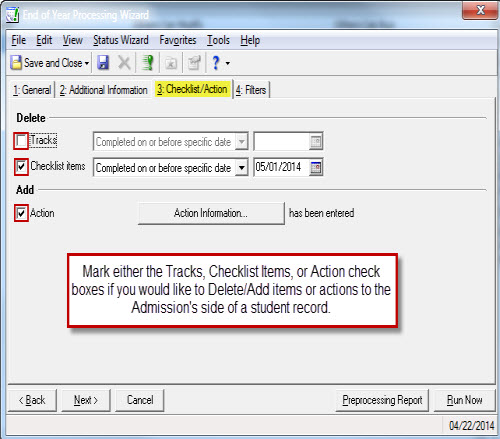
4. Select the Checklist/Action tab to delete tracks, checklist items, or add new actions.
Filters Tab:
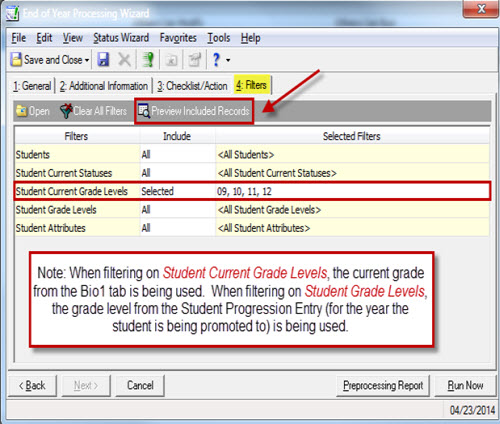
5. Select the Filters tab to define the students to be included in the wizard. For example, you can include students by query, status, grade level, and/or attributes.
6. To start processing, click Run Now.
For more information How to run End of Year Processing in The Education Edge (including video demo), check out Knowledgebase Solution: BB140968.
Have questions? Let me know in the comments below!
Wouldn’t it would be nice if there was a quick and easy way to promote students all at once? Well, there is: the End of Year Processing Wizard. You can locate this wizard in Registrar’s Office by navigating to Administration, Status Wizards, and selecting End of Year Processing on the left.
The End of Year Processing Wizard will promote students to the next grade level, update graduation information for graduating students, delete tracks & checklist items, add new actions, and clear locker information from your student records.
Before running the wizard, ensure your students have Student Progression Entries for the next academic year. This task can be done by running the Mark for Reenrollment Wizard.
NOTE: The End of Year Processing Wizard can be run separately for each individual grade level, or collectively for the entire student body. If you promote students by individual grade level, then you will need to promote in order from the highest to lowest grade level. For example, promote seniors first, then juniors, then sophomores, and finally freshman. Promoting students in this order will ensure you do not unintentionally promote a grade level twice.
General Tab:
1. On the General tab, select the appropriate academic year in the Promote students to year field.
2. In the Update frame, you can select the status, status date, and status reason to assign to the included student records. These fields are not mandatory, but updating the status here can save time later.
Additional Information Tab:
3. Select the Additional Information tab to process students who are graduating. Mark the Process graduating students using promotion schedule check box and select the appropriate promotion schedule in the drop down menu.
- TIP: Entering a new status into the Status field will update your graduating students’ current status.
Checklist/Action Tab:
4. Select the Checklist/Action tab to delete tracks, checklist items, or add new actions.
Filters Tab:
5. Select the Filters tab to define the students to be included in the wizard. For example, you can include students by query, status, grade level, and/or attributes.
- TIP: Selecting the Preview Included Records button in the menu bar will allow you to preview which student records will be processed by the wizard.
6. To start processing, click Run Now.
- TIP: Always run the Preprocessing Report prior to executing the wizard. The Preprocessing Report will allow you to preview the report of changes as well as any possible error messages that may occur when processing the wizard.
For more information How to run End of Year Processing in The Education Edge (including video demo), check out Knowledgebase Solution: BB140968.
Have questions? Let me know in the comments below!
NEED TRAINING OR A QUICK REFRESHER? LOOK NO MORE!
If you organization has a Learn subscription, you can access three video tutorial bundles about scheduling:
Scheduling Part I – Annual Preparation Tasks
Scheduling Part II – Creating the Master Schedule and Student Schedules
Scheduling Part III – Drop, Withdraw, and Transfer
To access the video tutorial bundles, search Training Central with this keyword: eevtscheduling.
News
Blackbaud K-12 Solutions™ Blog
05/20/2014 6:30am EDT
Leave a Comment