
Manually Scheduling Students - It's Easier Than You Think!
Published
You’ve been working through a laundry list of steps: create your academic year, make a timetable, craft a schedule, set up your classes, pull your hair out… Now you’re ready for the students to be scheduled in their classes and then finally a break!
Scheduling students manually is a simple task, and may often the better option if you have a smaller school, if you do not use course requests, or if the school year has already started. To see the step-by-step process, check out this link:
How to manually schedule students in classes
In the Scheduling module, under Class Scheduling Tasks, click Open a Class. A window will appear that will allow you to search for this class by Course ID, Class ID, Course Name, or Department. Classes can also be accessed through the Master Schedule by highlighting the class and clicking Open.
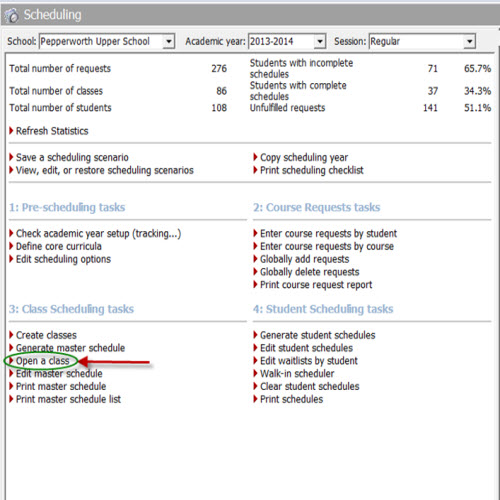
Once you have chosen you class, go to the Students tab on the record. There are two options on the gray bar—Add Student and Load Students—that will allow you to add one student (Add Student) or multiple students by query, by class, by homeroom, or by grade level (Load Students and choose the necessary option from the drop-down). After the student or students have been entered, the box under the “Enrolled?” column will need to be marked off.
For a chance to win a $25 Staples® gift card email backtoschoolcontest@blackbaud.com with the name of the blog in the subject line, your name, and Site ID in the body of the email. Participants must submit their entry by 11:59 pm Eastern on June 31st, 2014.
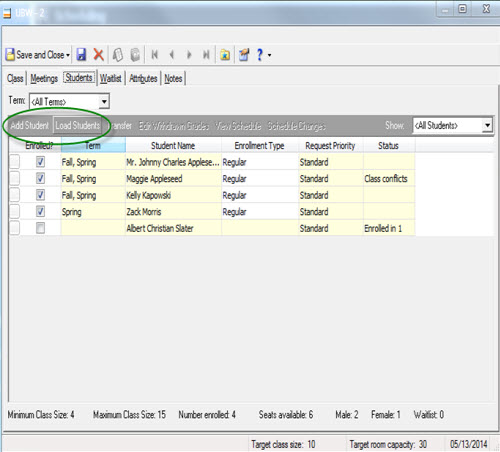
Once you’ve confirmed that these are the correct students, click Save and Close and give yourself a big pat on the back because you are done with the last step in the scheduling process.
Want to go about this process in a more student-focused as opposed to class-focused way? Students can be manually scheduled under Student Scheduling tasks as well. Here is a link that walks through all of the steps in this process:
How to manually edit student schedules
This is done in the Walk-in Scheduler in the Scheduling module.

Clicking this will yield a window that will prompt you to search for the specific student that needs to be scheduled. It looks like this:
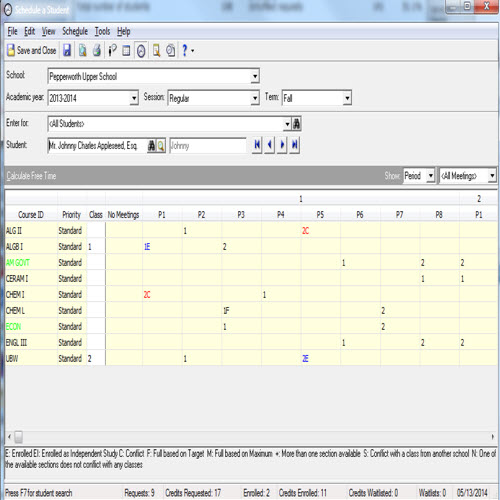
Here, you will need to choose the class sections in which the student should be enrolled, and also shows availability per cycle day. It will show any conflicts that arise, as well.
Have any tips or tricks to manually schedule students? Let me know in the comments below!
Scheduling students manually is a simple task, and may often the better option if you have a smaller school, if you do not use course requests, or if the school year has already started. To see the step-by-step process, check out this link:
How to manually schedule students in classes
In the Scheduling module, under Class Scheduling Tasks, click Open a Class. A window will appear that will allow you to search for this class by Course ID, Class ID, Course Name, or Department. Classes can also be accessed through the Master Schedule by highlighting the class and clicking Open.
Once you have chosen you class, go to the Students tab on the record. There are two options on the gray bar—Add Student and Load Students—that will allow you to add one student (Add Student) or multiple students by query, by class, by homeroom, or by grade level (Load Students and choose the necessary option from the drop-down). After the student or students have been entered, the box under the “Enrolled?” column will need to be marked off.
For a chance to win a $25 Staples® gift card email backtoschoolcontest@blackbaud.com with the name of the blog in the subject line, your name, and Site ID in the body of the email. Participants must submit their entry by 11:59 pm Eastern on June 31st, 2014.
Once you’ve confirmed that these are the correct students, click Save and Close and give yourself a big pat on the back because you are done with the last step in the scheduling process.
Want to go about this process in a more student-focused as opposed to class-focused way? Students can be manually scheduled under Student Scheduling tasks as well. Here is a link that walks through all of the steps in this process:
How to manually edit student schedules
This is done in the Walk-in Scheduler in the Scheduling module.
Clicking this will yield a window that will prompt you to search for the specific student that needs to be scheduled. It looks like this:
Here, you will need to choose the class sections in which the student should be enrolled, and also shows availability per cycle day. It will show any conflicts that arise, as well.
Have any tips or tricks to manually schedule students? Let me know in the comments below!
LOOKING FOR TRAINING ON SCHEDULING?
1. Visit Training Central.
2. Search with the keyword Scheduling.
3. In the results list, select the self-paced online class (aka video), curriculum (aka training path), or instructor-led online event that meets your need.
All videos and training paths about Scheduling are free with any type of Learn subscription.
Have a Learn More or Learn Everything subscription? All virtual instructor-led classes about Scheduling are free, too.
News
Blackbaud K-12 Solutions™ Blog
07/17/2014 6:30am EDT
Leave a Comment