
Applicants Have Been Accepted – Now What?
Published
Are you looking to bring new accepted Applicant records over to the Registrar’s Office? If so, then you will want to check out the Enroll Applicants wizard.
The Enroll Applicants wizard allows users to create enrollments from existing Applicant records and prepare Student records for next year’s scheduling and billing. The Enroll Applications wizard can be found in three different locations within the Admissions Office module.
NOTE: Options 1 and 2 can be applied to a group of Applicant records, or for a specific Applicant record. However, option 3 will only be applied to the current Applicant record that you have open in The Education Edge.
General Tab:

There are two mandatory fields that must be completed in order to proceed with the wizard: the From School and Academic Year fields. Since users can only enroll applicants for one school at time, you will need to ensure the appropriate school is selected from the drop down menu.
NOTE: If you only have one school set up in your database, you will not have a drop down menu in the From school field.
The Update frame allows users to set the new statuses of the records; this will affect the current status field on the Bio 1 tab. There are two options for the Set Current Grade field: To Value and Based on Promotion Schedule. To use the Based on Promotion Schedule option, you will need to have the Promotion Schedule already defined.
TIP: If you are unsure if the Promotion Schedule has been previously defined, then try using the To Value option instead and set the current grade to <Grade Apply>.
The Student Progression frame will allow users to create a Student Progression Entry for Student records. Remember, without a Student Progression Entry, you will not be able to add course requests and schedule students for classes next year. Therefore, you will want to ensure the appropriate Academic Year is selected in the Student Progression Frame.
Additional Information Tab:
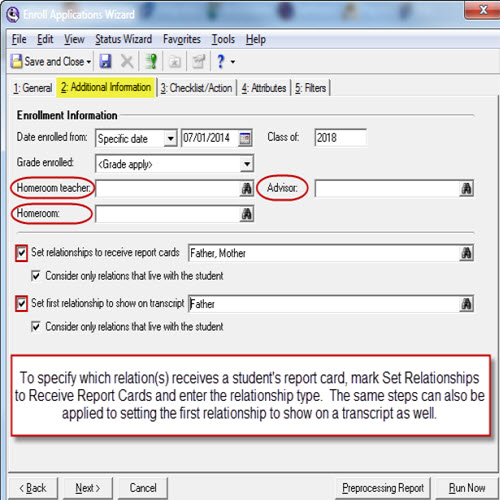
In the Enrollment Information frame, users can choose to add additional information to records such as Date Enrolled from, Grade Enrolled, Class of, Homeroom Teacher, and Advisor.
NOTE: If you are running the wizard for multiple students in multiple grade levels, then you will want to consider leaving the Homeroom Teacher, Advisor, and Class of fields blank. It is unlikely all students will have the same homeroom teacher, advisor, or graduating class. Entering data into these fields will be applied to every record processed by the wizard. This information can always be added later to the student records.
Checklist/Action Tab:
Mark either the Tracks, Checklist Items, or Action check boxes if you would like to Delete/Add items or actions to the Admission’s side of a student record.
Attributes Tab:
This tab allows users to copy existing attributes from the Applicant side of a record over to the Student side of a record. If you have required attributes in either Registrar’s Office or Student Billing, then this tab will also allow users to enter values into these fields as well.
NOTE: Like the Additional Information tab, if these attribute values are likely to be different from record to record, then it is suggested to leave these fields blank. Remember, this information can always be added later to the student records.
Filters Tab:
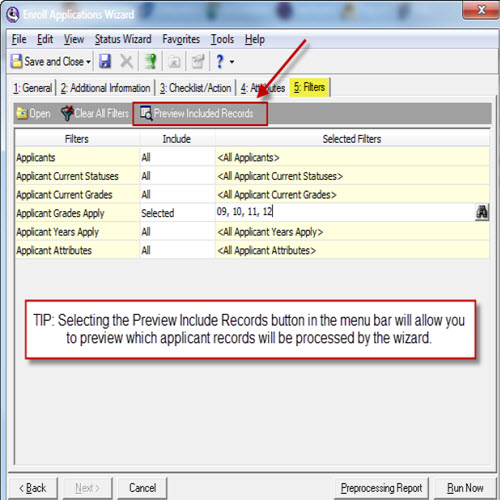
Select the Filters tab to define the applicants to be included in the wizard. For example, you can include applicants by query, status, grades apply, and/or attributes.
To start processing, click Run Now.
TIP: It is recommended to always run the preprocessing report prior to executing the wizard. The only way to undo the Enroll Applications process is to restore to a previous backup. Running the Preprocessing Report prior to executing the wizard will allow users to preview the report of changes and any possible error messages that may occur when processing the wizard.
Have questions? Let me know in the comments below!
The Enroll Applicants wizard allows users to create enrollments from existing Applicant records and prepare Student records for next year’s scheduling and billing. The Enroll Applications wizard can be found in three different locations within the Admissions Office module.
- Records > Applicants > Enroll Applications
- Administration > Status Wizards > Enroll Applications
- From the menu bar in any open Applicant record. Select Applicant > Enroll Applications
NOTE: Options 1 and 2 can be applied to a group of Applicant records, or for a specific Applicant record. However, option 3 will only be applied to the current Applicant record that you have open in The Education Edge.
General Tab:
There are two mandatory fields that must be completed in order to proceed with the wizard: the From School and Academic Year fields. Since users can only enroll applicants for one school at time, you will need to ensure the appropriate school is selected from the drop down menu.
NOTE: If you only have one school set up in your database, you will not have a drop down menu in the From school field.
The Update frame allows users to set the new statuses of the records; this will affect the current status field on the Bio 1 tab. There are two options for the Set Current Grade field: To Value and Based on Promotion Schedule. To use the Based on Promotion Schedule option, you will need to have the Promotion Schedule already defined.
TIP: If you are unsure if the Promotion Schedule has been previously defined, then try using the To Value option instead and set the current grade to <Grade Apply>.
The Student Progression frame will allow users to create a Student Progression Entry for Student records. Remember, without a Student Progression Entry, you will not be able to add course requests and schedule students for classes next year. Therefore, you will want to ensure the appropriate Academic Year is selected in the Student Progression Frame.
Additional Information Tab:
In the Enrollment Information frame, users can choose to add additional information to records such as Date Enrolled from, Grade Enrolled, Class of, Homeroom Teacher, and Advisor.
NOTE: If you are running the wizard for multiple students in multiple grade levels, then you will want to consider leaving the Homeroom Teacher, Advisor, and Class of fields blank. It is unlikely all students will have the same homeroom teacher, advisor, or graduating class. Entering data into these fields will be applied to every record processed by the wizard. This information can always be added later to the student records.
Checklist/Action Tab:
Mark either the Tracks, Checklist Items, or Action check boxes if you would like to Delete/Add items or actions to the Admission’s side of a student record.
Attributes Tab:
This tab allows users to copy existing attributes from the Applicant side of a record over to the Student side of a record. If you have required attributes in either Registrar’s Office or Student Billing, then this tab will also allow users to enter values into these fields as well.
NOTE: Like the Additional Information tab, if these attribute values are likely to be different from record to record, then it is suggested to leave these fields blank. Remember, this information can always be added later to the student records.
Filters Tab:
Select the Filters tab to define the applicants to be included in the wizard. For example, you can include applicants by query, status, grades apply, and/or attributes.
To start processing, click Run Now.
TIP: It is recommended to always run the preprocessing report prior to executing the wizard. The only way to undo the Enroll Applications process is to restore to a previous backup. Running the Preprocessing Report prior to executing the wizard will allow users to preview the report of changes and any possible error messages that may occur when processing the wizard.
- For more information on How to run the Enroll Applications Wizard in The Education Edge (including video demo) please check out Knowledgebase Solution BB171500.
Have questions? Let me know in the comments below!
News
Blackbaud K-12 Solutions™ Blog
03/11/2015 6:30am EDT
Leave a Comment