
Budget Imports-DEMYSTIFIED! (Part 2)
Published
Thank you for joining us for the second edition of Budget Imports- DEMYSTIFIED! In the first blog, we discussed required fields and how to find the Budget Scenario Import ID. Once your CSV file is created with the required fields, we can walk through validating our import! Let’s navigate to General Ledger, Administration, Import Records, and highlight either Fiscal Year Account Budget or Fiscal Year Project Budget, depending on the import we are performing. Once we highlight our selection, we are able to click the New Import button. We will want to select to Import new records, and let’s make sure to Validate data only under Options. We recommend validating before importing, as importing is a permanent process. The import parameter asks what file to import, and you will want to choose your file here by selecting the ellipsis button and navigating to your file. Depending on whether you have Budget Scenario Import ID or Budget Scenario ID-Fiscal Year in your CSV file, we will want to make sure that we have that selected on the General tab of the import. We will choose to make the format of the import file Delimited.
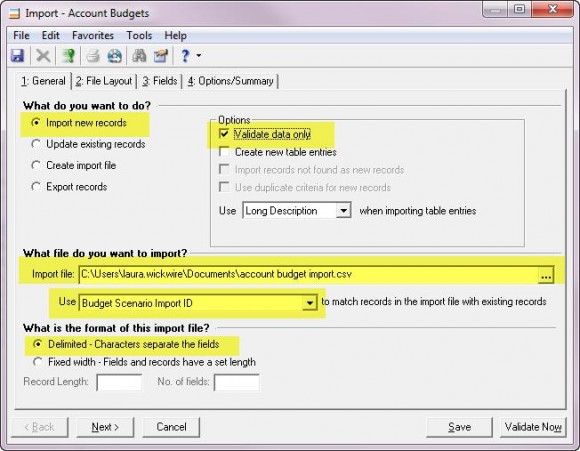
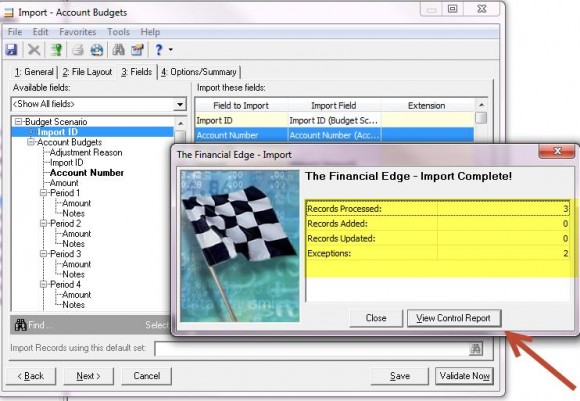
On the File Layout tab, we typically leave the Field separator to Comma and the Text qualifier to Quotation. On the Fields tab, we should see that each of our column headers from our CSV file is listed in the Field to Import column. When we go to Validate, we must ensure that each Import Field is mapped to the Field to Import. Account Number should be mapped to Account Number, Amount should be mapped to Amount, etc etc. To move this information over to the Import Field column, we must highlight the row in which we want it to show, and then double click the field on the left hand side to be mapped. Once all fields are mapped properly, we are ready to take the leap! Let’s click Validate Now in the bottom right corner.
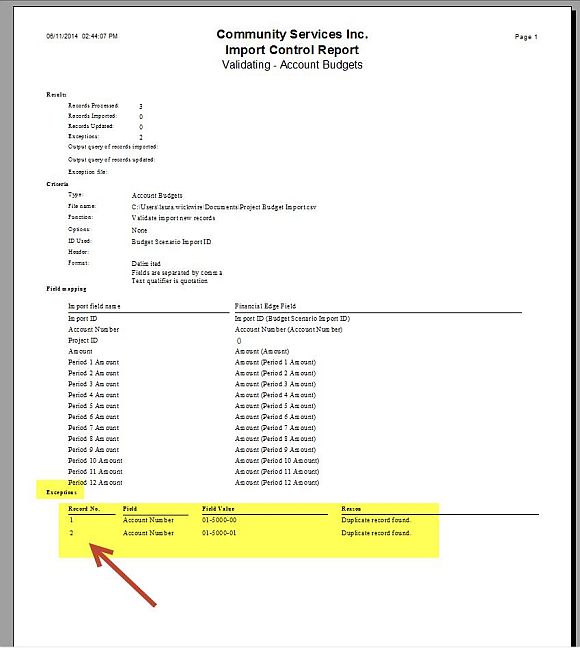
Once we click Validate Now, we will see a screen that is processing and it will show what number of records were processed, added, and updated. The screen will also show Exceptions. We can clearly see what the Exceptions are by clicking the button that says View Control Report. Once we choose to View the Control Report, the exceptions will be listed, and they will point us towards the records that must be changed and why this CSV would not import successfully as it is. When we view the Control Report, we will see a column that points us towards the record number that will not import. We will need to look at the line in the CSV file that is the Record Number plus 1, because the system does not take into account the column headers.
Once we make changes to our CSV to reflect what the Control Report tells us, we will be able to validate successfully and then import our data! Before importing, we recommend making a backup of your database, as this is a permanent change that cannot be undone. To import instead of validate, navigate to the General tab of the import parameter and uncheck the option to Validate data only. This will automatically give you a button in the bottom right corner that says Import Now.
Congratulations-you are a budget import expert now! Your final task is to say “budget import expert” five times fast!
On the File Layout tab, we typically leave the Field separator to Comma and the Text qualifier to Quotation. On the Fields tab, we should see that each of our column headers from our CSV file is listed in the Field to Import column. When we go to Validate, we must ensure that each Import Field is mapped to the Field to Import. Account Number should be mapped to Account Number, Amount should be mapped to Amount, etc etc. To move this information over to the Import Field column, we must highlight the row in which we want it to show, and then double click the field on the left hand side to be mapped. Once all fields are mapped properly, we are ready to take the leap! Let’s click Validate Now in the bottom right corner.
Once we click Validate Now, we will see a screen that is processing and it will show what number of records were processed, added, and updated. The screen will also show Exceptions. We can clearly see what the Exceptions are by clicking the button that says View Control Report. Once we choose to View the Control Report, the exceptions will be listed, and they will point us towards the records that must be changed and why this CSV would not import successfully as it is. When we view the Control Report, we will see a column that points us towards the record number that will not import. We will need to look at the line in the CSV file that is the Record Number plus 1, because the system does not take into account the column headers.
Once we make changes to our CSV to reflect what the Control Report tells us, we will be able to validate successfully and then import our data! Before importing, we recommend making a backup of your database, as this is a permanent change that cannot be undone. To import instead of validate, navigate to the General tab of the import parameter and uncheck the option to Validate data only. This will automatically give you a button in the bottom right corner that says Import Now.
Congratulations-you are a budget import expert now! Your final task is to say “budget import expert” five times fast!
News
ARCHIVED | Financial Edge® Tips and Tricks
07/09/2014 6:00am EDT
Leave a Comment