Processing Your 1094/1095 Forms
Published
Our Tax Season blogs continue with processing those 1094s and 1095s!
Now, if this is your first time processing these, I would definitely recommend checking out our video on this process here.
NOTE: If you have all of your ACA info in the system already, skip to minute 16:04 in the video.
If you processed ACA's last year, you know the beginning of the ACA processing is quite similar to that of W-2s:
1. In Payroll > Mail > State and Federal Tax reports > create a new Federal Tax report at the top
2. Select the 2018 1094/1095 and B or C > and Year = 2018 (or last year)
3. *Optional: Select the filters tab to include certain employees and exclude others
4. Click Display Report
*You can include (or create) an employee query with ACA criteria such as:
Displaying the report starts the 1094/1095 Aatrix Wizard which takes you through the report creation process.
Sidebar- If you haven’t yet installed or updated Aatrix on the workstation you’ll be prompted to do that first. Find a quick review of how to complete that here. If prompted for an update, you’ll generally want to choose the option for Automatic Update.
After clicking through the initial screens, the ACA wizard will eventually bring you to the “grid” portion of the process. Here you can double-check your employee’s ACA settings, and if need be, change the settings in the Wizard. Be sure to make note of any changes you make, as these will not flow back to the employee record, and you may wish to update the employee record after the fact.
Navigate through the employees by clicking on a row at the top or by using the white arrows on either end of the teal, middle bar to proceed to the next employee in the list.
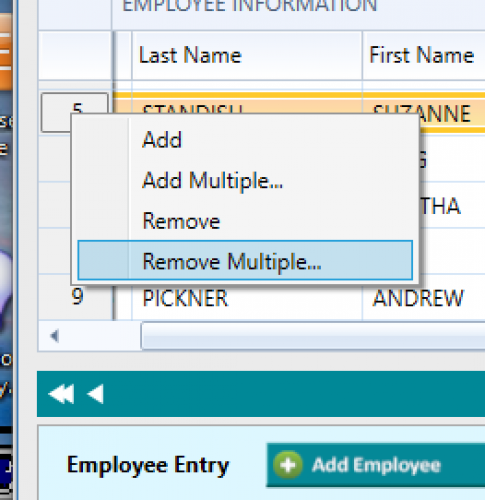
In the process, if you realize you need to add or remove someone, the wizard has a nice lil right click shortcut to help with that:

Now, if this is your first time processing these, I would definitely recommend checking out our video on this process here.
NOTE: If you have all of your ACA info in the system already, skip to minute 16:04 in the video.
If you processed ACA's last year, you know the beginning of the ACA processing is quite similar to that of W-2s:
1. In Payroll > Mail > State and Federal Tax reports > create a new Federal Tax report at the top
2. Select the 2018 1094/1095 and B or C > and Year = 2018 (or last year)
3. *Optional: Select the filters tab to include certain employees and exclude others
4. Click Display Report
*You can include (or create) an employee query with ACA criteria such as:
- ACA months
- ACA Description
- Full time employee
- Year
Displaying the report starts the 1094/1095 Aatrix Wizard which takes you through the report creation process.
Sidebar- If you haven’t yet installed or updated Aatrix on the workstation you’ll be prompted to do that first. Find a quick review of how to complete that here. If prompted for an update, you’ll generally want to choose the option for Automatic Update.
After clicking through the initial screens, the ACA wizard will eventually bring you to the “grid” portion of the process. Here you can double-check your employee’s ACA settings, and if need be, change the settings in the Wizard. Be sure to make note of any changes you make, as these will not flow back to the employee record, and you may wish to update the employee record after the fact.
Navigate through the employees by clicking on a row at the top or by using the white arrows on either end of the teal, middle bar to proceed to the next employee in the list.
In the process, if you realize you need to add or remove someone, the wizard has a nice lil right click shortcut to help with that:

When clicking the Next arrow at the very top, the wizard includes an error feature which will highlight any items that may need review before proceeding. Once the errors are fixed and cleared out, it’s possible to move onto the next section. The wizard also includes a handy tip box which can provide additional info.
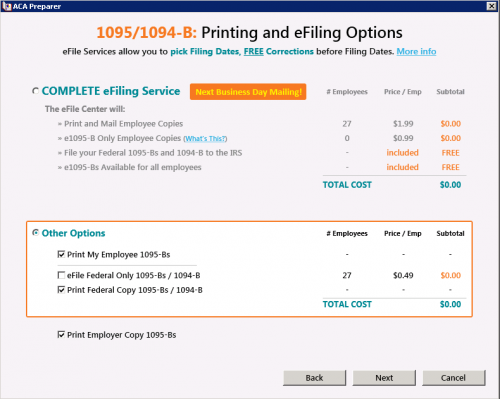
Once you’ve completed the grid, you’ll be able to move forward to the final step of the process: The printing and/or e-filing where you’ll have several options. For example, if you just want to print your 1094s/1095s, you can select Other Options:
Once you’ve completed the grid, you’ll be able to move forward to the final step of the process: The printing and/or e-filing where you’ll have several options. For example, if you just want to print your 1094s/1095s, you can select Other Options:
Happy Filing!
News
ARCHIVED | Financial Edge® Tips and Tricks
01/31/2019 12:01pm EST


Leave a Comment