Save Some Time: Default Sets
Published
Do you find yourself entering many invoices with the same information in several fields? What about charges? Our records have a great feature that is commonly overlooked – Default Sets. In each module, default sets can be created by clicking Tools from the top toolbar and then selecting Organize/Create defaults. You will see the different record types from the module you are in listed in the ‘Create defaults for’ list on the left.
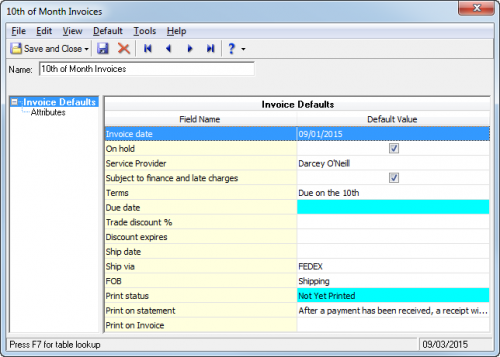
To create a default set, click the product type for which you would like to create a set; for our example, we will be in Accounts Receivable working with an Invoice default set. Once the record type is selected, click New from the right. You will enter a name for the set which will allow you to quickly identify what it represents when applying to a new record (e.g. Invoices for Training). In the grid, you will see all fields available to create defaults for such as Invoice date (useful if entering invoices for several clients all sent on the same day), Due date, Ship via, and the print on options. You may use as many, or few, fields for your default set as you need. Click Save and Close once the default set has all the desired information.

I am a big fan of defaults for Accounts Receivable invoices due to the option to enter default Print on statement and Print on Invoice fields. If you always print the same message on statements, just using this field alone can save you a good amount of key strokes.
Now, for using the default set. In Records, click into the record type for which you defined a default set. I created an AR Invoice default set so I am in a new invoice. First, enter the client (or vendor) name. Once that loads, click transaction (or if another module, click the name of the record) the top toolbar then select Load Defaults From. Here, you will see the title of your default set. Click to highlight your set (if there are multiple), mark the box on the bottom for “Automatically load field defaults”. If you want to make a modification to the set, click Open and edit. If you are ready to use the set, click OK. You should now see the fields populate.
Again, these are used throughout the software in different modules so be sure to try several types out. I am all for saving time when entering information, as I am sure you are too. Be sure to check back in for more of our weekly tips and tricks.
To create a default set, click the product type for which you would like to create a set; for our example, we will be in Accounts Receivable working with an Invoice default set. Once the record type is selected, click New from the right. You will enter a name for the set which will allow you to quickly identify what it represents when applying to a new record (e.g. Invoices for Training). In the grid, you will see all fields available to create defaults for such as Invoice date (useful if entering invoices for several clients all sent on the same day), Due date, Ship via, and the print on options. You may use as many, or few, fields for your default set as you need. Click Save and Close once the default set has all the desired information.

I am a big fan of defaults for Accounts Receivable invoices due to the option to enter default Print on statement and Print on Invoice fields. If you always print the same message on statements, just using this field alone can save you a good amount of key strokes.
Now, for using the default set. In Records, click into the record type for which you defined a default set. I created an AR Invoice default set so I am in a new invoice. First, enter the client (or vendor) name. Once that loads, click transaction (or if another module, click the name of the record) the top toolbar then select Load Defaults From. Here, you will see the title of your default set. Click to highlight your set (if there are multiple), mark the box on the bottom for “Automatically load field defaults”. If you want to make a modification to the set, click Open and edit. If you are ready to use the set, click OK. You should now see the fields populate.
Again, these are used throughout the software in different modules so be sure to try several types out. I am all for saving time when entering information, as I am sure you are too. Be sure to check back in for more of our weekly tips and tricks.
News
ARCHIVED | Financial Edge® Tips and Tricks
09/03/2015 10:59am EDT

Leave a Comment