
A Speedy Way to Enter Gifts
Published
How many of you have had an event and when it is over you have a stack of donations that you need to enter into your eTapestry database? If you’ve ever been in that situation then the Quick Gift Entry tool might speed things up for you.
You can access this tool simply by clicking on Giving on the menu bar.

When you click Giving, it will load the Quick Gift Entry tool which looks very similar to the regular New Gift/Pledge page when you are adding a donation to someone’s Journal.
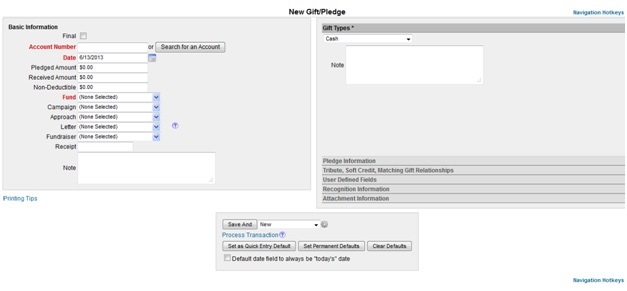
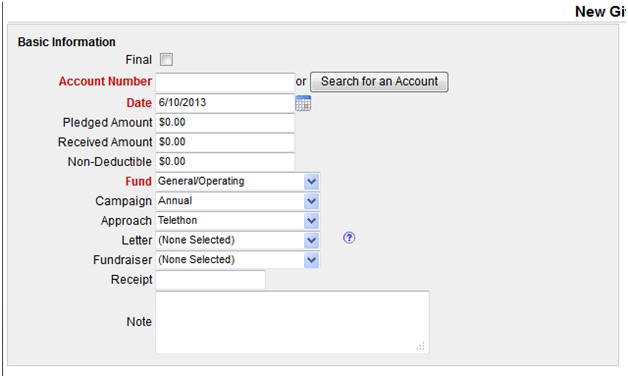
When you are on the Quick Gift Entry page, you will want to consider all of the information that is the same for each of your transactions that you have to enter. If your donations were all made on the day of an event, then they all are going to have the same date. You would want to type that date into the Date field. They would also most likely have the same Fund, Campaign, and Approach, so you would want to set those fields as well. Anything that you are going to end up marking the same on each donation, you’ll want to fill in.
Once you have all your fields marked, look down toward the bottom of the page. You should see three buttons called: Set As Quick Entry Default, Set Permanent Defaults, and Clear Defaults.
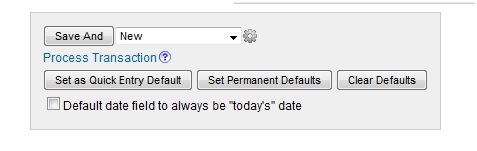
Let’s go over what each of those buttons will do:
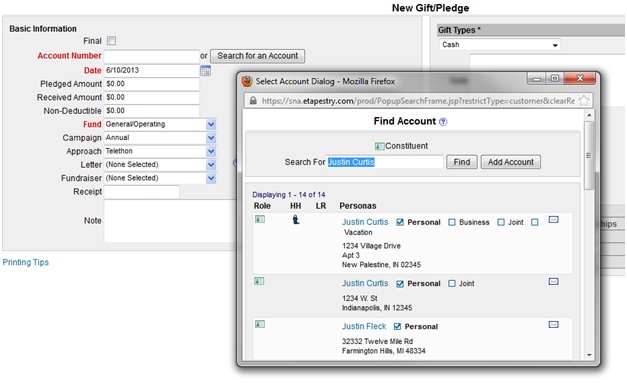
Once you have all of the fields that will be the same on each transactions filled in and you have clicked Set As Quick Entry Default (or Set Permanent Default), it is time to start entering your transactions. You would want to start by telling the system which donor the transaction belongs to. In order to do that you would want to click the “Search For An Account” button under the Basic Information section. This will open a Find Account window where you can search on one of the donors you need to add a donation to.
Once you’ve selected the donor, you can fill in the remaining fields such as their Received Amount and Gift Type.
When you have finished filling in all your fields you can then clicked Save And – New at the bottom of the page.
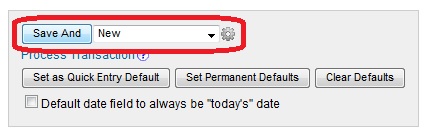
By clicking Save And – New, the database will save the donation to their account and then reload the page. Now you can search on the next person, enter in the remaining fields, and click Save And – New again and repeat the process. This process helps speeds things up for entering a large amount of donations because you don’t have to open as many pages and you have many of the fields you would be clicking over and over again already preset.
For more information on Quick Gift Entry, check out or Help section. Here are steps to the Help article:
Till next time!
You can access this tool simply by clicking on Giving on the menu bar.
When you click Giving, it will load the Quick Gift Entry tool which looks very similar to the regular New Gift/Pledge page when you are adding a donation to someone’s Journal.
When you are on the Quick Gift Entry page, you will want to consider all of the information that is the same for each of your transactions that you have to enter. If your donations were all made on the day of an event, then they all are going to have the same date. You would want to type that date into the Date field. They would also most likely have the same Fund, Campaign, and Approach, so you would want to set those fields as well. Anything that you are going to end up marking the same on each donation, you’ll want to fill in.
Once you have all your fields marked, look down toward the bottom of the page. You should see three buttons called: Set As Quick Entry Default, Set Permanent Defaults, and Clear Defaults.
Let’s go over what each of those buttons will do:
- Set As Quick Entry Default – When you click this button the system is going to remember the settings on all the fields you just filled in. This will help so each time you create a transaction those fields will remain filled in. This way you don’t have to set them every time. If you log out of the database, your settings will be forgotten.
- Set Permanent Defaults – Much like the Set As Quick Entry Default, this button will remember all the settings you have made. The difference is this button will remember your settings even if you log out of the database. So if you need to leave at the end of the day and you need to continue entering in gifts the next day, this option would be best so it will remember your settings when you start again.
- Clear Defaults – Clear Defaults is used to tell the system to forget the settings you have made. It is very important that when you are done entering all your transactions you click Clear Defaults so you don’t accidentally mark unrelated transactions with incorrect information.
Once you have all of the fields that will be the same on each transactions filled in and you have clicked Set As Quick Entry Default (or Set Permanent Default), it is time to start entering your transactions. You would want to start by telling the system which donor the transaction belongs to. In order to do that you would want to click the “Search For An Account” button under the Basic Information section. This will open a Find Account window where you can search on one of the donors you need to add a donation to.
Once you’ve selected the donor, you can fill in the remaining fields such as their Received Amount and Gift Type.
When you have finished filling in all your fields you can then clicked Save And – New at the bottom of the page.
By clicking Save And – New, the database will save the donation to their account and then reload the page. Now you can search on the next person, enter in the remaining fields, and click Save And – New again and repeat the process. This process helps speeds things up for entering a large amount of donations because you don’t have to open as many pages and you have many of the fields you would be clicking over and over again already preset.
For more information on Quick Gift Entry, check out or Help section. Here are steps to the Help article:
- Click Help & Support in the upper right corner
- Click Help in the drop down menu
- Click Best Practices on the left side of the help window
- Click Quick Gift Entry
Till next time!
News
ARCHIVED | Blackbaud eTapestry® Tips and Tricks
07/11/2013 8:31am EDT
Leave a Comment