
Best Practices For Setting Up Your DIY Donation Page
Published
As more organizations are utilizing eTapestry's DIY Forms, we wanted to share a few best practices to keep in mind when setting up your form. If this is your first time create a DIY form, please check out our Getting Started with DIY Forms guide.

Sources:https://nonprofitquarterly.org/management/21850-what-makes-for-an-effective-online-donation-page.htmlhttp://branded4good.com/blog/donation-page-branding-practices/
1. Your Logo
Your logo and branding should be visible and recognizable. Potential donors need to be reassured they are donating to the intended organization.
2. A Compelling Photo
You should have some king of visual that will show why the money is needed or who is being helped, preferably a program participant/consumer, NOT some stock photo found online.
3. A BRIEF Description of the Need
People are not going to read an entire essay. Get to the point and add a couple of links to additional information that your potential donor may want to know more about. Be careful not to include so many links that they become distracted and driven away from your donation page. Also, don't forget to say thank you ahead of time.
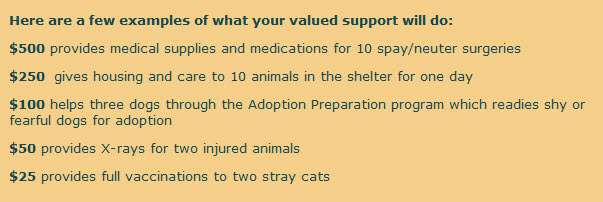
4. Example of What a Donation Will Provide
This can be very powerful, connecting an actual dollar amount to specific things that the nonprofit does. Create the list with your program participants in mind and show what will be provided and for how long for that specific dollar amount.
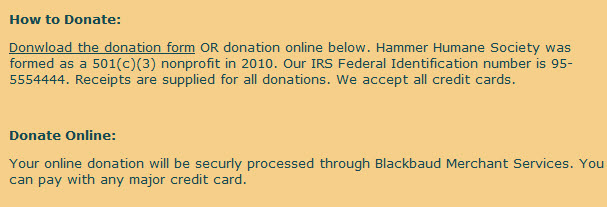
5. How to Donate
This may seem like a given, but you really need to make sure everyone can donate offline as well as online. For offline donations, give them a downloadable form that matches your online form, has your logo/header, and mailing instructions. Let people know up front what online system you are using to process their payment so they feel secure.
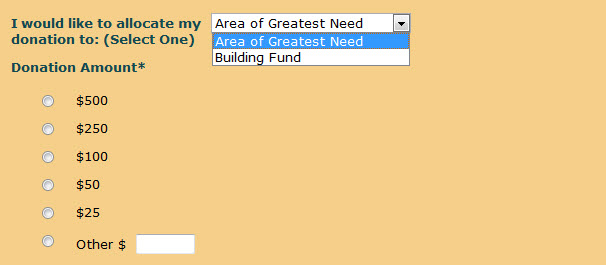
6. Let the Donor Make Choices
Letting the donors have some control may create a little more accounting effort on your part, but will have big rewards when you see your donations go up. Let them choose the program they want to contribute to, always leaving Area of Greatest Need as the default choice. Look at the donations you have been receiving on and offline to gauge the donation levels to set – don’t be afraid to go too high or to start a little higher – you don’t have to have a $20 option as long as you’ve got an “other” box.
7. Recurring Donations
Don’t miss an opportunity to receive regular monthly gifts. You can provide weekly, monthly, quarterly, semi-annually, or annual options. You can also link to a monthly giving program page if you have specific benefits outlined i.e. a Giving Club.
8. Newsletter Sign-Up
You may have a separate contact form for newsletter sign-ups, but don’t pass up the opportunity to have donors opt-in to your newsletter while making a donation.
Sources:https://nonprofitquarterly.org/management/21850-what-makes-for-an-effective-online-donation-page.htmlhttp://branded4good.com/blog/donation-page-branding-practices/
News
ARCHIVED | Blackbaud eTapestry® Tips and Tricks
03/18/2014 8:25am EDT
Leave a Comment