Save Time With eTapestry Shortcuts
Published
Everyone loves to save time, right? Well, if you’re interested in shaving some time off of common tasks in eTapestry then this is the blog for you! We will discuss a few ideas that can help you search, navigate, and perform data entry more efficiently. Let’s get started!
Searching
Navigating
Data Entry
If the account has any outstanding pledges, those will appear in the Pledge Information section. If you want to make a payment instead of add a gift, click on the paperclip icon to the left of the Pledge.
I hope you can incorporate these shortcuts into your daily work and save some time along the way. Do you have any tips on saving time while working in eTapestry? Share in the comments below!
Searching
Advanced Find
Make Advanced Find your default search option under your User Preferences. This option allows you to search for accounts based on Email, City, State, etc. It also makes the account User Defined Fields search options appear which can help you narrow down your results.
- Go to Welcome > My Preferences
- Under Search Preferences, choose Advanced Find as your Default Search Type
Search by Account Number
Quickly access the exact account you need by using the account number. The Account Number is on the upper right hand side of an account under the their role. Search on account number by using / and then the account number (for example /80). This can also be used in the Quick Gift Entry, which we will cover later.Navigating
Fast Navigation
Click Welcome > My Preferences again and scroll to the bottom of the page under Navigation Preferences. Fast Navigation can be turned on to save time moving around to different tasks and areas of the database. Save yourself a few button clicks and get to where you need to go quickly!
Action Button in search results
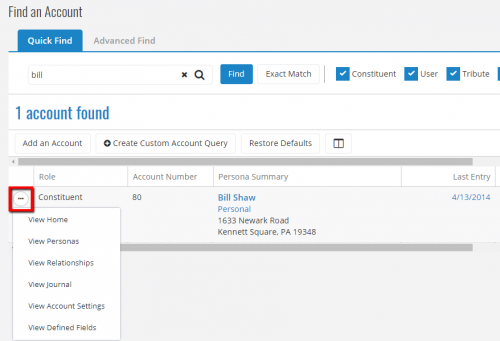
On the search results page, use the dotted menu icon in the far left column and you will see a list of the pages of their Account that you can navigate to, like Home, Personas, Relationships, etc…“Save And” drop down menu
When you save your work on any page of the account you can choose your next action. You could move to a different page or even add a journal entry after saving your work. But did you know that this drop-down menu can actually be customized to fit your needs? Click the gear icon to the right of the drop-down menu to make changes and eTapestry will remember your selections for that page. This is a user preference just for your account.Data Entry
Quick Add
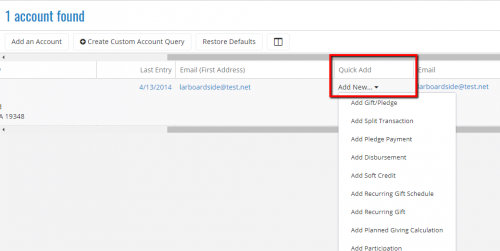
You can add a gift by using the Quick Add menu directly on the search results page. If you don’t have this selection in your columns you can add it by clicking the choose columns button. The types of entries listed in the Quick Add menu will vary depending on the account role. For example, Constituents have all journal entry options but Users and Tributes are limited to non-transaction entries.Quick Actions Tile
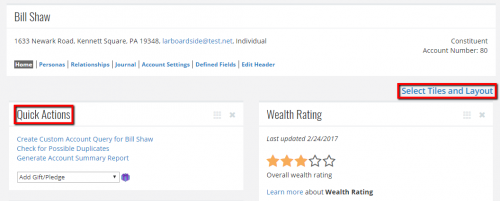
The Quick Actions tile can be added to the home page of any account and provides some shortcuts for common tasks and useful actions. You can quickly check for possible duplicates, generate an account summary report, or add a journal.- Add this by clicking Select Tiles and Layouts then Quick Actions under My Database. This is a user preference, so other users will need to do the same thing if they want to see the tile too
- Once you add this feature to any account’s home page it will appear on all accounts for your user account.
Quick Gift Entry
Click Giving > Add a Gift or Pledge to access the Quick Gift Entry. This feature allows you to enter gifts and pledges without navigating to each account or having to wait for items to save. The previous transaction is saved in the background as you work on entering the next transaction. If you’re entering a lot of gifts after an event you can also use the default options.
- Set as Quick Entry Default: To use the defaults for your current eTapestry session, click this button. Quick entry defaults clear when you log out of the program.
- Set Permanent Defaults: To leave the defaults in place after you log out of the program, click this button.
- Clear Defaults: To clear defaults, click this button.
If the account has any outstanding pledges, those will appear in the Pledge Information section. If you want to make a payment instead of add a gift, click on the paperclip icon to the left of the Pledge.
I hope you can incorporate these shortcuts into your daily work and save some time along the way. Do you have any tips on saving time while working in eTapestry? Share in the comments below!
News
ARCHIVED | Blackbaud eTapestry® Tips and Tricks
10/17/2017 12:00pm EDT


Leave a Comment