Early Decision is coming soon! Check your Transcript setup!
Published
Soon it will be time to send out mid-year transcripts for students who are applying for early decision. It is a good time to review transcripts to see what is currently set up and ensure you are ready for the beginning of the transcript season.
Each new school year, the school needs to setup transcript columns and choose which grades should display on the transcript. The End of Year process does not rollover the columns and grades that were used last year.
To see what is set up on the school's transcripts for 2015-2016, as a Grading Manager go to onRecord > Performance > Transcript Builder and you will see a transcript or a list of transcripts.
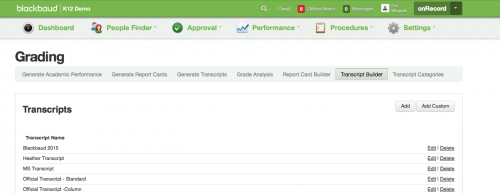
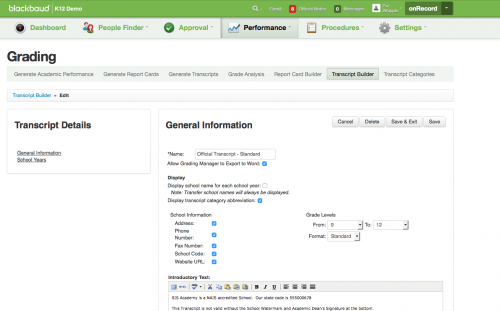
Across from the transcript name, click on Edit and you will land in General Information. Review the information that is entered and/or selected on this screen to make sure it is up to date.
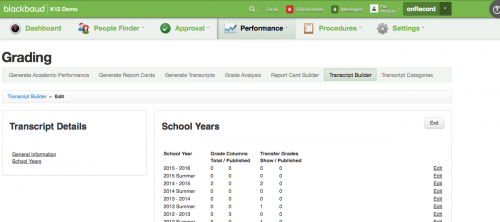
Once you have finished reviewing General Information, on the left hand side, under Transcript Details, click on School Years. You will land on a screen that lists out the school years.
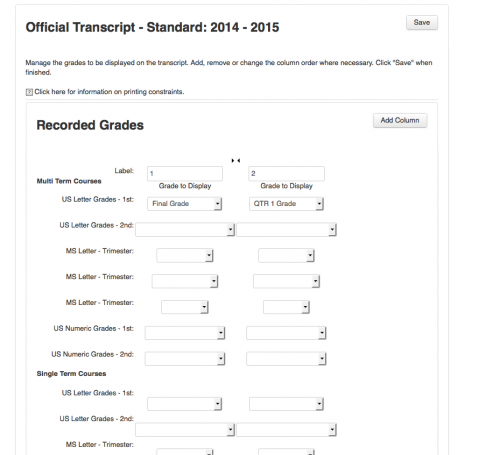
Start by clicking the Edit link across from last year 2014-2015 and take a screenshot so you can use it as a reference when adding columns nad selecting grades for the 2015-2016 school year.
Next close out of the 2014-2015 screen and click Edit across from the school year 2015-2016. If the school has not made any grading changes and the screen selections match what is selected in 2014-2015 then you are all set.
However, if the screen does not have any columns or the columns do not have any grades selected, then continue reading this article.
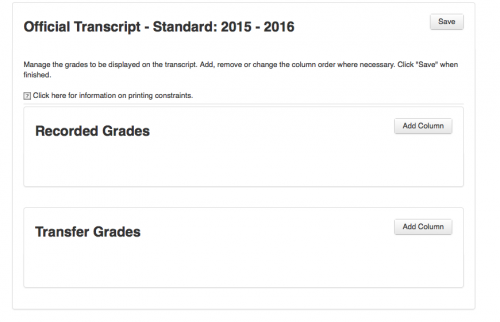
The Recorded Grades section represents grades that are recorded by teachers of a Grading Manager through our system. Transfer Grades represents grades that have been added in our system by a Grading Manager through onRecord > Procedures > Grading > Manage Grades > Grades & Credits - Transfer or through a historical grade import.
When you add a column for Recorded Grades, the system will ask you for a Label name. The Label name is for the column header that appears above the grades on the transcript. If you add a column name and you want to make a change later on, you can do so at any time. Once you enter in a Label name, the system's next screen will show you the column with the Label name.
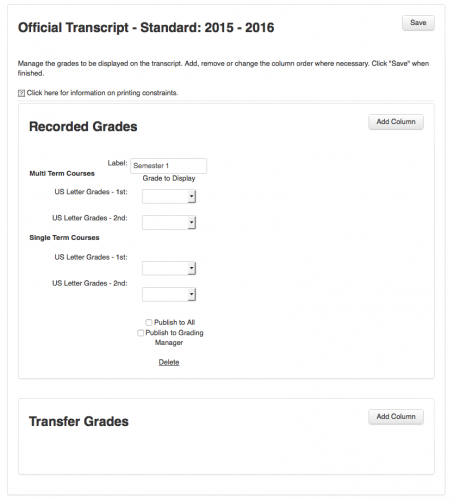
Under the Label name, you will see two bold names: Multi Term Courses and Single Term Courses. Below these headers you will see the name of your grade plan groups, then a dash and the name of the term. In the example above, we see the grade plan group name: US Letter Grades with a dash and then 1st which represents US Letter Grades that were recorded for 1st Semester.
If the column label shows Semester 1, you will want to choose a grade from the grade plan group name, US Letter Grades - 1st for both Multi Term Courses as well as Single Term Courses. For schools that do not have single term courses you do not have to choose a grade for Single Term Courses.
When you click on the dropdown, across from the grade plan group name such as US Letter Grades, you will see a list of the grade descriptions that pull from the grade plan. If you do not see the name of a grade description listed in the dropdown, as a Grading Manager go to onRecord > Settings > Grading > Grade Plans and check to see if the grade description has Include on Transcsript Builder set to Yes.
Once you have selected the grades you would like to display, then at the bottom of the column you will see two checkboxes: Publish to All and Publish to Grading Manager. If only the Grading Manager sees transcripts then you just want to check the checkbox for Publish to Grading Manager. However if your school allows Parents, Students of Faculty to see transcripts then you will also want to check the Publish to All checkbox.
The Publish to All checkbox does not singularly control whether or not Parents, Students or Faculty can see the transcript. The role task for View Transcripts needs to be enabled as well. As a Platform Manager this can be checked through Core > Users/Access > Profile > Manage Roles.
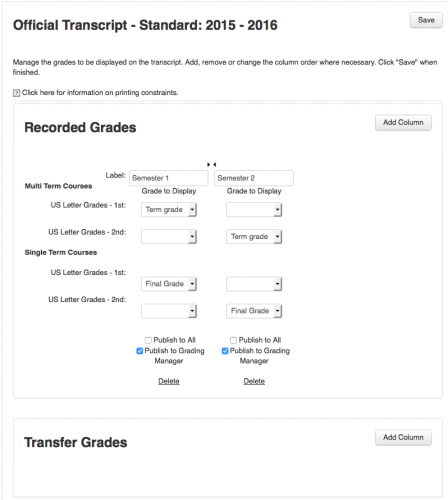
The last part to review is Transfer Grades. If last year's transcript included transfer grades then you want to click on the Add Column button across from Transfer Grades.
The screen that appears will look similar to what you see for Recorded Grades. The one difference is below the Label field you will see a checkbox for Final Grade.

Schools can include two types of transfer grades on a transcript. The first are term grades such as Semester 1 and Semester 2 or a school can include a Final Grade for the course. To include term grades leave the Final Grade checkbox unchecked. To include just a final grade then check off the Final Grade checkbox. Keep in mind, transfer grades do need to be included in our system in order for them to appear on the transcript.
Remember once you have added the column and clicked Save & Exit, make sure to check off Publish to Grading Manager and/or Publish to All then click on Save at the top of the screen.
Now that you have your transcript setup as a Grading Manager go on onRecord > People Finder and look up a student that would have grades associated with the transcript.
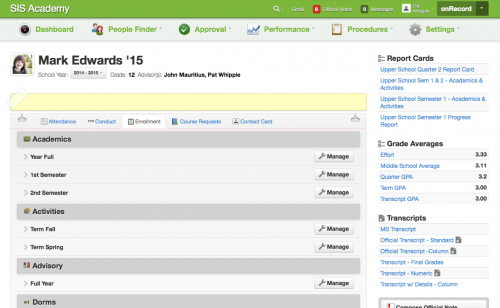
When you have the student pulled up, on the right hand side of the screen, you will see the transcript name. Click on the transcript name and this will pull up the transcript for you to review. Some of the transcripts may have an icon to the right of the name. This is an indication that a Grading Manager can export this transcript to Word and/or view as a PDF.
As a Grading Manager it is also possible to pull transcripts in bulk through onRecord > Performance > Generate Transcripts.

Across from the transcript name, click on Edit and you will land in General Information. Review the information that is entered and/or selected on this screen to make sure it is up to date.

Once you have finished reviewing General Information, on the left hand side, under Transcript Details, click on School Years. You will land on a screen that lists out the school years.

Start by clicking the Edit link across from last year 2014-2015 and take a screenshot so you can use it as a reference when adding columns nad selecting grades for the 2015-2016 school year.

Next close out of the 2014-2015 screen and click Edit across from the school year 2015-2016. If the school has not made any grading changes and the screen selections match what is selected in 2014-2015 then you are all set.
However, if the screen does not have any columns or the columns do not have any grades selected, then continue reading this article.

The Recorded Grades section represents grades that are recorded by teachers of a Grading Manager through our system. Transfer Grades represents grades that have been added in our system by a Grading Manager through onRecord > Procedures > Grading > Manage Grades > Grades & Credits - Transfer or through a historical grade import.
When you add a column for Recorded Grades, the system will ask you for a Label name. The Label name is for the column header that appears above the grades on the transcript. If you add a column name and you want to make a change later on, you can do so at any time. Once you enter in a Label name, the system's next screen will show you the column with the Label name.

Under the Label name, you will see two bold names: Multi Term Courses and Single Term Courses. Below these headers you will see the name of your grade plan groups, then a dash and the name of the term. In the example above, we see the grade plan group name: US Letter Grades with a dash and then 1st which represents US Letter Grades that were recorded for 1st Semester.
If the column label shows Semester 1, you will want to choose a grade from the grade plan group name, US Letter Grades - 1st for both Multi Term Courses as well as Single Term Courses. For schools that do not have single term courses you do not have to choose a grade for Single Term Courses.
When you click on the dropdown, across from the grade plan group name such as US Letter Grades, you will see a list of the grade descriptions that pull from the grade plan. If you do not see the name of a grade description listed in the dropdown, as a Grading Manager go to onRecord > Settings > Grading > Grade Plans and check to see if the grade description has Include on Transcsript Builder set to Yes.
Once you have selected the grades you would like to display, then at the bottom of the column you will see two checkboxes: Publish to All and Publish to Grading Manager. If only the Grading Manager sees transcripts then you just want to check the checkbox for Publish to Grading Manager. However if your school allows Parents, Students of Faculty to see transcripts then you will also want to check the Publish to All checkbox.
The Publish to All checkbox does not singularly control whether or not Parents, Students or Faculty can see the transcript. The role task for View Transcripts needs to be enabled as well. As a Platform Manager this can be checked through Core > Users/Access > Profile > Manage Roles.

The last part to review is Transfer Grades. If last year's transcript included transfer grades then you want to click on the Add Column button across from Transfer Grades.
The screen that appears will look similar to what you see for Recorded Grades. The one difference is below the Label field you will see a checkbox for Final Grade.

Schools can include two types of transfer grades on a transcript. The first are term grades such as Semester 1 and Semester 2 or a school can include a Final Grade for the course. To include term grades leave the Final Grade checkbox unchecked. To include just a final grade then check off the Final Grade checkbox. Keep in mind, transfer grades do need to be included in our system in order for them to appear on the transcript.
Remember once you have added the column and clicked Save & Exit, make sure to check off Publish to Grading Manager and/or Publish to All then click on Save at the top of the screen.
Now that you have your transcript setup as a Grading Manager go on onRecord > People Finder and look up a student that would have grades associated with the transcript.

When you have the student pulled up, on the right hand side of the screen, you will see the transcript name. Click on the transcript name and this will pull up the transcript for you to review. Some of the transcripts may have an icon to the right of the name. This is an indication that a Grading Manager can export this transcript to Word and/or view as a PDF.
As a Grading Manager it is also possible to pull transcripts in bulk through onRecord > Performance > Generate Transcripts.
News
ARCHIVED | K-12 Announcements
10/01/2015 3:22pm EDT

Leave a Comment