
Teacher Recommendations - Highly Recommended
What are these recommendation forms things that showed up in my system?
When did they get added?
How do they work?
I am glad you asked….
The Teacher Recommendations feature was added with the August release. The system now has the ability for you to attach a recommendation form on specific checklist steps. That form can be sent by the candidate directly to the teacher from within the system. The teacher will fill the form out and submit back to the school directly where you will be able to process it and check the step off as complete.
It is tough to test since there are 3 different users that all have work to do here. I am going to walk thru the 4 different parts of the process for you to hopefully answer any initial questions you may have.
Part 1: Setting up the checklist step for recommendations
Go to onBoard, Settings, Checklist. Open an existing checklist or create a new one. The main change here is that there is now a new type called “Recommendation” that can be selected on any checklist step.
Once we designate that this checklist step is a recommendation step there is a bit more work to do in this area.
Mark Yes to allow Candidate Publishing Options and more settings will be available.

This is where you can attach the recommendation form that will be sent to the teacher. Any file type that they can edit, add comments or sign can be sent. Just attach any file here as if you were sending that to the teacher via email.
Click the option to Allow Recommendation Request to open the last section of settings and we are done with Step 1.
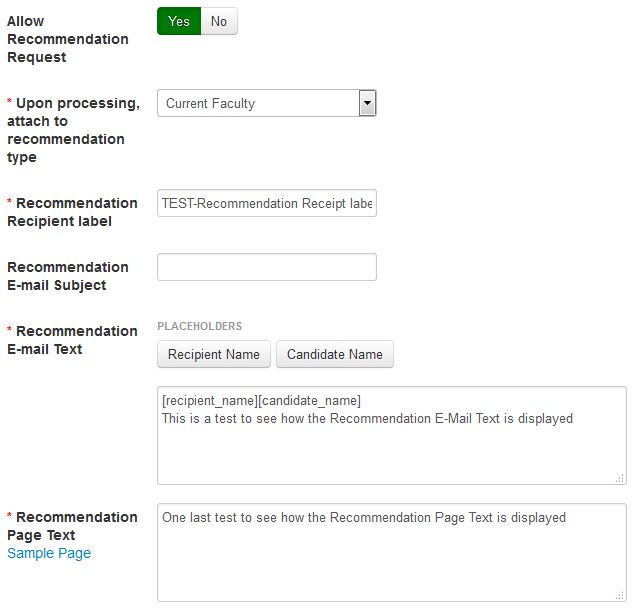
These settings deal with the format of the email and other various notification settings. Keep an eye out in the later screenshots to see exactly where these headings come into play.
Part 2: Sending the recommendation form to the teachers by the candidate
The checklist is now setup to include the recommendation form. The next action is on the candidate so let’s jump over to that side to see what they will be looking at. Any candidate that has the checklist we just edited will be able to see the option. The candidate will see the checklist item and an option to start the process.
Click start to begin the process and we will see some of our configured settings show up.

Once this is filled out it is time click Send Request and move to step 3.

Part 3: The teacher fills out the form and submits
The teacher or whoever the recipient is will get an email sent their way with instructions on how to complete and submit. They can either complete the form or decline if they wish.
Mr. Gallo did enjoy having this student in class so he definitely wants to fill the form out. Clicking the accept link will open a window where the teacher can download the form and upload it once it is complete.

The File Download link allows the teacher to download the document to their local machine. They should then be able to fill out the form and upload it back to the Completed File section.
Click Submit to send it back to the school.

What will the Candidate see on their record once this part is done?

Part 4: Process the submission and complete the checklist step
We are now back where we started in onBoard. Go to the Dashboard and we will have File Submissions showing to be processed.
In the File Submissions section we will see the form that was just submitted.

The checklist item needs to be toggled to Completed and we can print the form from here if needed. If we are good to go we can just click to Process.

The form has been sent.
The form has been submitted.
The checklist step is now Completed.
Thank you for reading and I hope this article helps to clear up any initial questions you may have.
Leave a Comment