DID YOU KNOW? - FIMS Tips - Article One
Published
Welcome to the first in a series of blog posts entitled “Did You Know?” We will be calling out specific features of FIMS with an explanation of how they work as well as providing a short video demonstration. Let’s get started!
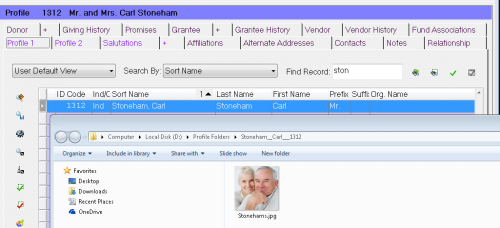
This first “Did you Know” article applies to everyone that is using a locally installed version of FIMS. Did you know you can drag a copy of an electronic file directly into a Profile folder?
First, make sure that you have the appropriate Profile record highlighted/selected in the data grid. This links the Profile Folder button to that profile record. You can then drag a copy of an electronic document from any location on your workstation, including any local or mapped network drives into the folder. Simply click on the document and drag over to the Profile folder icon. You will notice that when your cursor hovers over the Profile folder that a little plus is displayed. Let go of the mouse and you will now have a copy of that document in the Profile folder. You can also use this same method for dragging electronic documents into Fund Folders.

Click below to see a short demonstration.
How do I set up and use the Profile and Fund Folders in FIMS? (KB Article 24495)
Profile and Fund Folder buttons (located on the Profile and Fund toolbars respectively) give you easy access to documents and files stored in their associated Windows folders for Profiles or Funds (e.g. copies of correspondence sent, reports, emails, photographs, scanned newspaper clippings, etc.). You can also store Fund Statements and a scanned copy of the Fund Agreement for easy access.
To start using these folders, follow these instructions:
This first “Did you Know” article applies to everyone that is using a locally installed version of FIMS. Did you know you can drag a copy of an electronic file directly into a Profile folder?
First, make sure that you have the appropriate Profile record highlighted/selected in the data grid. This links the Profile Folder button to that profile record. You can then drag a copy of an electronic document from any location on your workstation, including any local or mapped network drives into the folder. Simply click on the document and drag over to the Profile folder icon. You will notice that when your cursor hovers over the Profile folder that a little plus is displayed. Let go of the mouse and you will now have a copy of that document in the Profile folder. You can also use this same method for dragging electronic documents into Fund Folders.

Click below to see a short demonstration.
How do I set up and use the Profile and Fund Folders in FIMS? (KB Article 24495)
Profile and Fund Folder buttons (located on the Profile and Fund toolbars respectively) give you easy access to documents and files stored in their associated Windows folders for Profiles or Funds (e.g. copies of correspondence sent, reports, emails, photographs, scanned newspaper clippings, etc.). You can also store Fund Statements and a scanned copy of the Fund Agreement for easy access.
To start using these folders, follow these instructions:
- Go to Windows Explorer and create a folder on either the server or another shared drive that all of your users can access.
- Create a subfolder under this main folder for your Fund information and another for your Profile information.(Or just create one folder for Profiles and one for Funds.)
- In FIMS, go to Tools > System Utilities > System Options.
- In the Section column choose Funds; in the Option column choose “Explore_Dir”: then click Browse and navigate to the Fund directory you set up.
- In the Section column choose Profiles; in the Option column choose “Explore_Dir”: then click Browse and navigate to the Profile directory you set up.
- In the Profile module, go to a Profile you want to have a folder for, then click the Profile Folder button on the toolbar.
- The first time you click that button for Profile, a folder will be created as a sub-folder underneath the main Profile folder.
- Each time you click on the button, it will open an Explorer window showing you the contents of the folder.
- The same happens for the Fund Folders.
- The Grants Module has an additional sub-folder system under the Profile Folder system specifically for Grant Applications.
- If you are in Applications, Application History, or Conditions, you can click on the Profile Folder button, a sub-folder will be created for that particular Application in this folder.
- You can save, move or copy documents and other files into the folders through normal methods as you would for any Windows folder.Once there, you’ll be able to access them easily from FIMS by clicking on the Profile or Fund folder button for a particular Profile or Fund.
News
ARCHIVED | Blackbaud Grantmaking™ Tips and Tricks
06/08/2016 11:53am EDT

Leave a Comment