DID YOU KNOW? - FIMS Tips - Article Five
Published
Welcome to the fifth article in a series of blog posts entitled “Did You Know?” If you are new to this series we will be calling out specific features of FIMS with an explanation of how they work. In this article we will be discussing the Field Encryption Tool.
Field Encryption
FIMS 12.8 added the ability to encrypt selected fields within your database. This allows access to selected fields to be limited to specific users and prevent unauthorized access to these fields.
There are 5 standard fields initially available:
NOTE: In addition to five fields listed, any FieldMaker fields you have created that contain character data can be encrypted also.
Configuring Encryption
There are two parts to configuring encryption within your system:
1. Defining the permissions
2. Selecting fields to encrypt
Defining Permissions
This is configured by using the Encryption Permissions screen which can be found by going to Tools > System Utilities > Admin Utilities > Encryption Utilities > Encryption Permissions.
You will also want to limit access to this menu option within the FIMS permissions.
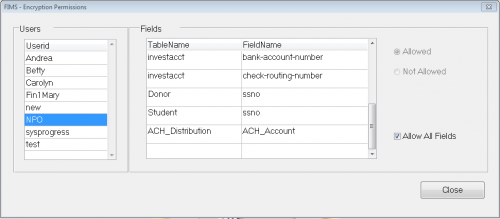
The following is the FIMS – Encryption Permissions screen:

For each user, you can check the box that says Allow all Fields to allow them to view the values for all fields, or select each field and choose Allowed or Not Allowed.
Selecting Fields to Encrypt
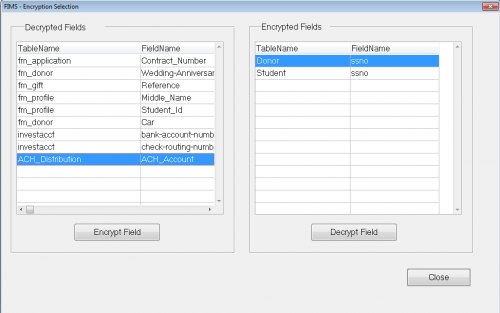
This functionality is used to actually perform the encryption on the data within your database. It is found on the menus by going to Tools > System Utilities > Admin Utilities > Encryption Utilities > Encryption Selection.

On the left side of the screen, select the fields you want to encrypt and then press the Encrypt Field button. This will run the encryption routine on all records within the database for the table.
Once the field has been processed, it will move to the right side.
Encrypted fields can be decrypted by selecting them on the right and clicking the Decrypt Field button. Once processed, the field will be moved back to the left side.
NOTE: To Encrypt or Decrypt fields, the user must have the Allow permission in the Encryption Permissions screen.
Encrypted Field Example
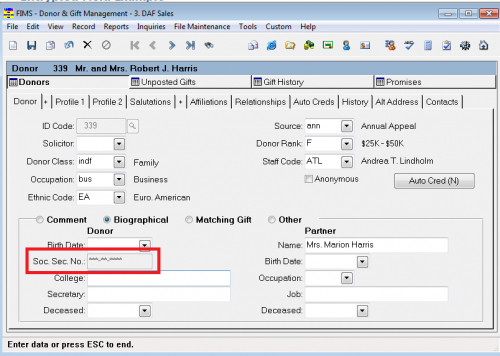
In the example below, the user does not have permission to see the Soc.Sec.No. field on the donor record, so it appears as asterisks.

A user who does have access would be able to see the social security number.
NOTES:
FIMS 12.8 added the ability to encrypt selected fields within your database. This allows access to selected fields to be limited to specific users and prevent unauthorized access to these fields.
There are 5 standard fields initially available:
- Social security number for donors
- Social security number for students
- ACH account number
- Bank account number
- Check routing number
NOTE: In addition to five fields listed, any FieldMaker fields you have created that contain character data can be encrypted also.
Configuring Encryption
There are two parts to configuring encryption within your system:
1. Defining the permissions
2. Selecting fields to encrypt
Defining Permissions
This is configured by using the Encryption Permissions screen which can be found by going to Tools > System Utilities > Admin Utilities > Encryption Utilities > Encryption Permissions.
You will also want to limit access to this menu option within the FIMS permissions.
The following is the FIMS – Encryption Permissions screen:

For each user, you can check the box that says Allow all Fields to allow them to view the values for all fields, or select each field and choose Allowed or Not Allowed.
Selecting Fields to Encrypt
This functionality is used to actually perform the encryption on the data within your database. It is found on the menus by going to Tools > System Utilities > Admin Utilities > Encryption Utilities > Encryption Selection.

On the left side of the screen, select the fields you want to encrypt and then press the Encrypt Field button. This will run the encryption routine on all records within the database for the table.
Once the field has been processed, it will move to the right side.
Encrypted fields can be decrypted by selecting them on the right and clicking the Decrypt Field button. Once processed, the field will be moved back to the left side.
NOTE: To Encrypt or Decrypt fields, the user must have the Allow permission in the Encryption Permissions screen.
Encrypted Field Example
In the example below, the user does not have permission to see the Soc.Sec.No. field on the donor record, so it appears as asterisks.

A user who does have access would be able to see the social security number.
NOTES:
- Encrypted fields will not display in reports.
- For people with permission, data in encrypted fields will be visible in the actual inquiry screens.
- For people without permission, data in encrypted fields will be replaced by asterisks.
News
ARCHIVED | Blackbaud Grantmaking™ Tips and Tricks
09/14/2016 1:11pm EDT

Leave a Comment