Hello! I am happy to share an updated version of my Adaptive Card for Event Check-in using the Multi-Card Interface with updated Trigger file below.
Original post:
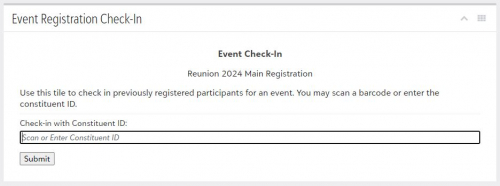
I'm sharing the adaptive card that I created to streamline Event check-in. We used it successfully at reunion a few weeks ago. We pre-printed the name badges that display a small QR code on them, via our third-party event registration software (Entegy). When a participant arrives to check in, we pull their badge, scan the QR code directly into the adaptive card, and click “Submit” to mark the participant as Attended. No typing in a name or searching a list, and certainly no printed lists with pen marks to enter in later…!
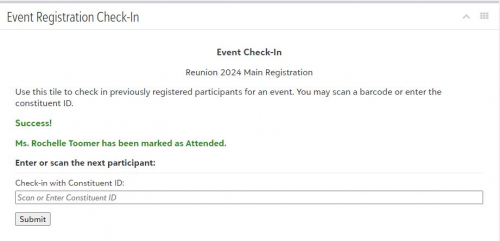
Description: This adaptive card displays as a tile on any Event record in NXT. The user can scan or type in a constituent ID and click Submit to mark a registered participant as “attended” in the Event record. New: If successful, the Adaptive Card will let you know the name of the attendee that was checked in and the text box will clear so you're ready to check-in the next participant.
Notes: The add-in will only check-in full constituents already registered as participants for an event. It will not check-in non-constituent guest participants, though the flow could easily be adapted to use participant ID instead of constituent ID.
Using a QR code (with 2D scanner) is overkill for a simple ID number. Instead, you can create a barcode (like 3 of 9) and use a 1D barcode scanner with this method. Our event registration software generates the badges with QR codes for us, and we like the aesthetic, so we rolled with it.
Required connections:
- SKY Developer Account with Application
- Blackbaud Raisers Edge NXT Constituents
- Blackbaud Raisers Edge NXT Events
- Blackbaud Raisers Edge NXT
- Blackbaud SKY Add-ins
- Suggested skill level required to use this template: Intermediate
- Category: Automation, Data Management
- Instructions:
This adaptive card requires two Power Automate flows to run, and you will need to make an update to each flow for your environment.
1) Update the Showcase - Participant Attended Button Trigger:
- Update the Application ID to your environment’s Application ID.
- Click Save
- After a successful save, Copy the URL of the flow that was generated in the first step/HTTP call
2) Update the Showcase - Event Check-in SKY card:
- Update the Application ID to your environment’s Application ID.
- Open up “Compose Adaptive Card JSON” and scroll to the bottom, where the “Action.Webrequest” Submit button is handled. Paste the copied URL from the Trigger flow, above, between the quotes.
- Click Save
- After a successful save, Copy the URL of the flow that was generated in the first step/HTTP call. This SKY card URL is used to build the URL to add to the application.
3) Build the URL for your SKY application: Blackbaud SKY Add-in URL Builder
In step #2 choose “Event Tile Dashboard”
In step #4 choose “Adaptive card”
In step #5 paste the URL for Showcase- Event Check-in SKY card
In step #6 choose “No”
In step #7 choose “Tile”
As previous community members have mentioned, Ben Lambert's two blog posts, Data Entry with Adaptive Cards (part 1) and Data Entry with Adaptive Cards (part 2), were incredibly helpful!
I also found Dan Snyder’s Proposal Entry Adaptive Card YouTube video (from a previous bbdevdays) very helpful! https://www.youtube.com/watch?v=wfTT6GK1Z2w&t=407s
Thank you both for the fantastic content.
Screenshots:
Update:
Attached Files
Showcase-EventCheck-inSKYcard_20240626141406.zip
Trigger file updated 7/1/2024: Showcase-ParticipantAttendedButtonTrigger_20240701185951.zip