Table Entry Dropdowns In Adaptive Cards
Learn how to build a table entry dropdown in an Adaptive Card.Adaptive Cards are great for presenting read-only informational content, but they can also be interactive with rich data fields for capturing input from users.
In this post, I’ll demonstrate a technique for building a table entry dropdown in an Adaptive Card (and we’ll use this technique as part of a broader scenario in the next blog post, so stay tuned!).
One of the more interesting examples you can find on the gallery of samples on the Adaptive Card website is the Inputs with validation sample. This sample demonstrates the various input controls that are supported by the Adaptive Card framework, including simple text fields, URLs, email/phone fields, numeric fields, date/time fields, checkboxes, and selection fields. Dropdown fields (like you find within the Blackbaud interface) are known as “choice sets” in Adaptive Cards and are represented by "type": "Input.ChoiceSet" in the card definition (you can read the documentation for the ChoiceSet schema element here).
ChoiceSets can be rendered differently by a host application depending on a few other properties defined – you can produce a list of checkboxes (multi-select), radio buttons (style = expanded), or (what we’re interested in here) a dropdown select field (style = compact). In each case, the card author must define the available choices presented to the end-user as part of the card definition.
A simple example of a ChoiceSet looks like this:

For this demo, I’ll build a dropdown of constituent title codes (of course, this technique can be used for any code table). I'll be using Power Automate to build the card definition, but as mentioned in my previous blog posts this tool isn't a requirement just a means to an end.
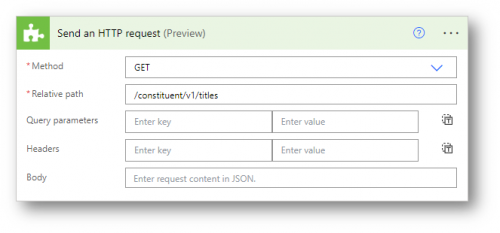
I'll start by using the Send an HTTP request action to fetch the table entries for the Title code table (using the ListTitles endpoint in the Raiser's Edge NXT Constituent SKY API):

(side note - this is needed because we don't currently expose the various code table endpoints as connector actions directly. Technically, the endpoints are included in the connectors in order to support a good user experience for other connector actions in the designer, they are just marked as "Internal" to minimize the signal-to-noise because there are so many code tables within the system)
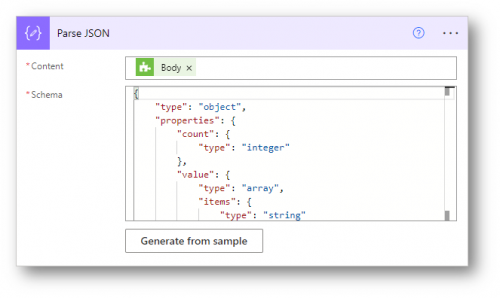
Next, I'll use the built-in Parse JSON action to parse the response into a JSON object:

I used the Generate from sample button to generate the schema from the sample response on the endpoint reference page for the ListTitles endpoint. Here is the resulting schema:

Most SKY APIs are built to accept the table entry “description” (ex: “Mr.”) instead of the internal table entry identifier (ex: “1211”) to keep things simple for consumers. So, while choice sets support both title and value concepts, we won’t need to make use of the identifier.
Visually, this step converts the string array response from the backend:
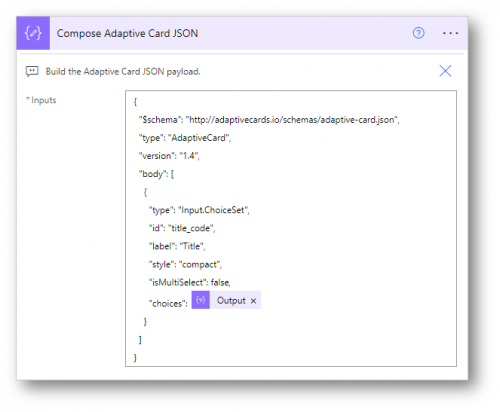
The Select action produces the JSON shape that defines the choices for a ChoiceSet, and you can reference the object array when building the card:

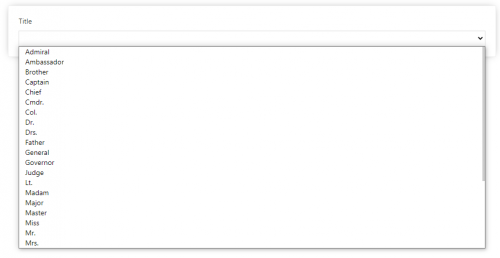
In the UI, the card shows a dropdown of values from the titles code table:

That's all!
To summarize - in this post I showed how to use the Send an HTTP request, Parse JSON, and Select actions to fetch and project table entries from SKY API into choices for an Adaptive Card ChoiceSet field. In the next post, we'll see an example of this technique in building an Adaptive Card that recreates an existing data entry form in the Blackbaud user interface.
I hope this is helpful, please let us know if you have any questions!
In this post, I’ll demonstrate a technique for building a table entry dropdown in an Adaptive Card (and we’ll use this technique as part of a broader scenario in the next blog post, so stay tuned!).
One of the more interesting examples you can find on the gallery of samples on the Adaptive Card website is the Inputs with validation sample. This sample demonstrates the various input controls that are supported by the Adaptive Card framework, including simple text fields, URLs, email/phone fields, numeric fields, date/time fields, checkboxes, and selection fields. Dropdown fields (like you find within the Blackbaud interface) are known as “choice sets” in Adaptive Cards and are represented by "type": "Input.ChoiceSet" in the card definition (you can read the documentation for the ChoiceSet schema element here).
ChoiceSets can be rendered differently by a host application depending on a few other properties defined – you can produce a list of checkboxes (multi-select), radio buttons (style = expanded), or (what we’re interested in here) a dropdown select field (style = compact). In each case, the card author must define the available choices presented to the end-user as part of the card definition.
A simple example of a ChoiceSet looks like this:
For a given host application, this would be rendered as:
{
  "type": "Input.ChoiceSet",
  "id": "color",
  "label": "Favorite color",
  "style": "compact",
  "isMultiSelect": false,
  "choices": [
    {
      "title": "Red",
      "value": "1"
    },
    {
      "title": "Green",
      "value": "2"
    },
    {
      "title": "Blue",
      "value": "3"
    }
  ]
}

For this demo, I’ll build a dropdown of constituent title codes (of course, this technique can be used for any code table). I'll be using Power Automate to build the card definition, but as mentioned in my previous blog posts this tool isn't a requirement just a means to an end.
I'll start by using the Send an HTTP request action to fetch the table entries for the Title code table (using the ListTitles endpoint in the Raiser's Edge NXT Constituent SKY API):

(side note - this is needed because we don't currently expose the various code table endpoints as connector actions directly. Technically, the endpoints are included in the connectors in order to support a good user experience for other connector actions in the designer, they are just marked as "Internal" to minimize the signal-to-noise because there are so many code tables within the system)
Next, I'll use the built-in Parse JSON action to parse the response into a JSON object:

I used the Generate from sample button to generate the schema from the sample response on the endpoint reference page for the ListTitles endpoint. Here is the resulting schema:
Next, I used the built-in Select action to create a projection of the array of strings into an array of objects, where both title and value properties have the same value (the table entry item itself).
{
  "type": "object",
  "properties": {
    "count": {
      "type": "integer"
    },
    "value": {
      "type": "array",
      "items": {
        "type": "string"
      }
    }
  }
}

Most SKY APIs are built to accept the table entry “description” (ex: “Mr.”) instead of the internal table entry identifier (ex: “1211”) to keep things simple for consumers. So, while choice sets support both title and value concepts, we won’t need to make use of the identifier.
Visually, this step converts the string array response from the backend:
…to an object array:
[
  "Mr.",
  "Mrs.",
  "Ms.",
  "Dr."
...
]
(Note: one gotcha to be aware of from reading the schema docs is that you can't use a comma in the value property, so if any of your table entries have a comma in them you'll have to resort to some trickery to get them to play nicely with this framework, for example maybe replace "," with "|" or some other unlikely character and then reverse engineer that later on to get the actual table entry value to use)
[
  {
    "title": "Mr.",
    "value": "Mr."
  },
  {
    "title": "Mrs.",
    "value": "Mrs."
  },
  {
    "title": "Ms.",
    "value": "Ms."
  },
  {
    "title": "Dr.",
    "value": "Dr."
  },
  ...
]
The Select action produces the JSON shape that defines the choices for a ChoiceSet, and you can reference the object array when building the card:

In the UI, the card shows a dropdown of values from the titles code table:

That's all!
To summarize - in this post I showed how to use the Send an HTTP request, Parse JSON, and Select actions to fetch and project table entries from SKY API into choices for an Adaptive Card ChoiceSet field. In the next post, we'll see an example of this technique in building an Adaptive Card that recreates an existing data entry form in the Blackbaud user interface.
I hope this is helpful, please let us know if you have any questions!
3
Categories
- All Categories
- 6 Blackbaud Community Help
- 209 bbcon®
- 1.4K Blackbaud Altru®
- 395 Blackbaud Award Management™ and Blackbaud Stewardship Management™
- 1.1K Blackbaud CRM™ and Blackbaud Internet Solutions™
- 15 donorCentrics®
- 359 Blackbaud eTapestry®
- 2.5K Blackbaud Financial Edge NXT®
- 646 Blackbaud Grantmaking™
- 563 Blackbaud Education Management Solutions for Higher Education
- 3.2K Blackbaud Education Management Solutions for K-12 Schools
- 934 Blackbaud Luminate Online® and Blackbaud TeamRaiser®
- 84 JustGiving® from Blackbaud®
- 6.4K Blackbaud Raiser's Edge NXT®
- 3.7K SKY Developer
- 243 ResearchPoint™
- 118 Blackbaud Tuition Management™
- 165 Organizational Best Practices
- 238 The Tap (Just for Fun)
- 33 Blackbaud Community Challenges
- 28 PowerUp Challenges
- 3 (Open) Raiser's Edge NXT PowerUp Challenge: Product Update Briefing
- 3 (Closed) Raiser's Edge NXT PowerUp Challenge: Standard Reports+
- 3 (Closed) Raiser's Edge NXT PowerUp Challenge: Email Marketing
- 3 (Closed) Raiser's Edge NXT PowerUp Challenge: Gift Management
- 4 (Closed) Raiser's Edge NXT PowerUp Challenge: Event Management
- 3 (Closed) Raiser's Edge NXT PowerUp Challenge: Home Page
- 4 (Closed) Raiser's Edge NXT PowerUp Challenge: Standard Reports
- 4 (Closed) Raiser's Edge NXT PowerUp Challenge: Query
- 779 Community News
- 2.9K Jobs Board
- 53 Blackbaud SKY® Reporting Announcements
- 47 Blackbaud CRM Higher Ed Product Advisory Group (HE PAG)
- 19 Blackbaud CRM Product Advisory Group (BBCRM PAG)


