Conditional Formatting your Exports in Excel
Published
Full disclosure: I am an Excel nerd.
That said, there are so many quick and easy tips and tricks for Excel that can take a list of meh to a list of YEAH! One of those is to export your lists and apply conditional formatting to any field of interest.

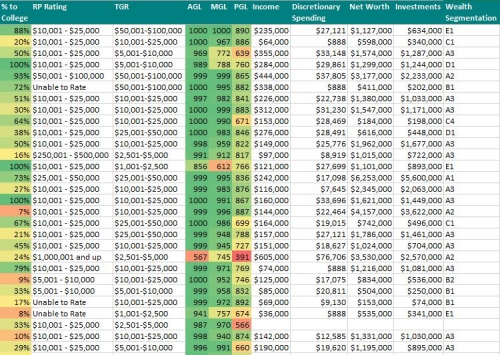
Say, for instance, you want to run a travel list of prospects to see if there is anyone worth contacting in a particular area. Go ahead and run the list by whatever criteria you're looking for, but apply conditional formatting to the rows of interest. In this case, I exported their scores for likelihood to make an Annual, Major, or Planned Gift (AGL, MGL, and PGL, respectively.) I also applied conditional formatting to the percentage of giving the prospect has made toward the college the development director is affiliated with.

In this case, what we want to see are the prospects with the highest scores in green, those mid-range in a yellow, and those with the worst scores in red. We also wanted to quickly see which prospects were most supportive of the college affiliated with the development director.
Note - the conditional formatting will apply to the entire range you select, so you should apply the formatting to each column separately (most of the time.)
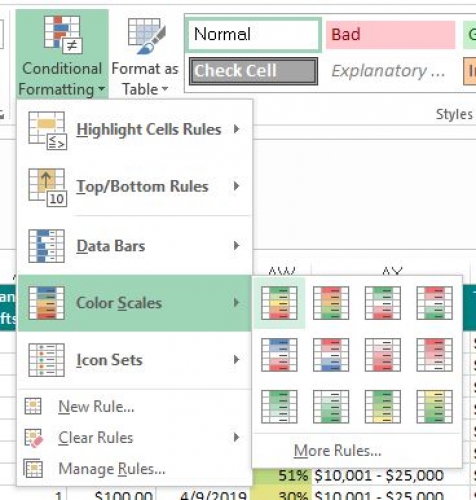
In this case, I selected the first column - AGL - and then selected the Conditional Formatting button on the Home tab of Excel. I chose the Color Scale option and then the Green Yellow Red color scale, that appears first in the line-up.

Boom. Two clicks and I'm done. I then repeated the process for the MGL and PGL columns and this made it easy to see how my list was stacking up. It makes list prospecting so much easier to just look for the green and it only took you a handful of clicks.
There are a lot of other options once you dive into things like Managing your Rules, but this is a great first step (and sometimes the only step) toward becoming an Excel(lent) Wizard!

That said, there are so many quick and easy tips and tricks for Excel that can take a list of meh to a list of YEAH! One of those is to export your lists and apply conditional formatting to any field of interest.

Say, for instance, you want to run a travel list of prospects to see if there is anyone worth contacting in a particular area. Go ahead and run the list by whatever criteria you're looking for, but apply conditional formatting to the rows of interest. In this case, I exported their scores for likelihood to make an Annual, Major, or Planned Gift (AGL, MGL, and PGL, respectively.) I also applied conditional formatting to the percentage of giving the prospect has made toward the college the development director is affiliated with.

In this case, what we want to see are the prospects with the highest scores in green, those mid-range in a yellow, and those with the worst scores in red. We also wanted to quickly see which prospects were most supportive of the college affiliated with the development director.
Note - the conditional formatting will apply to the entire range you select, so you should apply the formatting to each column separately (most of the time.)
In this case, I selected the first column - AGL - and then selected the Conditional Formatting button on the Home tab of Excel. I chose the Color Scale option and then the Green Yellow Red color scale, that appears first in the line-up.

Boom. Two clicks and I'm done. I then repeated the process for the MGL and PGL columns and this made it easy to see how my list was stacking up. It makes list prospecting so much easier to just look for the green and it only took you a handful of clicks.
There are a lot of other options once you dive into things like Managing your Rules, but this is a great first step (and sometimes the only step) toward becoming an Excel(lent) Wizard!

News Tips, Tricks, and Timesavers!
05/02/2019 1:04pm EDT


Leave a Comment