How To Create and Run GPA Calculations


As the end of the year approaches and many of you are preparing report cards and transcripts, you may have questions about GPA’s. What is a GPA and how do I create it? How do I know if my GPA is right?
A GPA is the numeric measure of a student’s average performance in all graded courses. One great resource we have on defining GPA calculations is our Knowledgebase article called How to define GPA calculations. GPA calculations can vary from school to school and there are many options available for setting up your calculations.
Before defining GPA calculations a few things need to be verified:
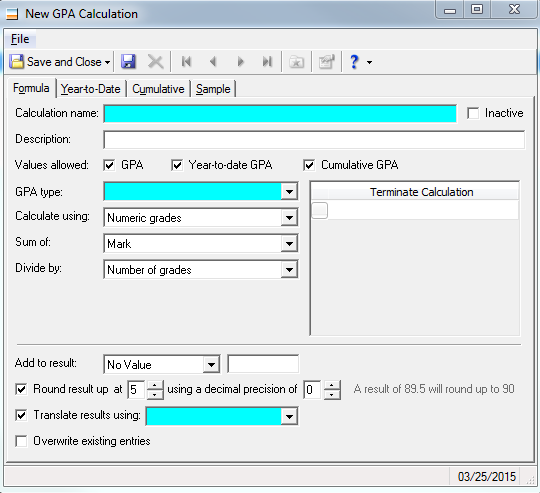
Calculation Name: This will be a name of your choice. Example: Weighted GPA.
Values allowed: Select which values we want calculated in this GPA calculation.
Note: After a Calculation is run for a value, the checkbox of the value is disabled in Values allowed
GPA type: Select one of the GPA types created in Configuration. This will be the name you will associate with course records and the translation table.
Calculate using: This determines what values to translate marking column grades into. Numeric grades uses only numeric grades and translates any non-numeric grades to numeric equivalents according to the translation table. GPA equivalents will translate numeric and letter grades to the GPA equivalent on the translation table for the selected GPA type.
Sum of: Select the formula to use when summing up marking column grades for the calculation. Mark is the marking column grade. Weight is entered for the GPA type on the Grading tab of course records. Attempted Credit is the amount of attempted credits on grade records for the marking column. Earned credit is the amount of credits the student is actually awarded in the marking column.
Divide by: Select which option to divide the sum by.
Terminate calculation: We can set up the calculation to not return a result for a student if a certain grade value is encountered, such as an Incomplete or No Grade.
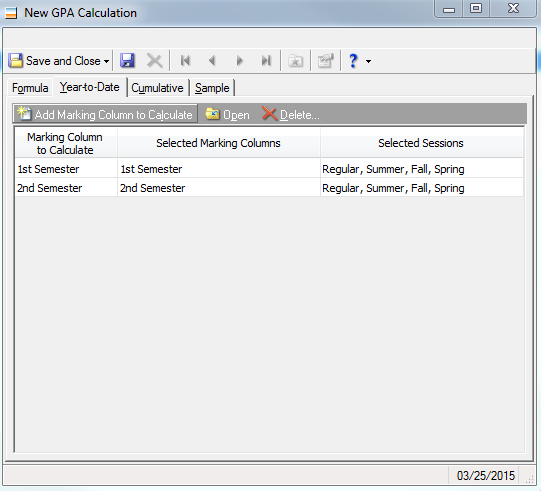
Year-to-Date Tab:
Choose to show the GPA for that academic year for multiple marking columns. For example, YTD GPA would show the GPA of classes for both 1st and 2nd semester.
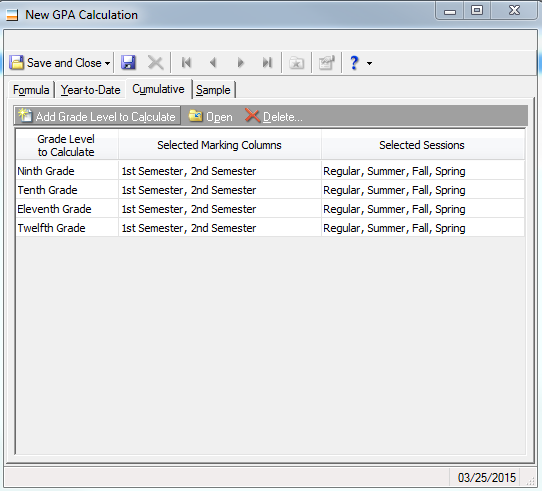
Cumulative Tab:
Choose to show the GPA for multiple academic years. This will take the GPAs calculated for marking columns in previous academic years and average them in with the current GPA value to provide a comprehensive look at student’s GPA during their school career.
After creating your GPA calculation, check out your calculation! Sample allows us to see an example of how GPA’s will be calculated based on the settings we established earlier. If you see something that doesn't look right, we can go back and fix it to get that perfect GPA calculation!
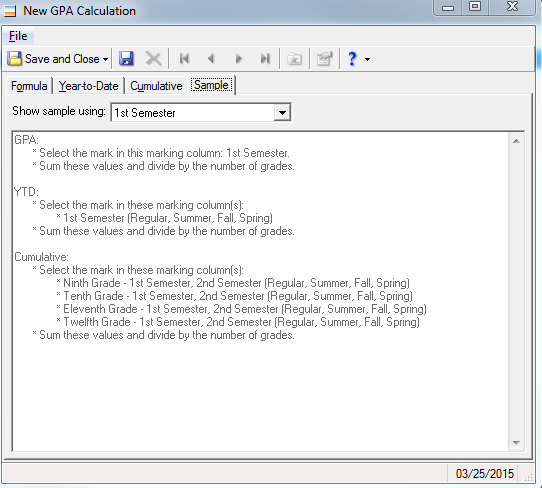
Note: You can delete a GPA calculation at any time, but this deletes all associated calculated GPAs. You can make a GPA calculation inactive instead.
Now that we have created our GPA calculation, we are almost ready to run! But first:
Want to run for just one student or perhaps just one grade level? Select the filters tab and choose the drop-down for Selected in order to run the calculations for a particular group of students. We can also choose to include a query!
It’s important to note that running the GPA calculation will populate the students’ record with that GPA for the particular marking column. If we have already run GPA calculations for a marking column and edit the calculation, we will want to re-run the calculation for students to update the record with the new calculation, as changes will not retroactively change the GPA value on the student record.
It’s always wise to run the Preprocessing Report before actually clicking Calculate Now when running GPA calculations for students in order to preview the GPA’s before adding or updating them on student records.

Unsure if the calculation seems correct? Mark the checkbox for Show calculations for each student. This will allow us to see exactly what grades went in to the calculation, what their GPA equivalents are, and how they were added and divided.
Running your GPA calculations and still not seeing the correct results? Check out our Knowledgebase article How to troubleshoot incorrect GPAs for more tips on getting those GPA’s all set!
Happy Calculating!
Have any questions? Leave a comment below!
A GPA is the numeric measure of a student’s average performance in all graded courses. One great resource we have on defining GPA calculations is our Knowledgebase article called How to define GPA calculations. GPA calculations can vary from school to school and there are many options available for setting up your calculations.
Before defining GPA calculations a few things need to be verified:
- Create GPA types in Configuration > Tables > GPA. Example: Weighted, Unweighted
- Confirm you have defined marking columns
- If GPA’s are weighted, determine how to award weight

Calculation Name: This will be a name of your choice. Example: Weighted GPA.
Values allowed: Select which values we want calculated in this GPA calculation.
Note: After a Calculation is run for a value, the checkbox of the value is disabled in Values allowed
GPA type: Select one of the GPA types created in Configuration. This will be the name you will associate with course records and the translation table.
Calculate using: This determines what values to translate marking column grades into. Numeric grades uses only numeric grades and translates any non-numeric grades to numeric equivalents according to the translation table. GPA equivalents will translate numeric and letter grades to the GPA equivalent on the translation table for the selected GPA type.
Sum of: Select the formula to use when summing up marking column grades for the calculation. Mark is the marking column grade. Weight is entered for the GPA type on the Grading tab of course records. Attempted Credit is the amount of attempted credits on grade records for the marking column. Earned credit is the amount of credits the student is actually awarded in the marking column.
Divide by: Select which option to divide the sum by.
Terminate calculation: We can set up the calculation to not return a result for a student if a certain grade value is encountered, such as an Incomplete or No Grade.
Year-to-Date Tab:
Choose to show the GPA for that academic year for multiple marking columns. For example, YTD GPA would show the GPA of classes for both 1st and 2nd semester.

Cumulative Tab:
Choose to show the GPA for multiple academic years. This will take the GPAs calculated for marking columns in previous academic years and average them in with the current GPA value to provide a comprehensive look at student’s GPA during their school career.

After creating your GPA calculation, check out your calculation! Sample allows us to see an example of how GPA’s will be calculated based on the settings we established earlier. If you see something that doesn't look right, we can go back and fix it to get that perfect GPA calculation!

Note: You can delete a GPA calculation at any time, but this deletes all associated calculated GPAs. You can make a GPA calculation inactive instead.
Now that we have created our GPA calculation, we are almost ready to run! But first:
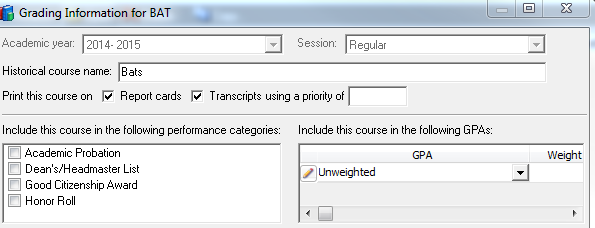
- Are the GPA’s associated with the course? We can check this by going into the Course Record grading tab and pulling up the Academic Year. Here, we will want to make sure that the GPA is listed in order to include the grades from this course in the calculation. Note: This pulls from the GPA type we established when creating the calculation.
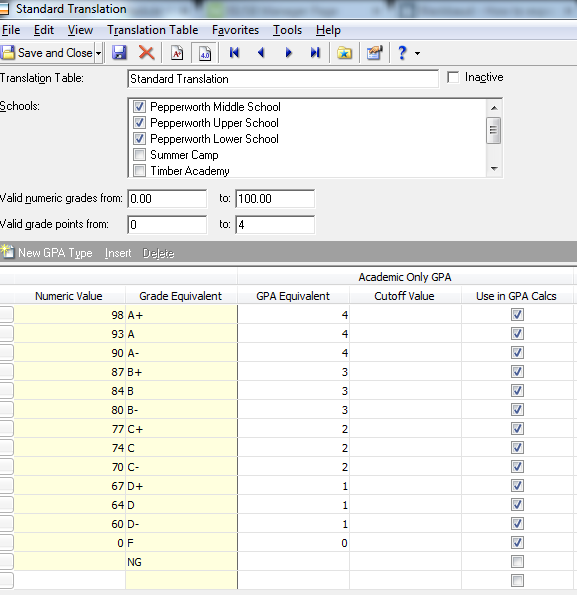
- Are translation tables set up to include this GPA Calculation? We can check this in Configuration>Registrar Setup> Translation Table. We will open the Translation table(s) and select the GPA view. Here, you will want to make sure our GPA type has been marked to be included in GPA calculations and has a corresponding GPA equivalent.


Want to run for just one student or perhaps just one grade level? Select the filters tab and choose the drop-down for Selected in order to run the calculations for a particular group of students. We can also choose to include a query!
It’s important to note that running the GPA calculation will populate the students’ record with that GPA for the particular marking column. If we have already run GPA calculations for a marking column and edit the calculation, we will want to re-run the calculation for students to update the record with the new calculation, as changes will not retroactively change the GPA value on the student record.
It’s always wise to run the Preprocessing Report before actually clicking Calculate Now when running GPA calculations for students in order to preview the GPA’s before adding or updating them on student records.

Unsure if the calculation seems correct? Mark the checkbox for Show calculations for each student. This will allow us to see exactly what grades went in to the calculation, what their GPA equivalents are, and how they were added and divided.
Running your GPA calculations and still not seeing the correct results? Check out our Knowledgebase article How to troubleshoot incorrect GPAs for more tips on getting those GPA’s all set!
Happy Calculating!
Have any questions? Leave a comment below!
0
Categories
- All Categories
- 6 Blackbaud Community Help
- 209 bbcon®
- 1.4K Blackbaud Altru®
- 395 Blackbaud Award Management™ and Blackbaud Stewardship Management™
- 1.1K Blackbaud CRM™ and Blackbaud Internet Solutions™
- 15 donorCentrics®
- 359 Blackbaud eTapestry®
- 2.5K Blackbaud Financial Edge NXT®
- 646 Blackbaud Grantmaking™
- 563 Blackbaud Education Management Solutions for Higher Education
- 3.2K Blackbaud Education Management Solutions for K-12 Schools
- 934 Blackbaud Luminate Online® and Blackbaud TeamRaiser®
- 84 JustGiving® from Blackbaud®
- 6.4K Blackbaud Raiser's Edge NXT®
- 3.7K SKY Developer
- 243 ResearchPoint™
- 118 Blackbaud Tuition Management™
- 165 Organizational Best Practices
- 238 The Tap (Just for Fun)
- 33 Blackbaud Community Challenges
- 28 PowerUp Challenges
- 3 (Open) Raiser's Edge NXT PowerUp Challenge: Product Update Briefing
- 3 (Closed) Raiser's Edge NXT PowerUp Challenge: Standard Reports+
- 3 (Closed) Raiser's Edge NXT PowerUp Challenge: Email Marketing
- 3 (Closed) Raiser's Edge NXT PowerUp Challenge: Gift Management
- 4 (Closed) Raiser's Edge NXT PowerUp Challenge: Event Management
- 3 (Closed) Raiser's Edge NXT PowerUp Challenge: Home Page
- 4 (Closed) Raiser's Edge NXT PowerUp Challenge: Standard Reports
- 4 (Closed) Raiser's Edge NXT PowerUp Challenge: Query
- 779 Community News
- 2.9K Jobs Board
- 53 Blackbaud SKY® Reporting Announcements
- 47 Blackbaud CRM Higher Ed Product Advisory Group (HE PAG)
- 19 Blackbaud CRM Product Advisory Group (BBCRM PAG)