A Day in the Life of Accounts Payable
Within The Financial Edge NXT we can currently complete the majority of tasks in Accounts Payable. We have the ability to add a vendor and add an invoice. After adding this information in NXT we can then approve and pay invoices and finally post depending on the work flow of your organization.
While the majority of the content in NXT is the same as the database view but with a great new user interface, there are a few new features that make a day in the life of Accounts Payable much easier!
Adding a Vendor Record
Let’s start with adding a Vendor record. While most of these might already exist in your database, when new vendors come up we can add them in NXT. To complete this we will log into NXT, select Payables on the menu bar, and then Vendors below this.
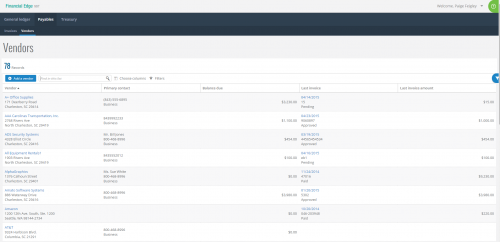
Here we will select the “add a vendor” button. All of the fields will be the same as in Financial Edge 7 but rather than tabs we will see the information divided into tiles. We can expand or collapse each tile using the grey arrows on the far right. Here we will add general, address, 1099, and custom field information as well as payment defaults and default distribution.

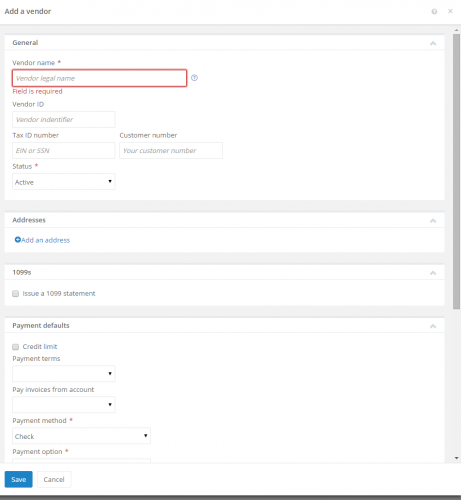
There are a few new features for the Vendor record in Financial Edge NXT. Attributes have been renamed to custom fields. These will pull from the same attributes you have setup in the database view. Within Financial Edge NXT 1099 distribution requirements have been updated and the 1099 box number is now required. This is a great update and will eliminate a lot of end of year issues due to incorrect 1099 distribution and 1099 tracking.
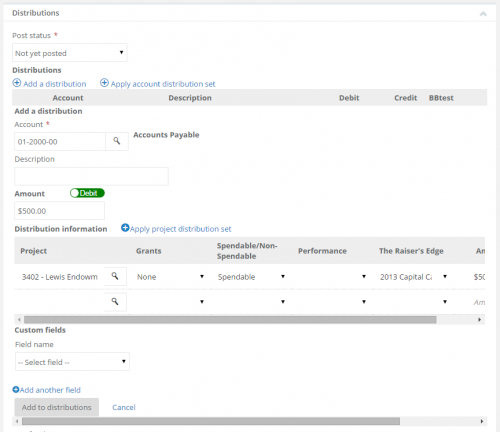
We have two options to add default distribution. This area of Financial Edge NXT will look very different than in the database view. We can add the distribution manually or use a distribution set. It is very important to select the “add to distributions” button to save the distribution with each option. To apply an account distribution set we can follow these steps:
- Choose the apply account distribution set option from the default distribution tile
- Select a distribution set from the drop down menu (these pull from Financial Edge database view in Configuration> Distributions)
- Select apply to distributions
- In the Vendor record select add a distribution on the default distributions tile.
- Enter the account number in the account field.
- Add a description to the line item.
- Enter an amount in the amount field.
- If Project, Grant, and Transaction Codes are used enter these in the Distribution Information fields.
- If Custom Fields are used select one from the drop down menu below field name.
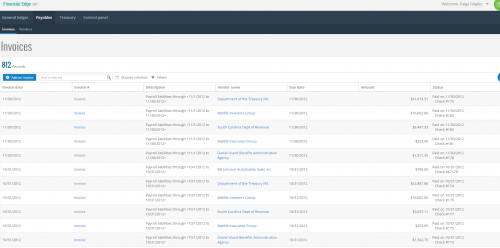
Within Financial Edge NXT we will go to Payables and select Invoices to view and add invoices. Here we will see a list of all invoices, we can search and filter within this list to find specific invoices. To create a new invoice we will select the blue “add an invoice” button.

Invoices will have the same setup as vendor records in that each tab from the database view is organized into a tile in Financial Edge NXT. If fields are required for your invoices you will see an asterisk next to the field. We have the option on the general tile to add a new vendor or search for an existing one by typing the name in the vendor field. Another great addition to Financial Edge NXT is the option to copy invoices from a previous invoice on the general tile. The invoices shown here will be based on the vendor you choose. If you need to create the same invoice as one currently in your database you can select the invoice here. The data from the previous invoice will populate but you can edit any of the fields.
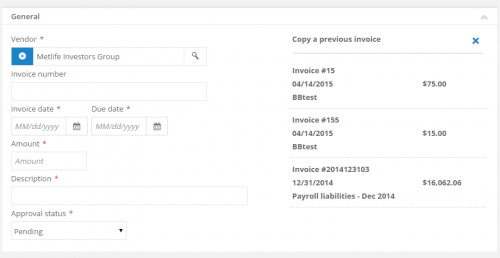
If we are entering a new invoice and do not need to copy one we can close out of the copy a previous invoice section and continue filling out the other fields. On the general tile we will enter the vendor name, invoice date, due date, amount, description, and approval status. Next we will define the payment details and invoice distribution. We will have the same options to add distribution as we did on the vendor record- manually or by using an account distribution set.
To add invoice distribution manually:
- In the invoice select add a distribution on the Distributions tile.
- Enter the account number in the Account field.
- Add a description to the line item.
- Enter an amount in the amount field.
- If Project, Grant, and Transaction Codes are used enter these in the Distribution Information fields.
- If Custom Fields are used select one from the drop down menu below field name.
- Select Add to distributions to save the distribution for this invoice.

If we select this option we will be able to enter the 1099 box number, state, and amount. You will also see a warning that the vendor does not receive a 1099 statement. This is another great feature that will reduce tracking incorrect 1099 activity.


Next we can apply any unapplied credit memos for this vendor. If there are not any credit memos we will see the message, “no credit available”. However, if there are credit memos we will see the credit memos listed and an option to mark to apply the credit memo. When we mark the option to apply the amount will move to the credit applied field and the credit applied amount will show below this.

The next tile will be used to add discounts the same way as in Financial Edge 7, if we do not need to add any discounts to the invoice we can leave this field blank.


The final tile on an invoice record will be the custom fields. These are the same as attributes in the database view. Here we will select the field name from the drop-down menu.


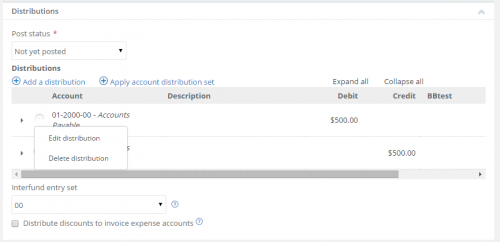
After filling out all of the required information on the invoice record we can select save or save and new to add this invoice to the database. If we need to go back and edit any distribution applied to the invoice we can complete this in the distributions tile. We will first select to edit the invoice. Next we will select the ellipsis icon and then select edit distribution. Here we will see the same window we did when adding distribution. We can make the appropriate changes and select save.

Once the invoice is saved in Financial Edge NXT we can approve, pay, and post within Financial Edge. In the future this part of the Accounts Payable process will be completed in Financial Edge NXT from start to finish!


Leave a Comment