How to find and correct 1099 activity
Published
It’s time to process 1099’s and you're stomped as to where to begin. The good news is we've got this covered.
First thing's first, generate a list of Vendors marked as 1099 Vendors and see their associated amounts.
There are two ways to review 1099 Vendor Activity:
A. The 1099 Activity Report 
B. Create a 1099 Activity Query (click the link to see detailed steps and a short video)
Now that the reports are run and you've identified all of your 1099 Vendors you notice that they are showing incorrect 1099 amounts. Don’t fret, there is an easy fix.
How to correct 1099 activity:
Finally, to prevent this from happening again next tax season take the appropriate steps to configure your Vendor 1099 information.
How to Configure Vendor's 1099 information:
First thing's first, generate a list of Vendors marked as 1099 Vendors and see their associated amounts.
There are two ways to review 1099 Vendor Activity:
A. The 1099 Activity Report
- In Accounts Payable > Click on Reports
- Click on Vendor Reports> Run the 1099 Activity Report

B. Create a 1099 Activity Query (click the link to see detailed steps and a short video)
- In Accounts Payable > Click on Query
- Create a new Vendor/ Dynamic Query
- To see a list of only 1099 Vendors paid a certain amount over a period of time expand the Vendor menu and double click 1099 Vendor. Select equals in the Operator field and “Yes” in the value field. Click Okay. If you want to see a list of all Vendors, not just 1099 Vendors, skip to step 3.
- Still on the Criteria tab expand Summary and Select Total Payment Amount.
- In the Edit Field Criteria screen select Greater than or equal to as the Operator and enter an amount in the Value Field. Click Okay. While still on the Edit Field Criteria screen select the Filter tab and select Payment date with an Operator of between. Enter the Start and End dates. Click Okay. To filter out checks with a status of Voided select Voided? With an Operator of equals “No”. Click Okay.
- Select the Output tab> Select fields to include in the results
Now that the reports are run and you've identified all of your 1099 Vendors you notice that they are showing incorrect 1099 amounts. Don’t fret, there is an easy fix.
How to correct 1099 activity:
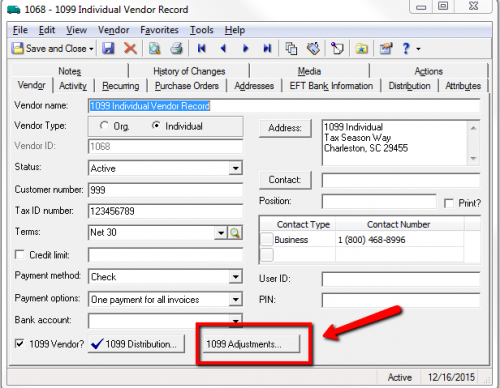
- If there are vendors with activity above the box minimums that do not appear on the 1099 Activity Report, adjust the amounts on the Vendor record.

- Once the 1099 amounts are correct on all vendor records, exit and sign out of the program and sign back in.
- Review all information that prints to the 1099 Activity Report.
- After year-end, when all information is confirmed, print your 1099s
Finally, to prevent this from happening again next tax season take the appropriate steps to configure your Vendor 1099 information.
How to Configure Vendor's 1099 information:
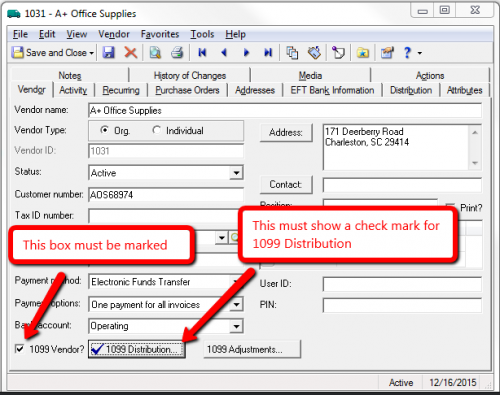
- Confirm the Vendor is setup as a 1099 Vendor and has default 1099 Distribution,

- Once this has been setup all future Invoices will be subject to 1099 Distribution as specified by the 1099 box. Please note that this box is only a default and be adjusted manually on each invoice.
News ARCHIVED | Financial Edge® Tips and Tricks
12/20/2015 11:12am EST

Leave a Comment