Using The Account Distribution Report To Reconcile General Ledger


As the fiscal year’s end draws near it is common for many organizations to begin the process of reconciling Blackbaud CRM to the General Ledger. Many organizations use query as a tool to group transactions in similar accounts or as a reporting tool, but it is important to note that there are some limitations that need to be highlighted. Queries are used to group records that meet a set of criteria as defined by the user, but they don’t always have access to the whole picture. When a posted transaction has adjustments it is important to know how the query tool will act.
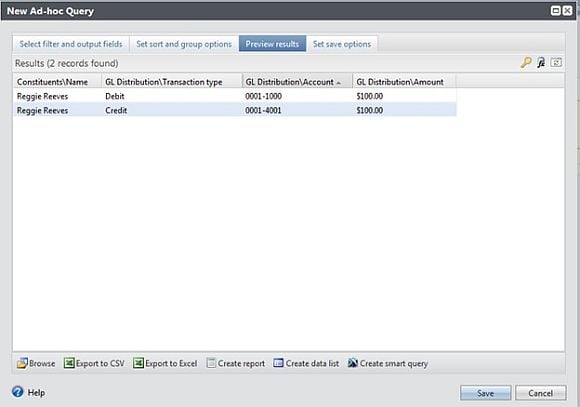
The query tool allows us to pull the current distribution of a transaction. In the following example, the debit and credit of a specific revenue transaction are displayed for a posted transaction:
After saving an adjustment on the posted transaction the query now displays the following results:
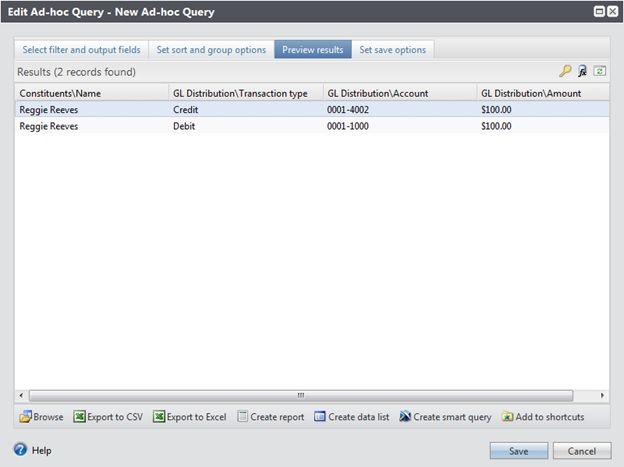
Note that the new distribution is displayed. There are no entries for the original accounts or the reversals. A query of the distribution on a transaction will only show the current distribution. The values for the reversal and the original distribution are stored in tables that are not available for the Revenue query view.
Query is a valuable and powerful tool, but it is important to be cognizant of the limitations. Users attempting to reconcile Blackbaud CRM to the General Ledger are encouraged to use the Account Distribution Report. The Account Distribution Report provides a breakdown by General Ledger account that includes the adjustments and reversals, giving users a complete view of the account’s activity. The Revenue user guide details the steps to run this report. To view this report you can follow these steps:
The query tool allows us to pull the current distribution of a transaction. In the following example, the debit and credit of a specific revenue transaction are displayed for a posted transaction:

After saving an adjustment on the posted transaction the query now displays the following results:

Note that the new distribution is displayed. There are no entries for the original accounts or the reversals. A query of the distribution on a transaction will only show the current distribution. The values for the reversal and the original distribution are stored in tables that are not available for the Revenue query view.
Query is a valuable and powerful tool, but it is important to be cognizant of the limitations. Users attempting to reconcile Blackbaud CRM to the General Ledger are encouraged to use the Account Distribution Report. The Account Distribution Report provides a breakdown by General Ledger account that includes the adjustments and reversals, giving users a complete view of the account’s activity. The Revenue user guide details the steps to run this report. To view this report you can follow these steps:
- From Revenue, click Account distribution under Reports. Or, from Analysis, click Revenue reports and then Account distribution.
- In the Account system field, select the account system for the transactions you want to view. This field only appears if your organization configures multiple general ledger account systems and implements site security, and you have rights to work with multiple account systems.
- To select the GL accounts to include, click Include and select All, Specific, or Selected. If you select Specific or Selected, in the field that appears, search for GL accounts to include in the report.
- To select the transaction types to include, click the search button in the Transaction types field. The Transaction types screen appears where you can select one or more transaction types. When you select transactions types, you limit the report results to only the transaction types you select. By default, all transaction types are included unless you use this filter. From this screen, you can click Select all to choose all transaction types and Deselect all to include none. Examples of transaction types include pledges, refunds, and payments.
- In the Post date field. select a specific time period of post dates to include. If you select “Specific Date,” the From and To fields appear where you can enter a specific period of time.
- In the Post status, select the post status of the transactions to include. You can include posted or not posted transactions, or both. Note: Transactions with a post status of “Do not post” do not generate general ledger distributions and are excluded from the Account Distribution Report.
- To display the report in both summary and detail format, select Include detail. To view the report in summary format only, do not select Include detail. Warning: If you filter the report using a small amount of criteria or no criteria at all, and you select to view the report in detail, a message may appear alerting you that results exceed the capacity of the report. In this case, we recommend you filter by smaller segments of activity, such as post date, specific accounts, or specific transaction types.
- To group the report by account alias, select Group by account alias. If you do not select this option, the report is grouped by GL account.
- With Multicurrency, the Currency field appears. Use this field to determine how you want to view transaction amounts in the report. “Base” is the base currency of the associated account system. “Organization” is the organization currency, and “Transaction” is the revenue’s transaction currency. When you add revenue, the program calculates and stores the base currency and organization currency amounts, along with the original transaction currency amount. When you switch currencies on the report, the amounts displayed are the original currency amounts calculated when the transactions were added.
- Click View Report.
- To close the report and return to the previous page, on the shell toolbar, click Back.

0
Categories
- All Categories
- 6 Blackbaud Community Help
- 209 bbcon®
- 1.4K Blackbaud Altru®
- 394 Blackbaud Award Management™ and Blackbaud Stewardship Management™
- 1.1K Blackbaud CRM™ and Blackbaud Internet Solutions™
- 15 donorCentrics®
- 359 Blackbaud eTapestry®
- 2.5K Blackbaud Financial Edge NXT®
- 646 Blackbaud Grantmaking™
- 563 Blackbaud Education Management Solutions for Higher Education
- 3.2K Blackbaud Education Management Solutions for K-12 Schools
- 934 Blackbaud Luminate Online® and Blackbaud TeamRaiser®
- 84 JustGiving® from Blackbaud®
- 6.4K Blackbaud Raiser's Edge NXT®
- 3.7K SKY Developer
- 243 ResearchPoint™
- 118 Blackbaud Tuition Management™
- 165 Organizational Best Practices
- 238 The Tap (Just for Fun)
- 33 Blackbaud Community Challenges
- 28 PowerUp Challenges
- 3 (Open) Raiser's Edge NXT PowerUp Challenge: Product Update Briefing
- 3 (Closed) Raiser's Edge NXT PowerUp Challenge: Standard Reports+
- 3 (Closed) Raiser's Edge NXT PowerUp Challenge: Email Marketing
- 3 (Closed) Raiser's Edge NXT PowerUp Challenge: Gift Management
- 4 (Closed) Raiser's Edge NXT PowerUp Challenge: Event Management
- 3 (Closed) Raiser's Edge NXT PowerUp Challenge: Home Page
- 4 (Closed) Raiser's Edge NXT PowerUp Challenge: Standard Reports
- 4 (Closed) Raiser's Edge NXT PowerUp Challenge: Query
- 779 Community News
- 2.9K Jobs Board
- 53 Blackbaud SKY® Reporting Announcements
- 47 Blackbaud CRM Higher Ed Product Advisory Group (HE PAG)
- 19 Blackbaud CRM Product Advisory Group (BBCRM PAG)