Smart Tuition: Using The Integration As A Payer


Missed any of the previous parts of this series? Catch up here with Spreadsheet Enrollment and then the administrator experience.
Just like the streamlined contract creation for onBoard managers, Smart Tuition also merges two annual processes into one streamlined workflow. Families no longer need to enroll at their school through the “ON” products, then enroll in Smart Tuition for payment processing.
Using a Smart Family ID, users first accept an onBoard enrollment contract from the school, then the responsible signers go through to accept and finalize the contract.
Finding the contract. After logging in to the “ON” Products, a banner across the top displays a message that notifies you of any contracts that need to be reviewed. Select the link in the banner to go to the contract.
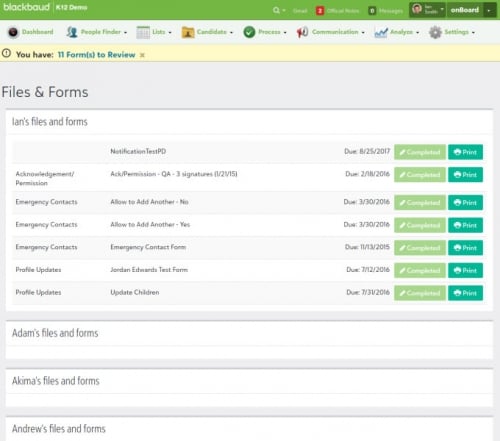
Alternatively, you can also select Files & Forms from under your profile name to see a complete list of contracts. Better yet, each contract also displays a status, such as Pending, Review, Continue, and Completed to let you quickly know where each one is within the process.
All about Smart Family Accounts. When a Smart-enabled contract is selected, the integration automatically detects whether or not you already have Smart Family Account set up. If an account exists, you’re taken to the first available section of the contract.
If an account doesn’t exist, a decision needs to be made:
- If you’ve previously used Smart Tuition, you can then enter your Smart login credentials to link the accounts.
- If you don’t have a pre-existing Smart Account, you should then select No. A new Smart Family Account will be automatically provisioned after the contract is submitted.
 https://www.youtube.com/watch?v=lqZbxaAZEqg
Manage your billing information. When going through a Smart-enabled contract, your Home address information is automatically added to the Payment section. Payment Plan details can also be selected from here, and you can enter information to use the payment method of choice.
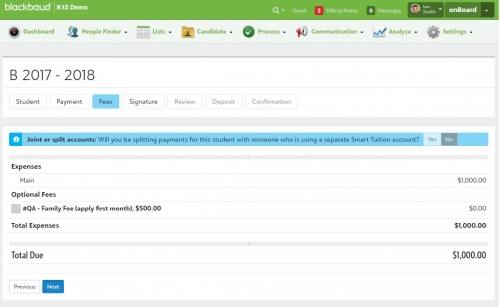
Viewing your fees. The Fee screen of the contract displays all expenses for which you are paying. This section covers everything from Tuition, Required, Optional, and Enrollment Fees. If the school offers Financial Aid, you can select it here as well.
It’s also from here that the account can be split with someone else, using a separate Smart Tuition account. Select Yes from the banner at the top of this section to enable a split account or No to remain as a joint account with a second payer. Whatever the decision, the second payer sees a message that they are getting added to existing account or that they need to set up their own account.
Add your eSignature and Review. After all information has been entered, an eSignature needs to be added to confirm that everything entered previously is correct. Before moving to the review screen, if any piece of information is incorrect or missing, the field in question is highlighted in red, along with its location in the contract. Before you can continue, all issues must first be corrected.Deposits and confirmation. Any details required to make your first required payment are finalized through the Deposit section. Starting on December 13, 2017, schools can also enable In-School Payments for Smart Tuition contracts, which enable families make deposits and pay enrollment fees offline.
If you’re looking for more details on working with Smart Tuition as an administrator, make sure to visit our help page. Next week is release week for the K-12 “ON” Products so make sure to join me for a look at what’s new in Update 12.13. As always, thanks for reading!
Categories
- All Categories
- 6 Blackbaud Community Help
- 209 bbcon®
- 1.4K Blackbaud Altru®
- 395 Blackbaud Award Management™ and Blackbaud Stewardship Management™
- 1.1K Blackbaud CRM™ and Blackbaud Internet Solutions™
- 15 donorCentrics®
- 359 Blackbaud eTapestry®
- 2.5K Blackbaud Financial Edge NXT®
- 646 Blackbaud Grantmaking™
- 563 Blackbaud Education Management Solutions for Higher Education
- 3.2K Blackbaud Education Management Solutions for K-12 Schools
- 934 Blackbaud Luminate Online® and Blackbaud TeamRaiser®
- 84 JustGiving® from Blackbaud®
- 6.4K Blackbaud Raiser's Edge NXT®
- 3.7K SKY Developer
- 243 ResearchPoint™
- 118 Blackbaud Tuition Management™
- 165 Organizational Best Practices
- 238 The Tap (Just for Fun)
- 33 Blackbaud Community Challenges
- 28 PowerUp Challenges
- 3 (Open) Raiser's Edge NXT PowerUp Challenge: Product Update Briefing
- 3 (Closed) Raiser's Edge NXT PowerUp Challenge: Standard Reports+
- 3 (Closed) Raiser's Edge NXT PowerUp Challenge: Email Marketing
- 3 (Closed) Raiser's Edge NXT PowerUp Challenge: Gift Management
- 4 (Closed) Raiser's Edge NXT PowerUp Challenge: Event Management
- 3 (Closed) Raiser's Edge NXT PowerUp Challenge: Home Page
- 4 (Closed) Raiser's Edge NXT PowerUp Challenge: Standard Reports
- 4 (Closed) Raiser's Edge NXT PowerUp Challenge: Query
- 779 Community News
- 2.9K Jobs Board
- 53 Blackbaud SKY® Reporting Announcements
- 47 Blackbaud CRM Higher Ed Product Advisory Group (HE PAG)
- 19 Blackbaud CRM Product Advisory Group (BBCRM PAG)

