Adaptive Card- HTML Table in Tile?


I've been struggling trying to get the Fund Relationship to appear on a tile. I have my Add In setup correctly. https://app.blackbaud.com/addin-adaptivecard-host/tile?cardServiceUrl= (my encoded URL)
It triggers the flow but the tile doesn't appear. I want the data in a table.
I'm doing it in one flow, I've tried doing it a few different ways.
- I tried appending it to a string with my columns like this in the JSON in an Apply to Each loop for each relationship.
{ "type": "Column", "width": "stretch", "items": [ { "type": "TextBlock", "text": "@{items('Apply_to_each')?['FundName']}" } ] },
2. I tried data binding but I don't think that works with loops. For a text block, you put ${FundName} in the text area.
2. I tried Create HTML table but that didn't seem to produce anything either.


Can you not have a HTML table using the adaptive card SPA?
Any ideas?
Thanks,
Carol
Answers
-
@Carol Grant Not a direct answer to your question, but I have a Power BI report embedded on the fund record if you can't do an HTML table in an adaptive card.
I also think that pretty soon they will be releasing something so this will be displayed as there were a bunch of email updates about fund relationship ideas in the idea bank being changed to Planned (I got 5 emails about it) so I would hope it would be sooner rather than later.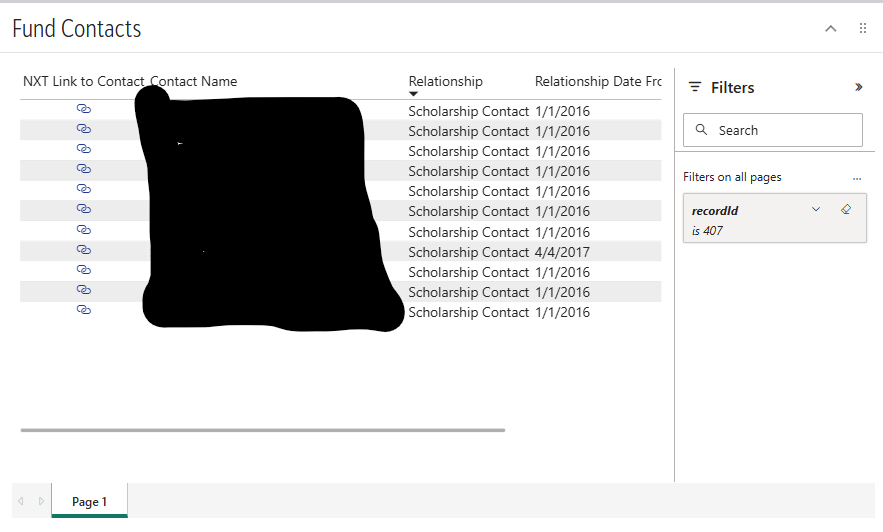 0
0 -
Hi @Carol Grant - An HTML table won't work on an Adaptive Card but the underlying way the JSON is rendered is not in a way that the Adaptive Card can read. We are limited to using the containers/inputs that you can see on the Adaptive Card Designer (adaptivecards.io/designer).
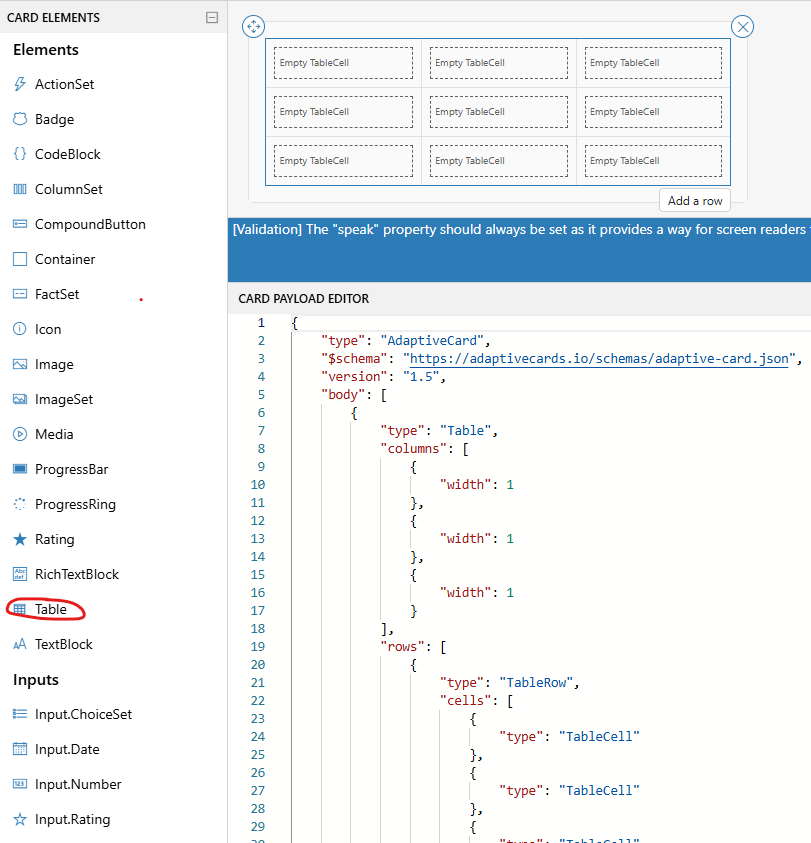
In the Adaptive Card Designer, if you change Target Version to 1.5 you'll see a new container option for Table. (I know all of our documentation says to use Target Version 1.4 but that's only because later functionality may not work. I've used the Table several times though and it works well).
The key to get this to work is you end up needing to append your data into the individual row structure for the table. If you want your table to contain a "header" row, you'll actually need two tables, one above the other with the same number of columns. The top table will be your header row, and the bottom table will be where you append the actual data.
My suggestion would be to start to build this out in the Adaptive Card Designer where you'll end up with something like this.
- We only need one row in each table.
- The header table will stay as is, but the data table will have additional rows appended inside the Flow depending on the number of relationships.
- Each TableCell should be populated with a TextBlock
- I tend to "name" the data table TextBlocks with something like 'HeaderValue' so I can easily identify the pieces to swap.
- In my example I also chose not to show grid lines.

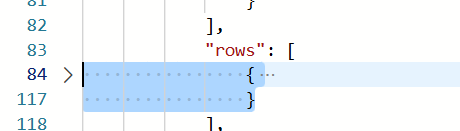
Now in the Card Payload Editor, you need to find the section where the second Table starts and then locate the Rows section. (The first TableCell in the Row should be your FundHolderValue cell). For me it's row 83 but I'd expect yours to be a higher number since I don't have all of my header TextBlocks in the sample here. In the following row (here 84) use the down chevron next to the row number to condense the whole section.
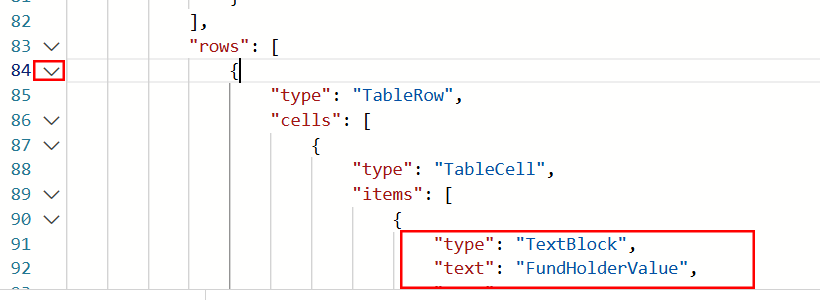
Then copy from the beginning curly bracket for that row to the corresponding ending curly bracket (for me row 117, but I'd expect yours to be higher due to the other TextBlocks).
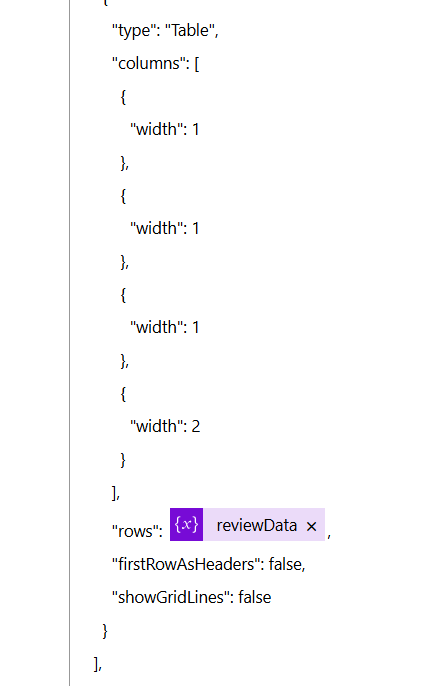
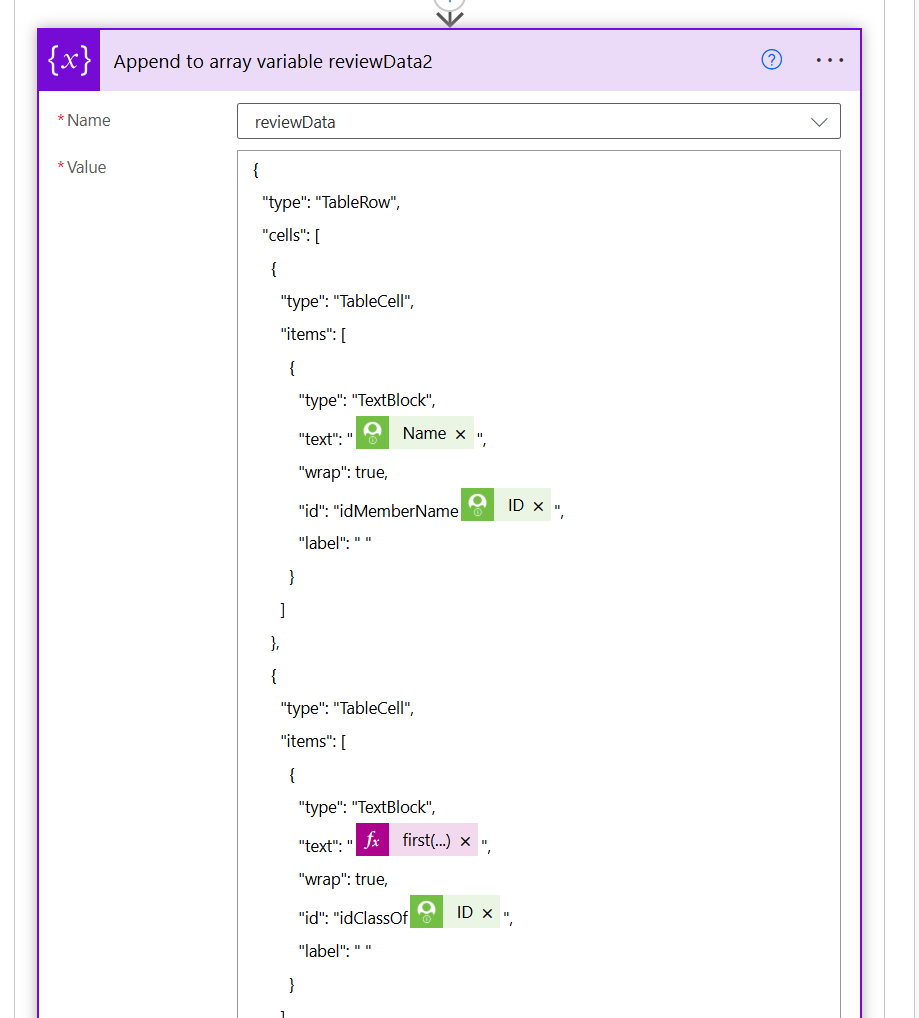
Now in your Flow you'll need to add an Array variable and then paste all of this into an Append to Array Variable action. Then you'll start replacing the text such as FundHolderValue with the actual values from RENXT.
Last in your Compose Adaptive Card JSON action, you'll remove everything within and including the [ ] starting on the "rows" row and ending at the comma. Then replace this with your Array Variable. i.e. like this (note: this is from an actual Flow and not the mock-ups I did for this post)
I know this is a lot, and it feels kind of confusing at first but once you start playing around with it more it starts to make more sense. Let me know if you have other questions!
1 -
Also, as an example, here is a snippet from my Append to Array action of my real life scenario. This one has input fields so it looks a bit different than yours will with just TextBlocks but hopefully it gives an idea.
 0
0 -
@Ashley Moose - Thank YOU!! This is the way I was heading after I posted this question. I did see that Adaptive Cards don't recognize HTML. Co-Pilot did tell me to put the row header into the Initialize Variable part then as you said inside the loop is where my Items will be. Like you just posted. Then another end footer after the loop but I can put that into the Compose. Co-Pilot was having me Append to a String but you are appending to an Array.
I'll review the rest of your post for tips.
Now I'm dealing with performance issues, it doesn't render the card, it's still looping through the values when I view the flow.
1 -
Adaptive Card does not display HTML, so using HTML Table will not work. Adaptive Card tables display uses a very different "coding", if you use the Adaptive Card Designer, and drag a table into the designer, you will see how the code looks like
{

    "type": "AdaptiveCard",

    "$schema": "https://adaptivecards.io/schemas/adaptive-card.json",

    "version": "1.5",

    "body": [

        {

            "type": "Table",

            "columns": [

                {

                    "width": 1

                },

                {

                    "width": 1

                },

                {

                    "width": 1

                }

            ],

            "rows": [

                {

                    "type": "TableRow",

                    "cells": [

                        {

                            "type": "TableCell",

                            "items": [

                                {

                                    "type": "TextBlock",

                                    "text": "New TextBlock",

                                    "wrap": true

                                }

                            ]

                        },

                        {

                            "type": "TableCell",

                            "items": [

                                {

                                    "type": "Image"

                                }

                            ]

                        },

                        {

                            "type": "TableCell"

                        }

                    ]

                },

                {

                    "type": "TableRow",

                    "cells": [

                        {

                            "type": "TableCell"

                        },

                        {

                            "type": "TableCell"

                        },

                        {

                            "type": "TableCell"

                        }

                    ]

                }

            ]

        }

    ]

}
And then for each "table cell" you can drag in a element (i.e. TextBlock, Image, etc)
You will need to create Adaptive card JSON code with this structured: first define an array of columns and its "width" (designer use "1" for all, I assume that means all columns are equal width, I do width that adds up to 100 for 100%). and then add in the array of row data.
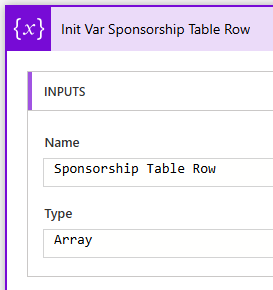
Here's what I have in flow:
Initialize an array variable (i.e. Sponsorship Table Row)
Append the table header row frist:
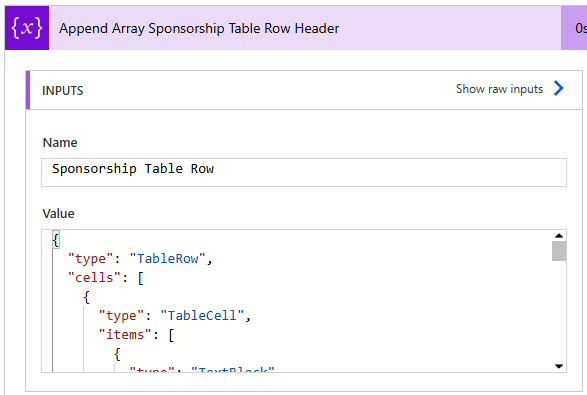
{

  "type": "TableRow",

  "cells": [

    {

      "type": "TableCell",

      "items": [

        {

          "type": "TextBlock",

          "text": "Spon.ID",

          "weight": "Bolder"

        }

      ]

    },

    {

      "type": "TableCell",

      "items": [

        {

          "type": "TextBlock",

          "text": "School Year",

          "weight": "Bolder"

        }

      ]

    },

    {

      "type": "TableCell",

      "items": [

        {

          "type": "TextBlock",

          "text": "Impact ID",

          "weight": "Bolder"

        }

      ]

    },

    {

      "type": "TableCell",

      "items": [

        {

          "type": "TextBlock",

          "text": "Student Name",

          "weight": "Bolder"

        }

      ]

    },

    {

      "type": "TableCell",

      "items": [

        {

          "type": "TextBlock",

          "text": "Assigned Amount",

          "weight": "Bolder"

        }

      ]

    },

    {

      "type": "TableCell",

      "items": [

        {

          "type": "TextBlock",

          "text": "Paid Amount",

          "weight": "Bolder"

        }

      ]

    }

  ],

  "horizontalAlignment": "Center",

  "style": "good"

}
Apply to each record row you want to add to the table (I also have a Apply to Each Index Sponsorship number variable, used to keep track of how many record rows and uses that number to determine "even odd" for banding the row's color.
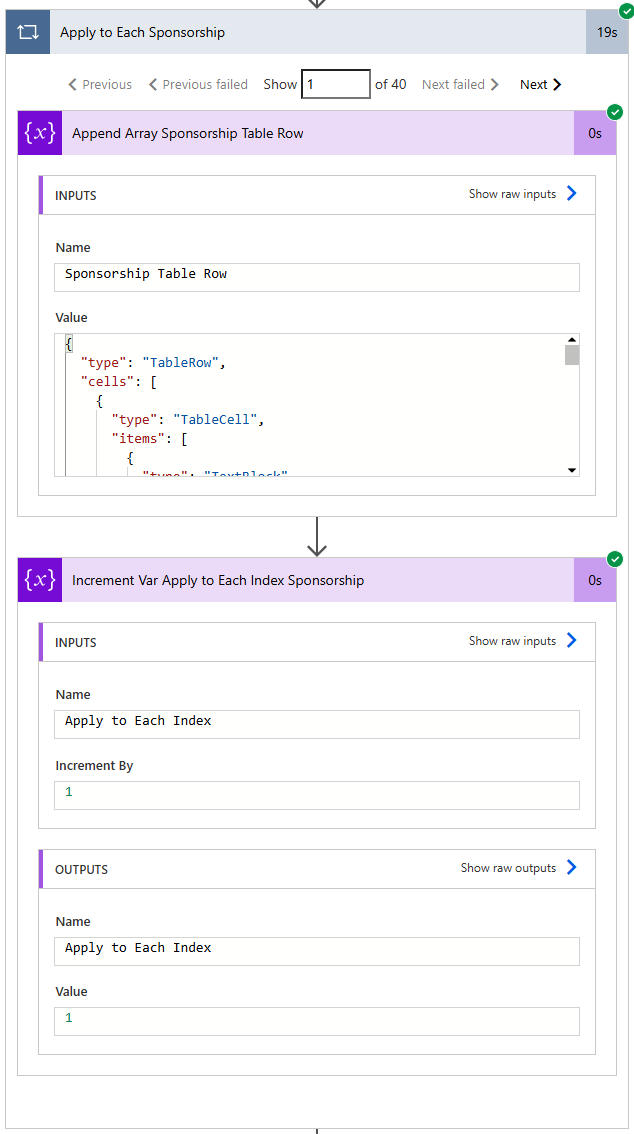
{
  "type": "TableRow",
  "cells": [
    {
      "type": "TableCell",
      "items": [
        {
          "type": "TextBlock",
          "horizontalAlignment": "Center",
          "text": "@{items('Apply_to_Each_Sponsorship')?['SponsorshipID']}"
        }
      ]
    },
    {
      "type": "TableCell",
      "items": [
        {
          "type": "TextBlock",
          "horizontalAlignment": "Center",
          "text": "@{items('Apply_to_Each_Sponsorship')?['Year']}"
        }
      ]
    },
    {
      "type": "TableCell",
      "items": [
        {
          "type": "TextBlock",
          "horizontalAlignment": "Center",
          "text": "@{items('Apply_to_Each_Sponsorship')?['ImpactId']}"
        }
      ]
    },
    {
      "type": "TableCell",
      "items": [
        {
          "type": "TextBlock",
          "text": "@{items('Apply_to_Each_Sponsorship')?['name']}"
        }
      ]
    },
    {
      "type": "TableCell",
      "items": [
        {
          "type": "TextBlock",
          "horizontalAlignment": "Right",
          "text": "@{formatNumber(items('Apply_to_Each_Sponsorship')?['sponamt'], '$#,##0.00')}"
        }
      ]
    },
    {
      "type": "TableCell",
      "items": [
        {
          "type": "TextBlock",
          "horizontalAlignment": "Right",
          "text": "@{if(equals(items('Apply_to_Each_Sponsorship')?['payamt'], null), '', formatNumber(items('Apply_to_Each_Sponsorship')?['payamt'], '$#,##0.00'))}"
        }
      ]
    }
  ],
  "style": "@{if(equals(mod(variables('Apply to Each Index'), 2), 1), 'emphasis', 'default')}"
}
notice expression used for the "style" property of the row based on the mod() 2 of the index for 0 or 1 to be different style.
Then finally compose the "element object for table" for the JSON to be added to the adaptive card
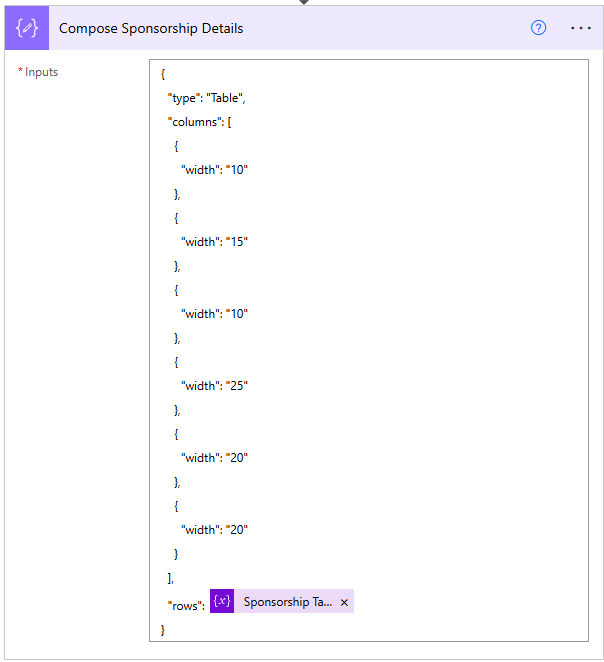
the columns width is 10% first column, 15% 2nd column, etc.
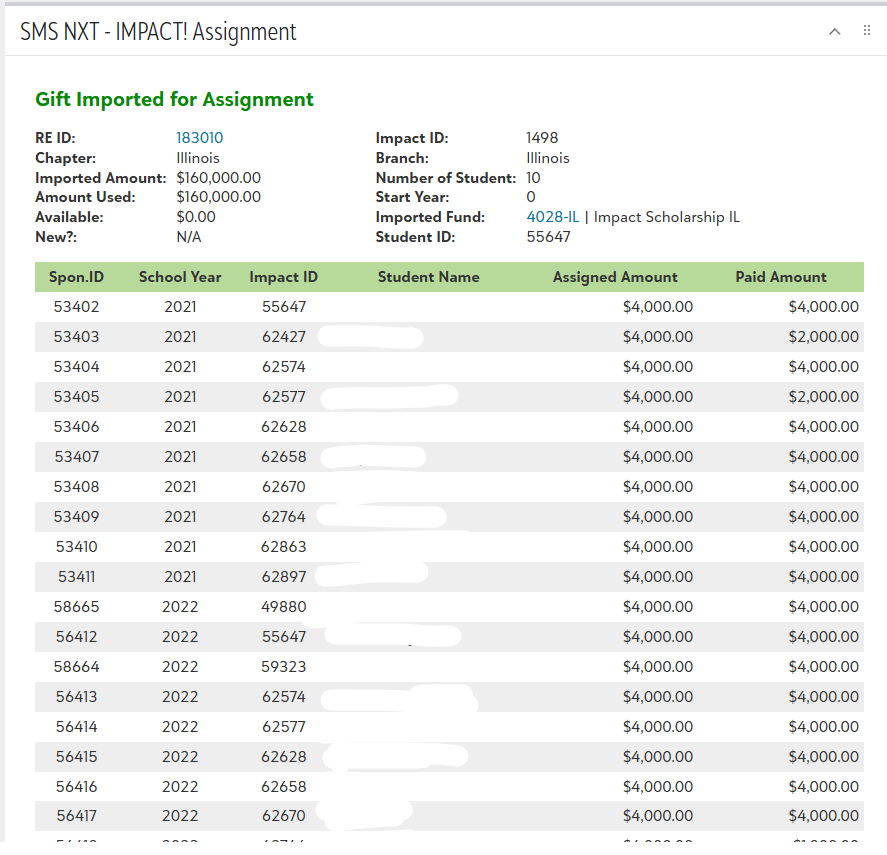
this is the resulting Adaptive card with table
 0
0 -
Thank you @Alex Wong, so helpful ! Have either you or @Ashley Moose been able to link something in the table? I've been trying to setup a link to the Fund and Co-Pilot said to use Markdowns but that doesn't seem to be working. Then I tried doing Action.OpenURL which didn't seem to work either. I keep trying to render the card trying these, the flow doesn't fail but the card doesn't render either.
I can't do what I usually do in a flow which is <ahref=https://host.nxt.blackbaud.com/cfa/funds/fundID>
Still plugging away but I did get some tiles to appear so thank you again.
0 -
you need to use markdown way of doing link, <a href=""></a> is HTML link, not markdown link.
From my reply last screenshot, you can see the "RE ID" is a link. It is using this code:
[text to be clicked on](https://host.nxt.blackbaud.com/url/to/be/linked)
0 -
@Carol Grant I haven't added a link before (although will definitely try Alex's suggestion next time), but I have had success using Action.OpenURL. So that should work but at least now you have options :)
0


Categories
- All Categories
- 6 Blackbaud Community Help
- 211 bbcon®
- 1.4K Blackbaud Altru®
- 403 Blackbaud Award Management™ and Blackbaud Stewardship Management™
- 1.2K Blackbaud CRM™ and Blackbaud Internet Solutions™
- 15 donorCentrics®
- 360 Blackbaud eTapestry®
- 2.6K Blackbaud Financial Edge NXT®
- 659 Blackbaud Grantmaking™
- 579 Blackbaud Education Management Solutions for Higher Education
- 3.2K Blackbaud Education Management Solutions for K-12 Schools
- 943 Blackbaud Luminate Online® and Blackbaud TeamRaiser®
- 84 JustGiving® from Blackbaud®
- 6.7K Blackbaud Raiser's Edge NXT®
- 3.8K SKY Developer
- 250 ResearchPoint™
- 120 Blackbaud Tuition Management™
- 165 Organizational Best Practices
- 241 Member Lounge (Just for Fun)
- 36 Blackbaud Community Challenges
- 37 PowerUp Challenges
- 3 (Open) PowerUp Challenge: Grid View Batch
- 3 (Closed) PowerUp Challenge: Chat for Blackbaud AI
- 3 (Closed) PowerUp Challenge: Data Health
- 3 (Closed) Raiser's Edge NXT PowerUp Challenge: Product Update Briefing
- 3 (Closed) Raiser's Edge NXT PowerUp Challenge: Standard Reports+
- 3 (Closed) Raiser's Edge NXT PowerUp Challenge: Email Marketing
- 3 (Closed) Raiser's Edge NXT PowerUp Challenge: Gift Management
- 4 (Closed) Raiser's Edge NXT PowerUp Challenge: Event Management
- 3 (Closed) Raiser's Edge NXT PowerUp Challenge: Home Page
- 4 (Closed) Raiser's Edge NXT PowerUp Challenge: Standard Reports
- 4 (Closed) Raiser's Edge NXT PowerUp Challenge: Query
- 798 Community News
- 3K Jobs Board
- 56 Blackbaud SKY® Reporting Announcements
- 47 Blackbaud CRM Higher Ed Product Advisory Group (HE PAG)
- 19 Blackbaud CRM Product Advisory Group (BBCRM PAG)