Analytics In Raiser's Edge NXT: Export With ProspectPoint™ Models

Shelley Weifenbach
Blackbaud Employee


You have the ProspectPoint™ predictive models in Raiser’s Edge NXT and you need to export the results. This blog will review tips for when you need to use Export rather than Query or Lists to analyze Ratings.
Note: This post was updated to incorporate the Raiser's Edge®-ResearchPoint™ integration enhancements releasing in Q2 2023.ProspectPoint™ custom predictive models are a great way to identify and prioritize key prospects for annual, mid-level, major, principal, and planned giving fundraising efforts. The most common models are Annual Giving Likelihood (AGL), Major Giving Likelihood (MGL), Planned Giving Likelihood (PGL), and Target Gift Range (TGR). These models are commonly bundled in the Advanced Wealth Insights package with your Blackbaud Raiser’s Edge NXT subscription, but it can also be purchased separately. Refer to this Knowledgebase article or the Blackbaud University on-demand “Basics of Modeling” training for more information about custom modeling.
In this blog post, we will review both the helpful tips for viewing custom predictive model Ratings in an Export when Lists and Query will not meet your reporting needs.
WHEN TO USE EXPORT TO REPORT ON PROSPECTPOINT RATINGS
A great rule to live by in Blackbaud Raiser’s Edge NXT is that Query is for grouping records and Export is for extracting data. When comparing the functionality of reporting on Ratings, Export is my last stop on my reporting journey after starting with Lists and Query. For more on Lists and Query, refer to the “Basic Lists With ProspectPoint Models” and “Basic Queries With ProspectPoint Models” blog posts in this series.
Benefits to Export:
First, let’s start with the basics. Create a New Export to export Constituents with the format of a CSV file. On the General tab, include a query of constituents to export. For instance, constituents with Major Giving Likelihood greater than or equal to 701 AND Target Gift Range one of $100,001+; $50,001-$100,00; $25,001-$50,000. Select other applicable options. On the Output tab, add your desired fields.
Now, let’s select the custom predictive model Ratings in the output. You may follow along or bookmark this Knowledgebase article for the steps.
EXPORTING RATINGS WITH “BLACKBAUD ANALYTICS - WP” SOURCE
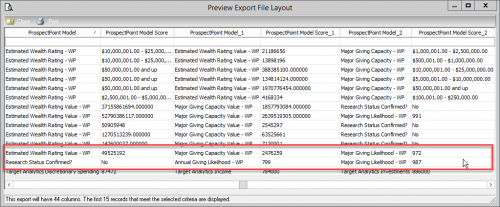
Prior to the Raiser’s Edge-ResearchPoint integration enhancements in May 2023, all ratings synchronized from ResearchPoint had the same rating source of “Blackbaud Analytics - WP”. This was particularly challenging with when trying to export specific ratings because you could only limit the ratings by source. The exported spreadsheet then required additional clean up to make it presentable. The process looked a little like this:
Then you had additional spreadsheet clean up in Excel to get each rating into a separate column.
If you have not yet re-synchronized Ratings from ResearchPoint after the May 2023 enhancements, consider the benefits of the new ratings naming conventions especially as it relates to exporting data. Use these steps to implement the changes to your ratings.
EXPORTING SPECIFIC RATINGS
Step 1: Add the Rating Description
To add Ratings, navigate to Prospect (if you have the RE:Search module) > Ratings in the available fields section, then select or drag-and-drop the Description field into the Output section to the right.
Step 2: Select a Specific Rating using Group Criteria
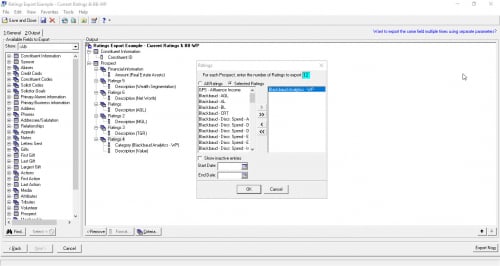
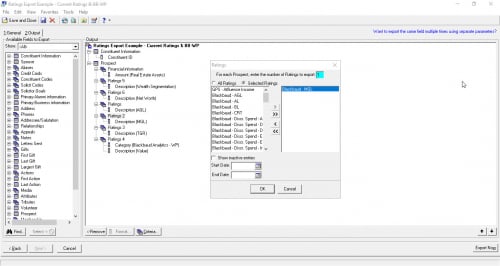
You will be prompted to enter the Ratings group criteria—essentially which Ratings you want to display.
Step 3: Optional: Display Additional Ratings Fields
Add additional fields as desired, for example Date Added.
Step 4: Add Ratings with a Different Source
Repeat the process above creating a new group criteria for each Rating Source. For example, you may also want to include the other custom predictive model ratings, e.g. Blackbaud - AGL, Blackbaud - PGL, Blackbaud - TGR. You may also want to include Raiser’s Edge NXT Analytics, Affluence Insight models, or other Ratings.
Step 5: Preview and Export
Preview the export and adjust the export parameter file as needed, then export to a spreadsheet when you are ready.
SUMMARY
Export is a great tool for extracting data from Blackbaud Raiser’s Edge NXT, especially for ratings synchronized from ResearchPoint after the May 2023 enhancements.
I hope you found this blog post helpful in clarifying how to use Export to extract Ratings data, especially using the ProspectPoint custom predictive models. Check out other posts in the “Analytics in Raiser’s Edge NXT” series listed at the end of “The Best Reporting Tool” post.
Do you have other Ratings Export tips you would like to share? Comment below to share with the Community!
Note: This post was updated to incorporate the Raiser's Edge®-ResearchPoint™ integration enhancements releasing in Q2 2023.ProspectPoint™ custom predictive models are a great way to identify and prioritize key prospects for annual, mid-level, major, principal, and planned giving fundraising efforts. The most common models are Annual Giving Likelihood (AGL), Major Giving Likelihood (MGL), Planned Giving Likelihood (PGL), and Target Gift Range (TGR). These models are commonly bundled in the Advanced Wealth Insights package with your Blackbaud Raiser’s Edge NXT subscription, but it can also be purchased separately. Refer to this Knowledgebase article or the Blackbaud University on-demand “Basics of Modeling” training for more information about custom modeling.
In this blog post, we will review both the helpful tips for viewing custom predictive model Ratings in an Export when Lists and Query will not meet your reporting needs.
WHEN TO USE EXPORT TO REPORT ON PROSPECTPOINT RATINGS
A great rule to live by in Blackbaud Raiser’s Edge NXT is that Query is for grouping records and Export is for extracting data. When comparing the functionality of reporting on Ratings, Export is my last stop on my reporting journey after starting with Lists and Query. For more on Lists and Query, refer to the “Basic Lists With ProspectPoint Models” and “Basic Queries With ProspectPoint Models” blog posts in this series.
Benefits to Export:
- Extract practically any data from Export—for instance summary totals of this year’s giving vs. last year’s giving—whereas Lists has limited column options and Query will display duplicates if you include one-to-many fields.
- Output specific ratings easier than ever in Export after the Raiser's Edge-ResearchPoint™ integration enhancements in May 2023. Prior to the updated naming conventions for ratings synced from ResearchPoint, the options for customizing your Ratings output in Export were limited. You may have already learned this the hard way. Now, the ratings have unique rating Sources which enables users to select specific ratings to export.
First, let’s start with the basics. Create a New Export to export Constituents with the format of a CSV file. On the General tab, include a query of constituents to export. For instance, constituents with Major Giving Likelihood greater than or equal to 701 AND Target Gift Range one of $100,001+; $50,001-$100,00; $25,001-$50,000. Select other applicable options. On the Output tab, add your desired fields.
Now, let’s select the custom predictive model Ratings in the output. You may follow along or bookmark this Knowledgebase article for the steps.
EXPORTING RATINGS WITH “BLACKBAUD ANALYTICS - WP” SOURCE
Prior to the Raiser’s Edge-ResearchPoint integration enhancements in May 2023, all ratings synchronized from ResearchPoint had the same rating source of “Blackbaud Analytics - WP”. This was particularly challenging with when trying to export specific ratings because you could only limit the ratings by source. The exported spreadsheet then required additional clean up to make it presentable. The process looked a little like this:
Then you had additional spreadsheet clean up in Excel to get each rating into a separate column.
If you have not yet re-synchronized Ratings from ResearchPoint after the May 2023 enhancements, consider the benefits of the new ratings naming conventions especially as it relates to exporting data. Use these steps to implement the changes to your ratings.
EXPORTING SPECIFIC RATINGS
Step 1: Add the Rating Description
To add Ratings, navigate to Prospect (if you have the RE:Search module) > Ratings in the available fields section, then select or drag-and-drop the Description field into the Output section to the right.
Step 2: Select a Specific Rating using Group Criteria
You will be prompted to enter the Ratings group criteria—essentially which Ratings you want to display.
- Change the radio button selection to “Selected Records” and select only 1 Rating Source to the right. Tip: If you are not sure what to select, check the Ratings tab on a constituent record to determine the Rating Source or refer to the current rating naming conventions (https://kb.blackbaud.com/knowledgebase/articles/Article/201725), for example "Blackbaud - MGL".
- Enter the maximum number of 1 Rating to display for that source.
- Optional: Enter a start date.
- Select OK to create the Ratings group.
Step 3: Optional: Display Additional Ratings Fields
Add additional fields as desired, for example Date Added.
Step 4: Add Ratings with a Different Source
Repeat the process above creating a new group criteria for each Rating Source. For example, you may also want to include the other custom predictive model ratings, e.g. Blackbaud - AGL, Blackbaud - PGL, Blackbaud - TGR. You may also want to include Raiser’s Edge NXT Analytics, Affluence Insight models, or other Ratings.
Step 5: Preview and Export
Preview the export and adjust the export parameter file as needed, then export to a spreadsheet when you are ready.
SUMMARY
Export is a great tool for extracting data from Blackbaud Raiser’s Edge NXT, especially for ratings synchronized from ResearchPoint after the May 2023 enhancements.
I hope you found this blog post helpful in clarifying how to use Export to extract Ratings data, especially using the ProspectPoint custom predictive models. Check out other posts in the “Analytics in Raiser’s Edge NXT” series listed at the end of “The Best Reporting Tool” post.
Do you have other Ratings Export tips you would like to share? Comment below to share with the Community!
2
Comments
-
Thanks for this great writing up Shelley.0
Categories
- All Categories
- 6 Blackbaud Community Help
- 211 bbcon®
- 1.4K Blackbaud Altru®
- 398 Blackbaud Award Management™ and Blackbaud Stewardship Management™
- 1.1K Blackbaud CRM™ and Blackbaud Internet Solutions™
- 15 donorCentrics®
- 360 Blackbaud eTapestry®
- 2.5K Blackbaud Financial Edge NXT®
- 651 Blackbaud Grantmaking™
- 570 Blackbaud Education Management Solutions for Higher Education
- 3.2K Blackbaud Education Management Solutions for K-12 Schools
- 939 Blackbaud Luminate Online® and Blackbaud TeamRaiser®
- 84 JustGiving® from Blackbaud®
- 6.6K Blackbaud Raiser's Edge NXT®
- 3.7K SKY Developer
- 248 ResearchPoint™
- 119 Blackbaud Tuition Management™
- 165 Organizational Best Practices
- 240 The Tap (Just for Fun)
- 34 Blackbaud Community Challenges
- 31 PowerUp Challenges
- 3 (Open) PowerUp Challenge: Data Health
- 3 (Closed) Raiser's Edge NXT PowerUp Challenge: Product Update Briefing
- 3 (Closed) Raiser's Edge NXT PowerUp Challenge: Standard Reports+
- 3 (Closed) Raiser's Edge NXT PowerUp Challenge: Email Marketing
- 3 (Closed) Raiser's Edge NXT PowerUp Challenge: Gift Management
- 4 (Closed) Raiser's Edge NXT PowerUp Challenge: Event Management
- 3 (Closed) Raiser's Edge NXT PowerUp Challenge: Home Page
- 4 (Closed) Raiser's Edge NXT PowerUp Challenge: Standard Reports
- 4 (Closed) Raiser's Edge NXT PowerUp Challenge: Query
- 788 Community News
- 2.9K Jobs Board
- 53 Blackbaud SKY® Reporting Announcements
- 47 Blackbaud CRM Higher Ed Product Advisory Group (HE PAG)
- 19 Blackbaud CRM Product Advisory Group (BBCRM PAG)


